Plans
Plan Mode in Artemis enables you to create comprehensive development roadmaps by working interactively with AI agents. Unlike standalone tasks that focus on immediate code changes, plans help you break down complex objectives into structured, manageable steps — perfect for implementing new features, refactoring initiatives, or bug fixes that require careful planning.
Key Features
- Interactive Planning – Artemis gathers requirements by asking targeted questions about your project, ensuring a thorough understanding before generating the plan.
- Automated Task Breakdown – Complex objectives are automatically divided into well-defined subtasks that build incrementally toward your goal.
- Agent & User Tasks – Plans include both agent-automated tasks and user tasks, giving you control over which steps require human oversight.
- Built-in Workflows – Choose from ready-to-go plan templates for common development scenarios, or create custom plans from scratch.
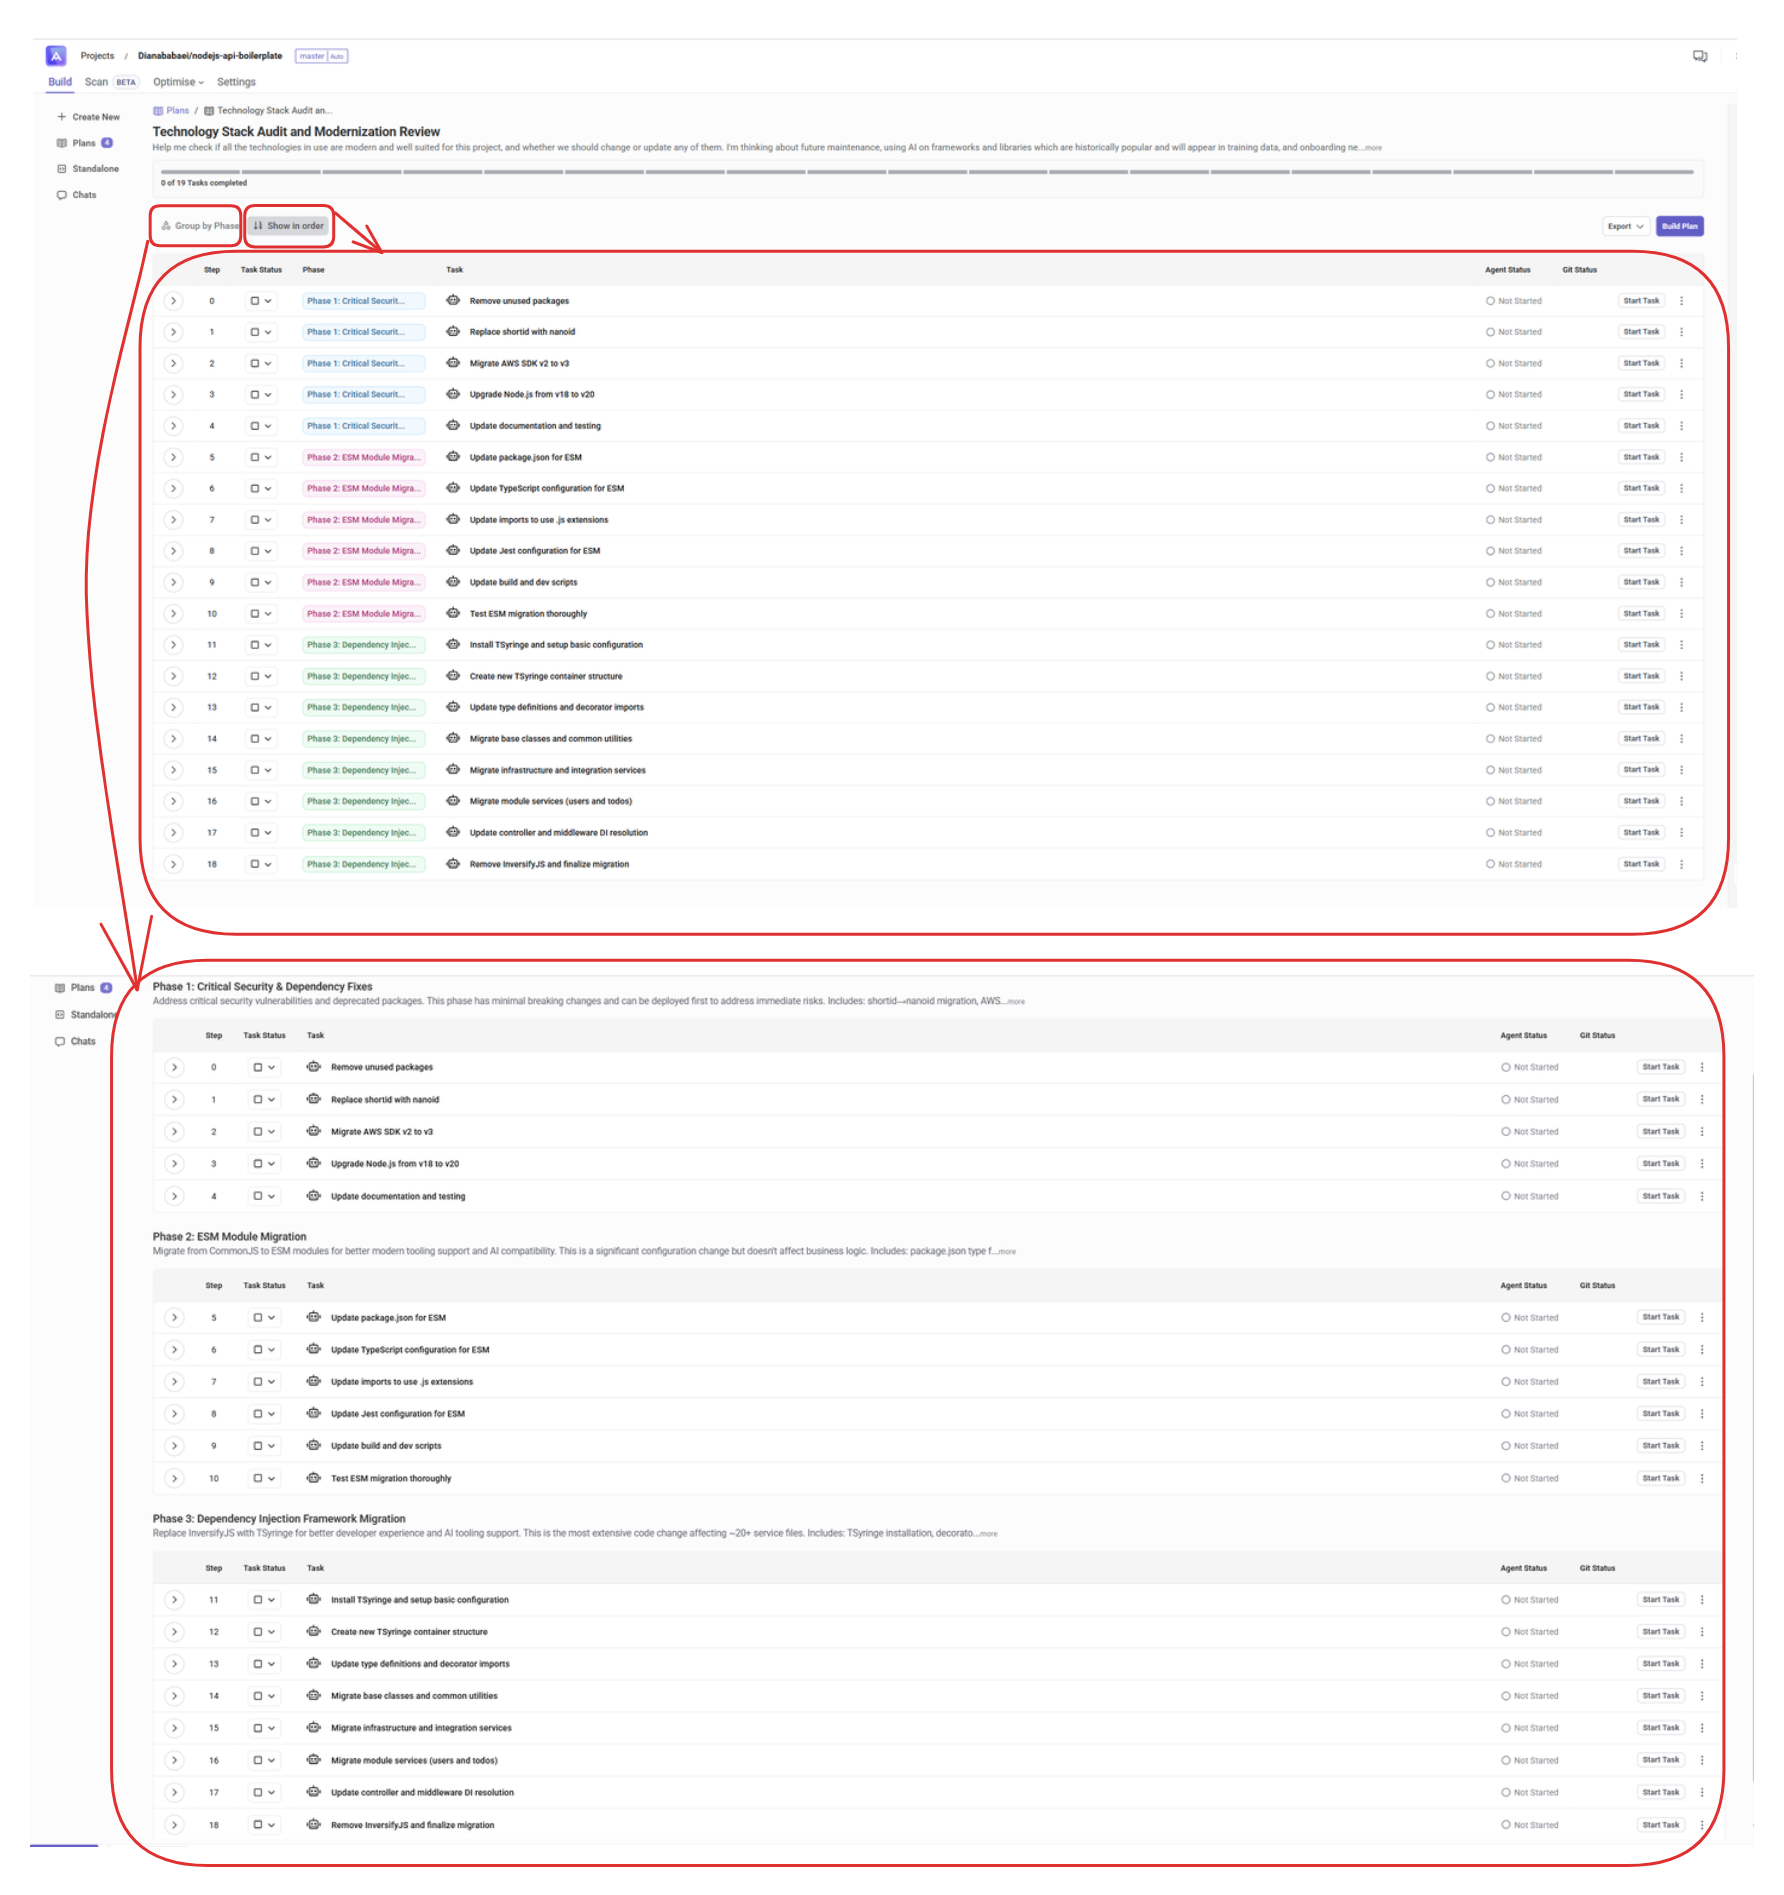
- Task hierarchy grouped by phase - Tasks are structured into phases. Inside each phase, subtasks are presented in a clear hierarchy which gives you an organized view of scope, dependencies, and logical execution flow.
- Git Integration – Each completed task can be reviewed, validated, and published as a pull request with automatic Git status tracking.
- Progress Tracking – Monitor task completion with visual progress indicators and status updates throughout the plan execution.
Step 1: Access the Plans Panel
Navigate to the Build section and click on Plans in the sidebar, then click New Plan to begin.
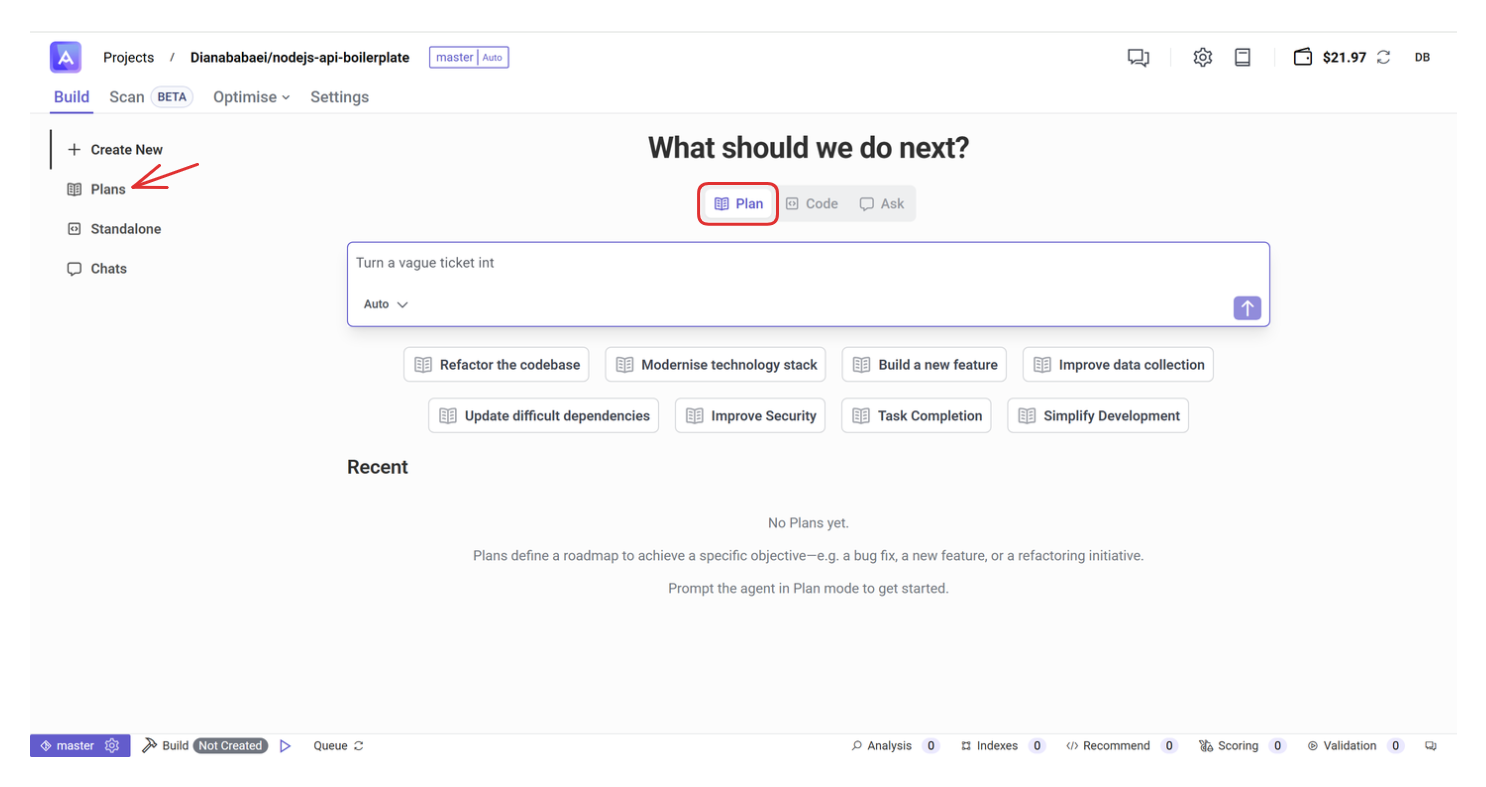
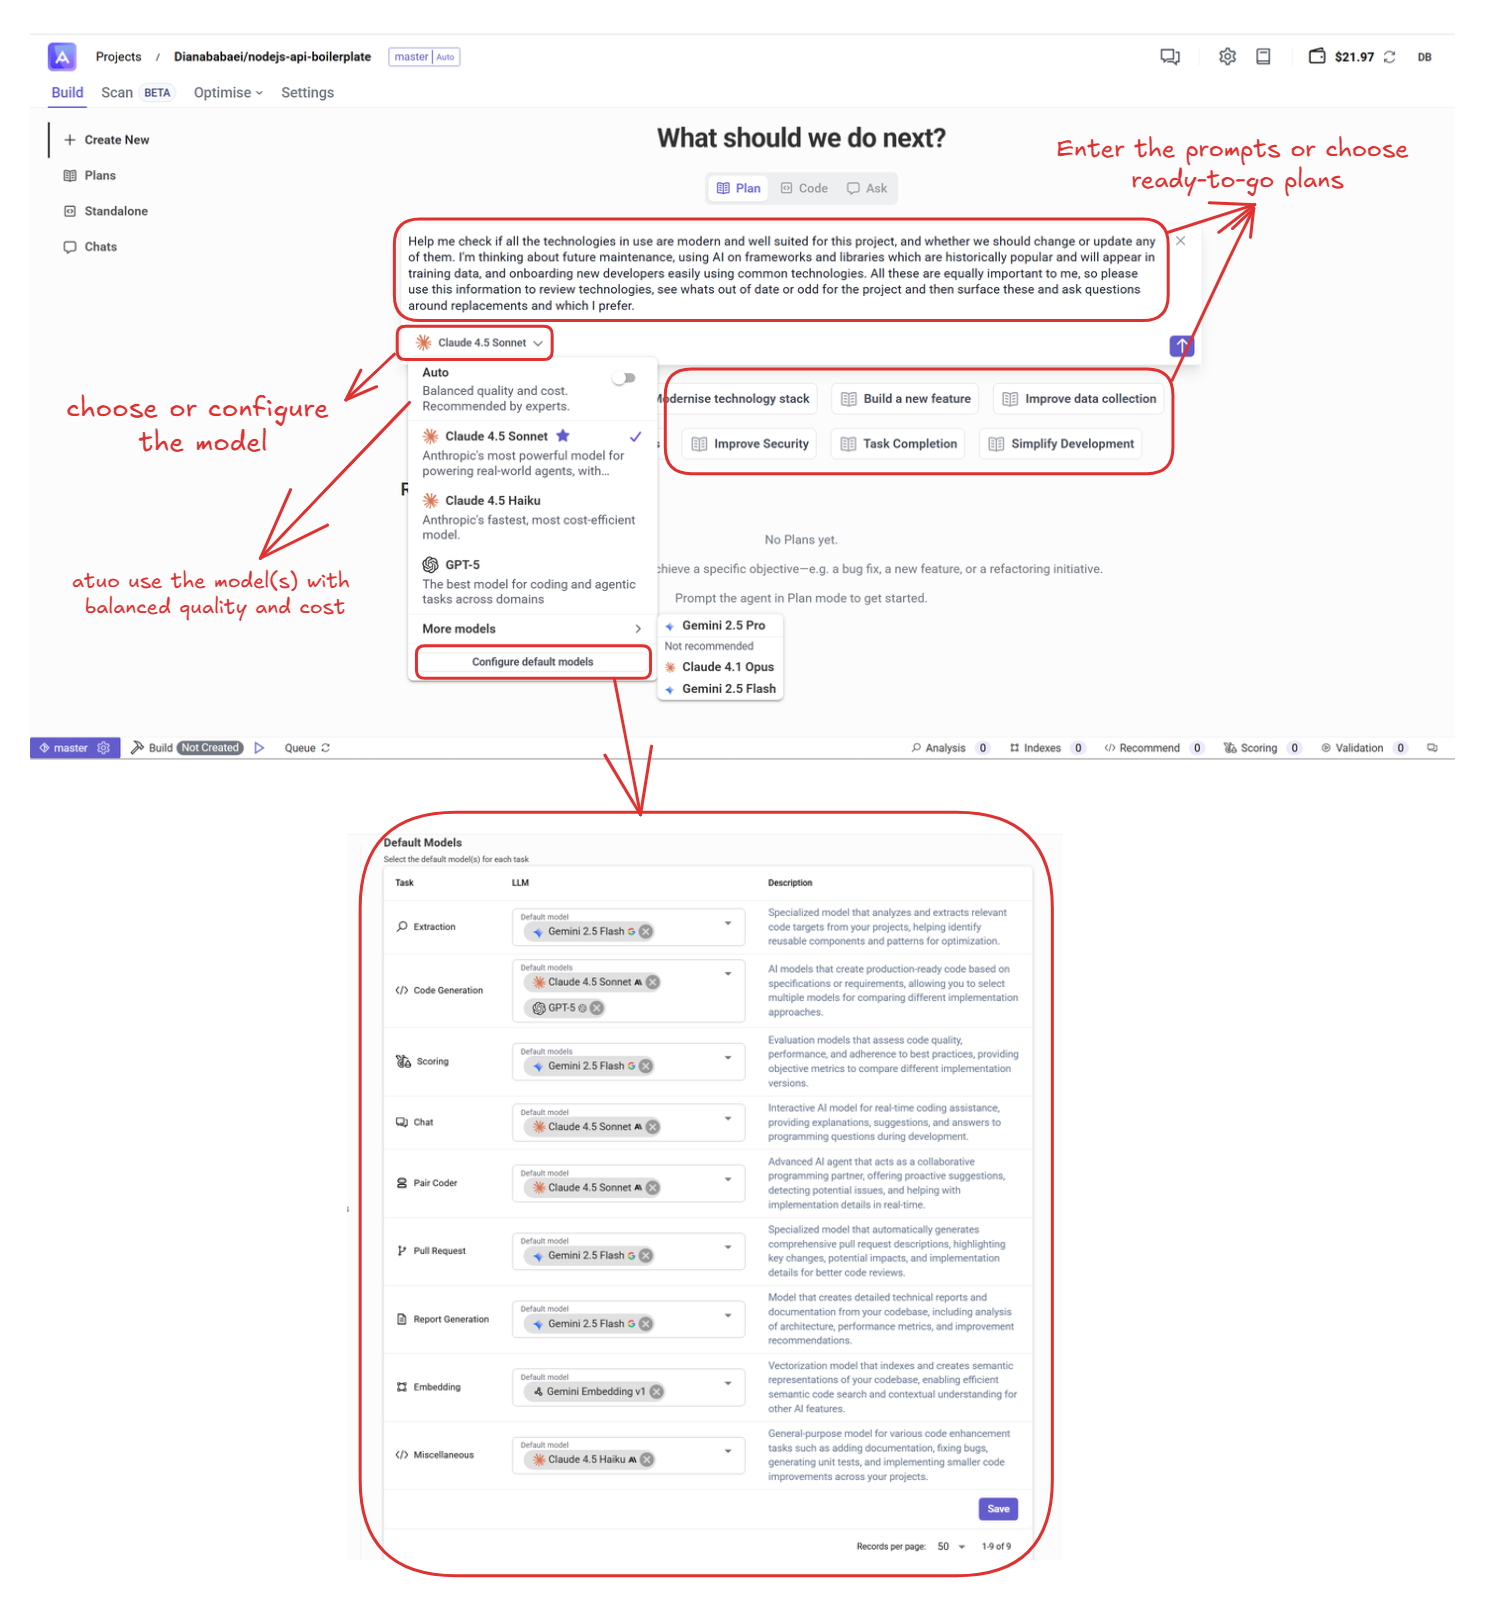
Step 2: Initialize Your Plan
Enter your prompt describing what you want to build, or select from the ready-to-go plan templates. Choose your preferred model, then click the Plan button to start the planning process.
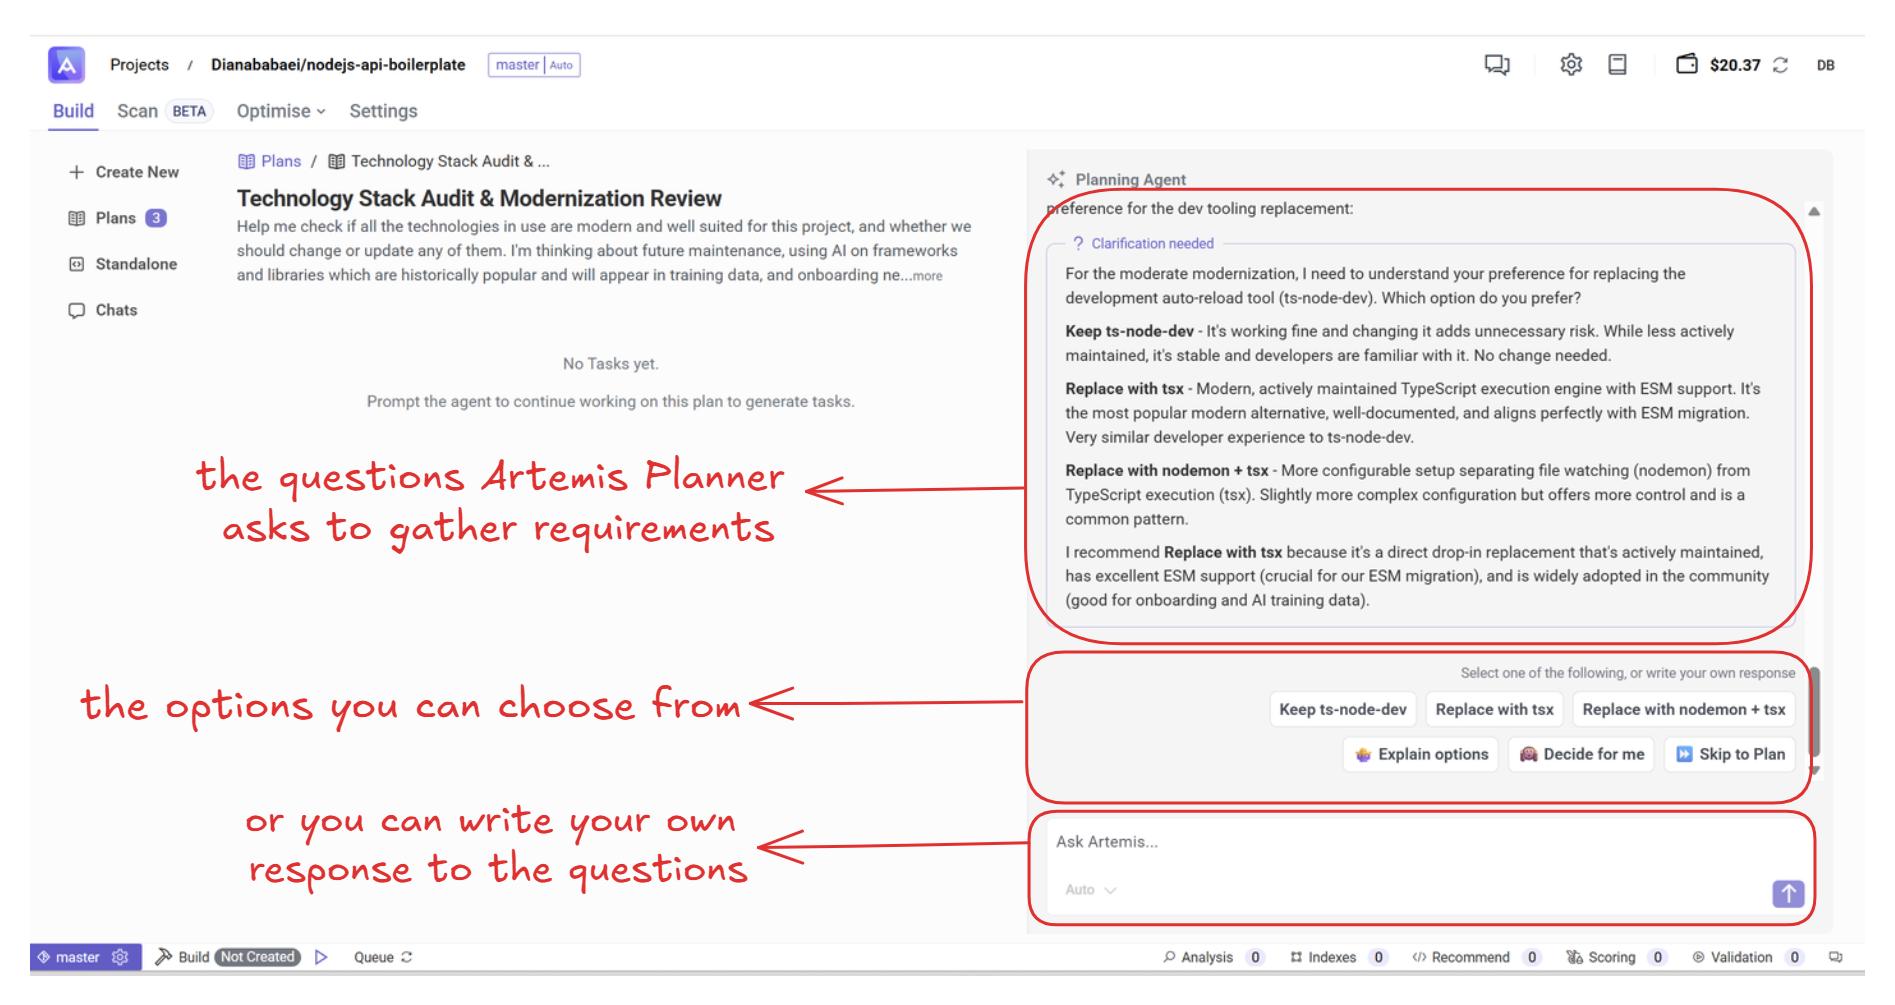
Step 3: Answer Planning Questions
Artemis will ask a series of questions to gather context and requirements for your plan. You can:
- Select from suggested options
- Write custom responses
- Skip questioning by choosing "Stop questioning me and proceed with the Plan"
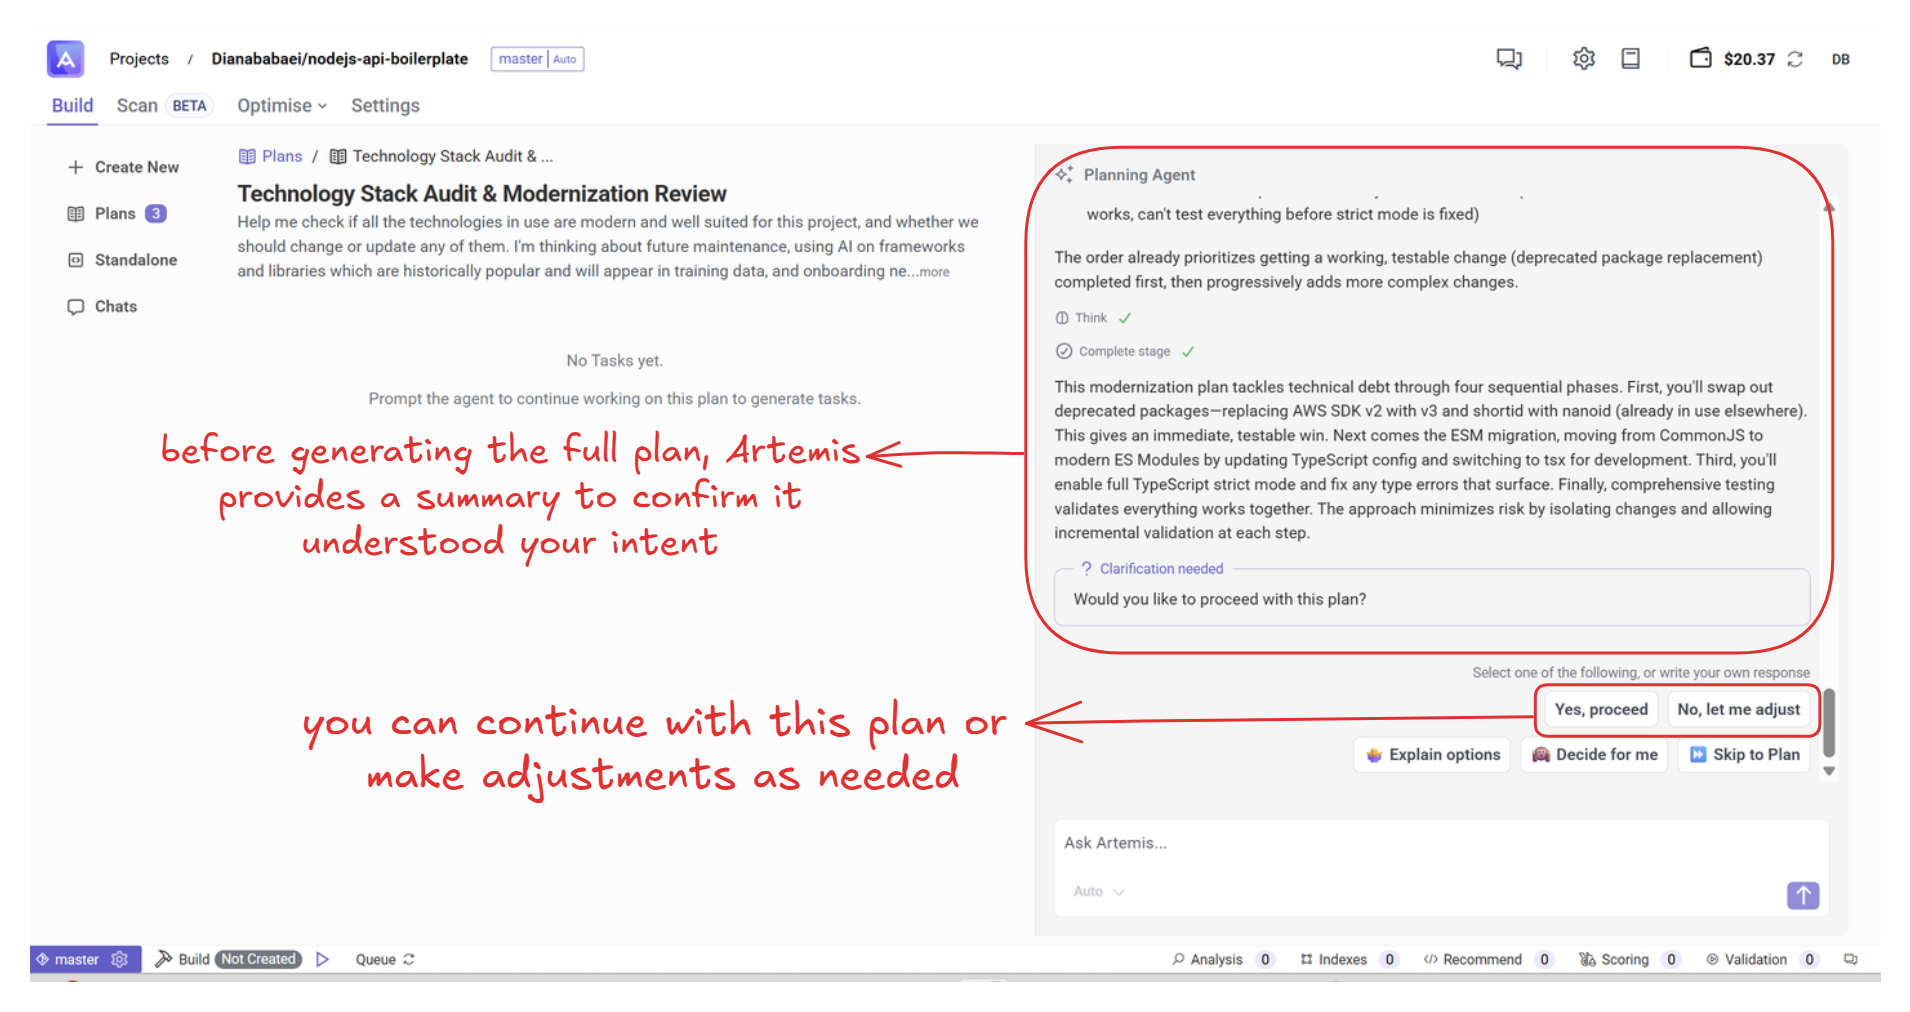
Step 4: Review the Generated Plan
After gathering requirements, Artemis creates a detailed plan summary that includes:
- Project assessment and scope analysis
- Complete list of subtasks with clear descriptions
- Technical approach and reasoning
- Incremental delivery strategy
Review the plan carefully. You can:
- Yes, proceed – Accept the plan and move to the Plan Dashboard
- No, let me adjust – Request modifications to the plan
- Continue asking questions for further refinement
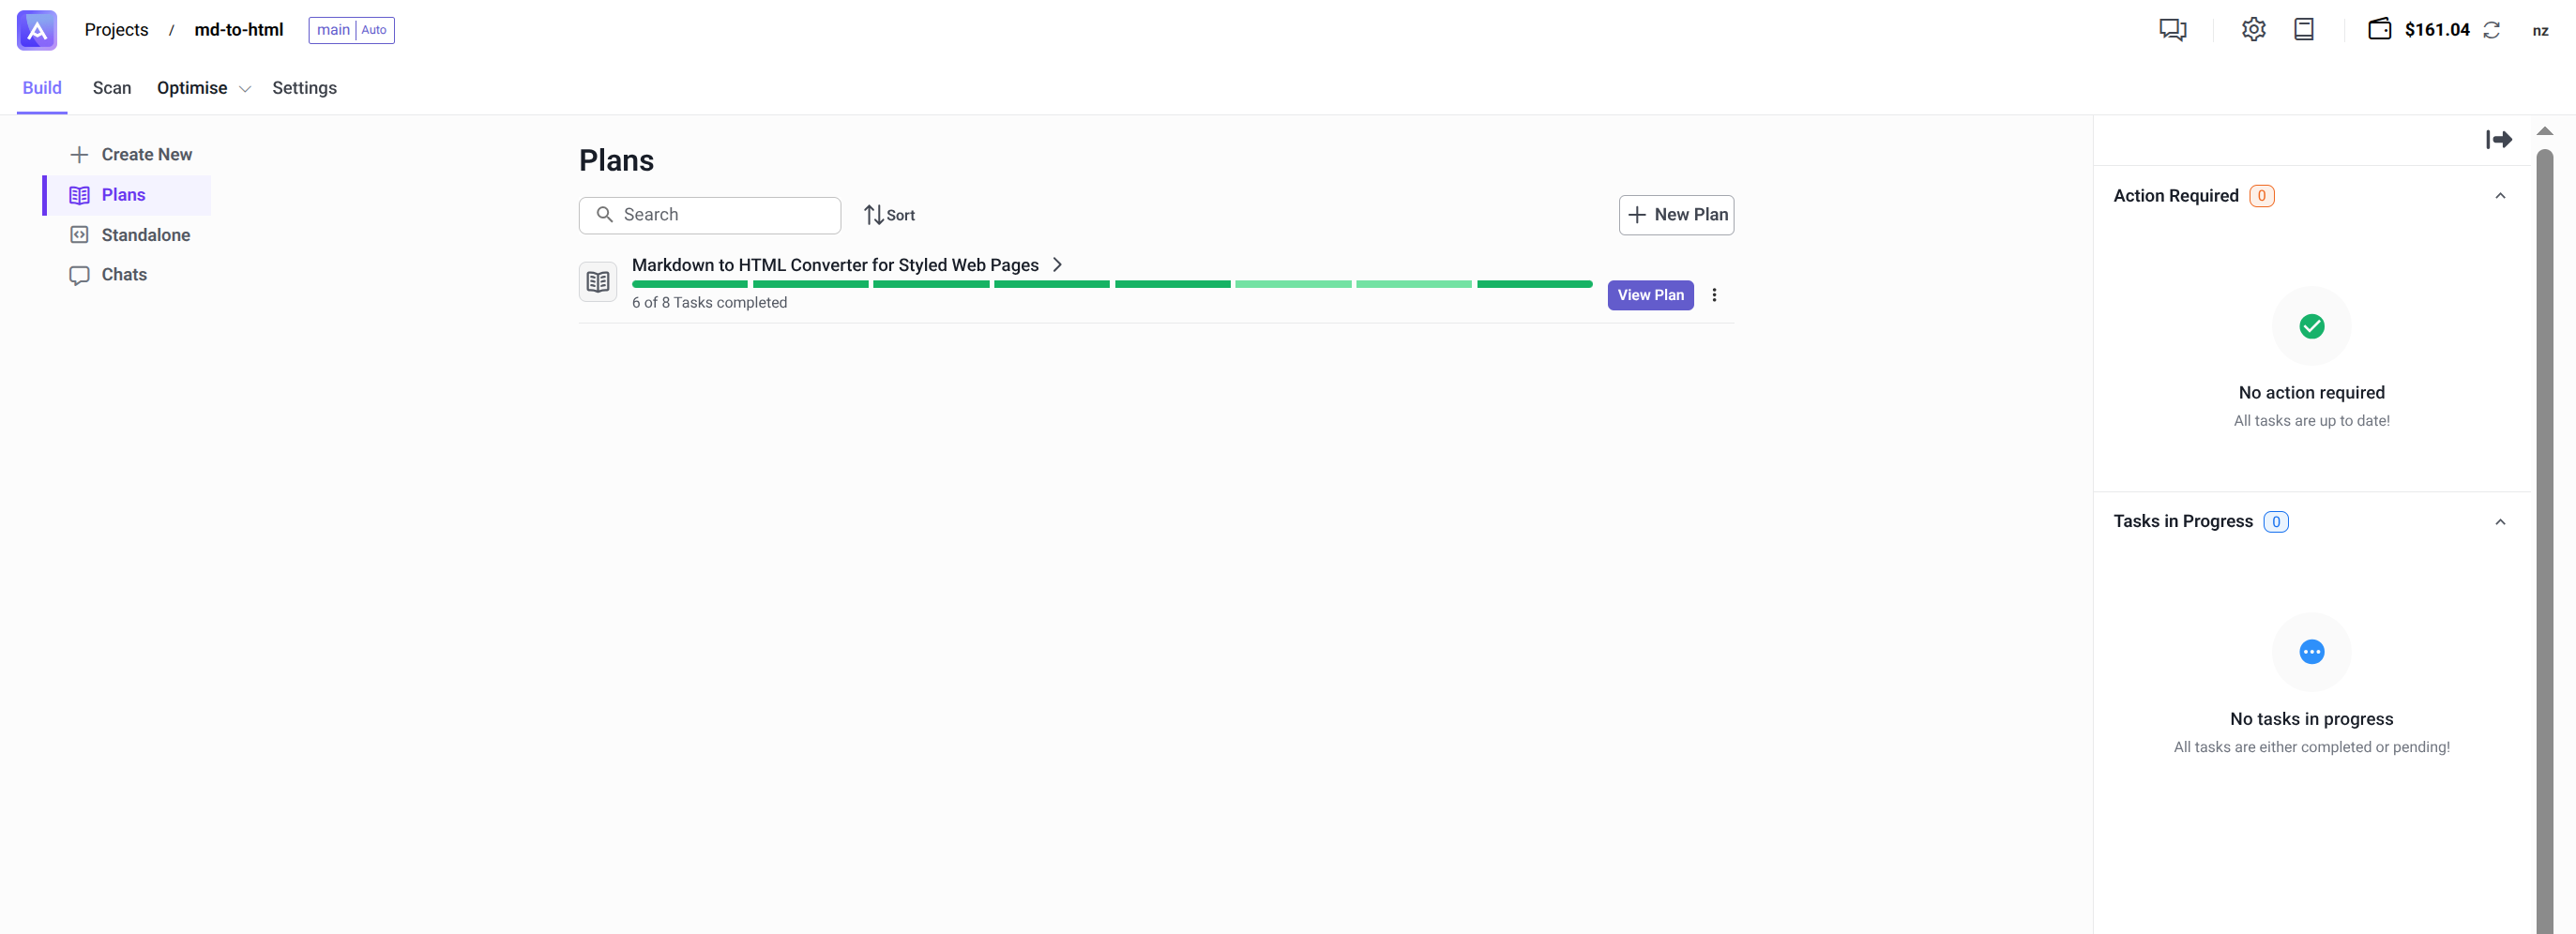
Step 5: Build or download the plan
The Plan Dashboard displays all tasks in your plan with their current status. Each task shows:
- Step number and Task Status (completed/in progress/not started)
- Task description
- Agent Status (Not Started, Running, Draft Ready, Agent Done)
- Git Status (tracks PR status when tasks are published)
- Actions (Start Task, View Task)
Managing Tasks
Click the three-dot menu next to any task to:
- Delete Task – Remove tasks that are no longer needed
- Add Task Below – Insert new tasks into the plan

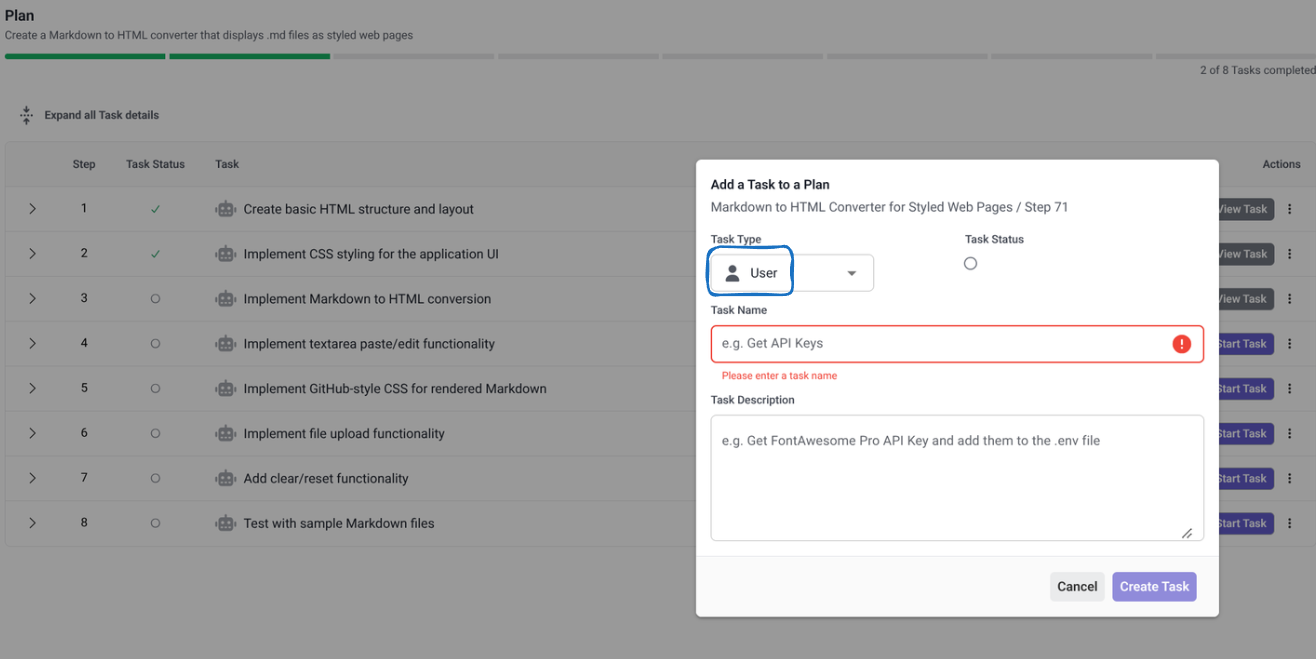
Adding Custom Tasks
When adding a task, specify:
- Task Type – Choose between Agent (automated) or User (manual) tasks
- Task Name – A clear, descriptive name that appears in the dashboard
- Task Description – Detailed instructions for completing the task
- Prompt (for Agent tasks) – The specific instructions the agent will execute
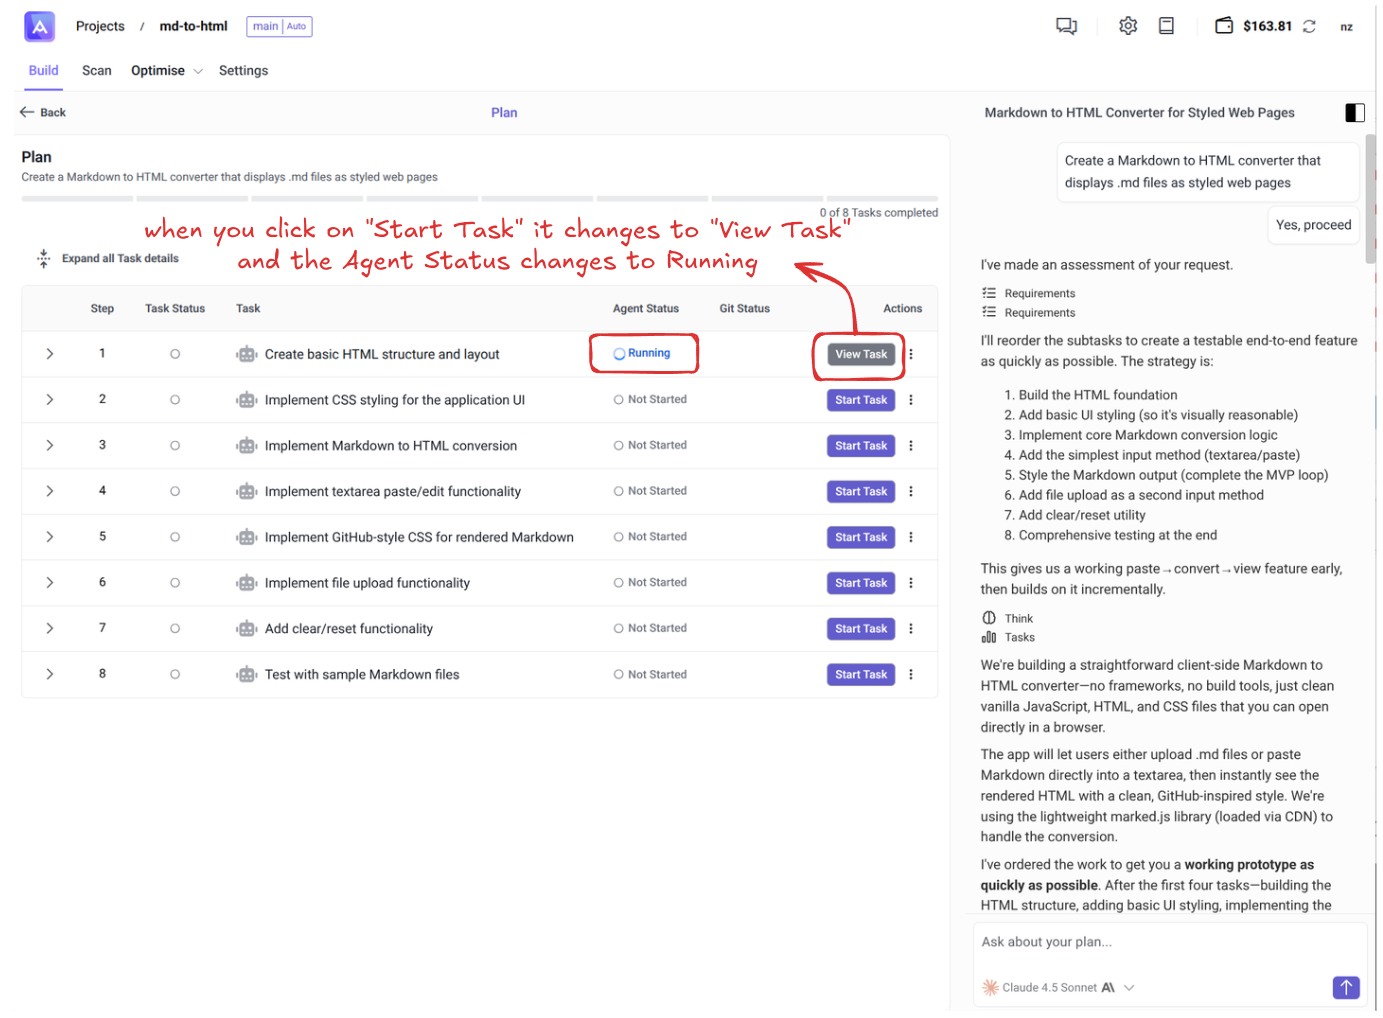
Monitor Execution
Click Start Task to begin execution. The Agent Status will change to Running, and the button changes to View Task.
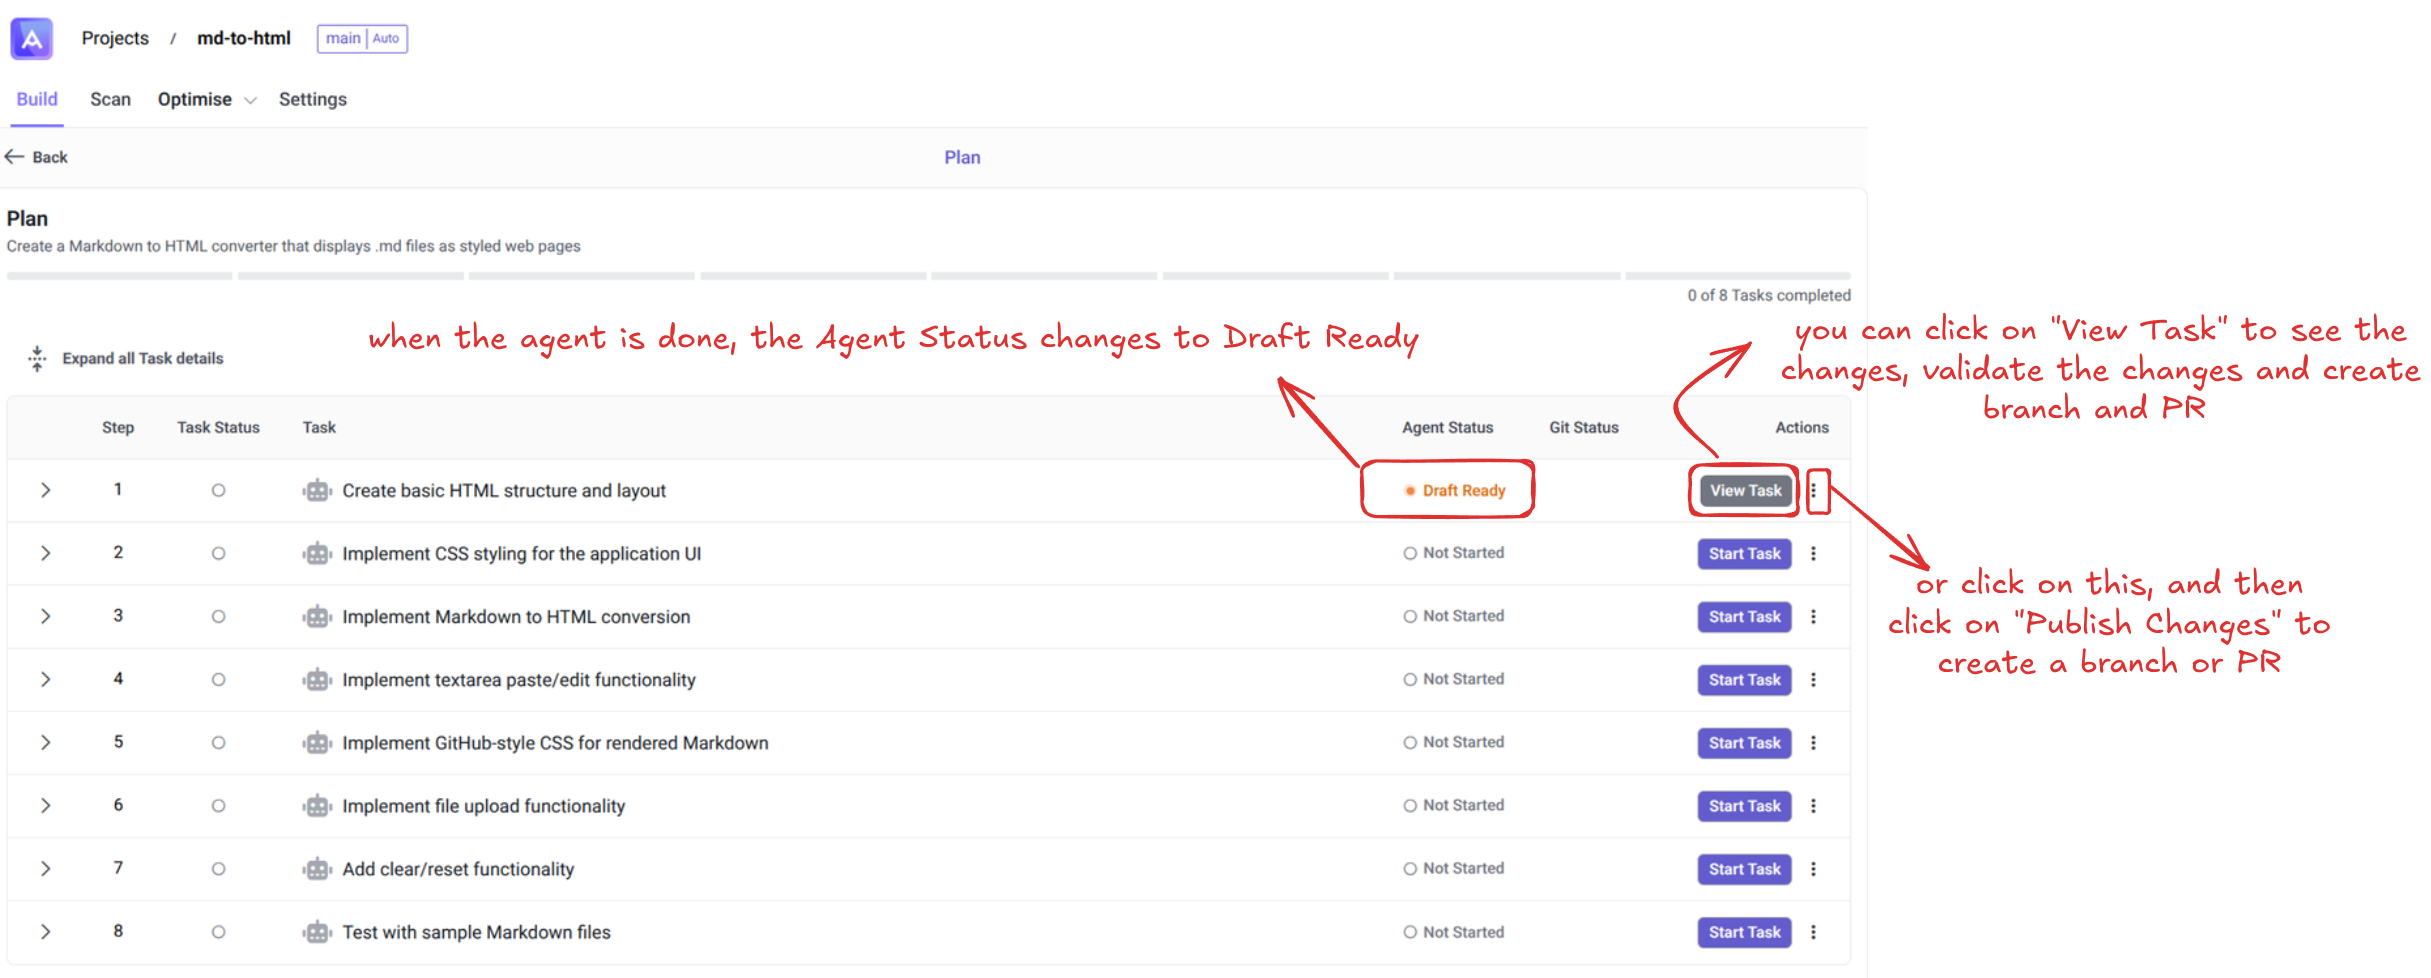
Step 6: Review and validate Changes
When a task completes, the Agent Status changes to Draft Ready. Click View Task to:
- Review the generated code changes
- Validate the implementation
- Click Publish Changes to create a branch and pull request
Alternatively, use the three-dot menu to publish changes directly from the dashboard.
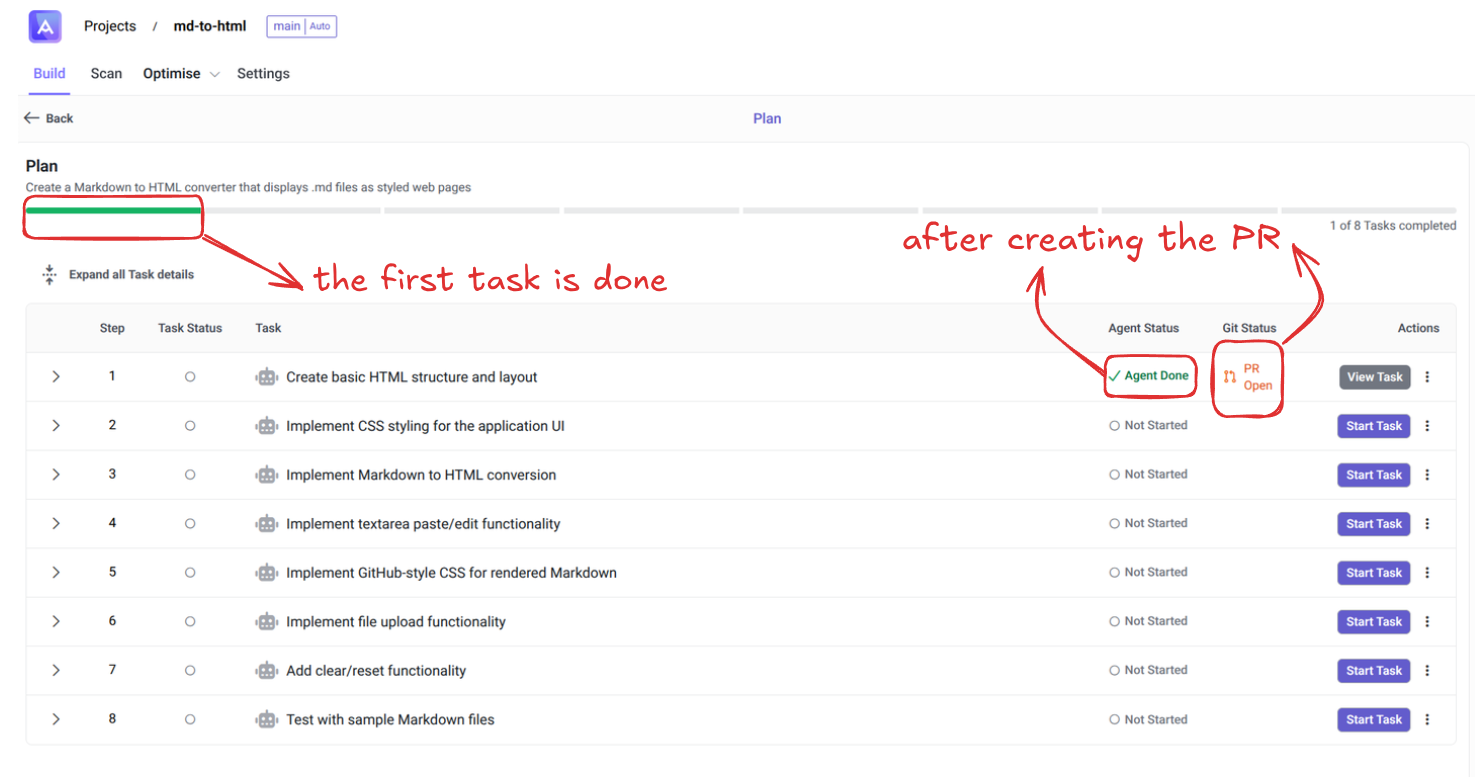
Step 7: Git Actions
After publishing, the Git Status updates automatically to show:
- PR Open – Pull request has been created
- PR Merged – Changes have been merged into your codebase
- Agent Done – Task completed successfully
The progress bar at the top tracks overall plan completion.
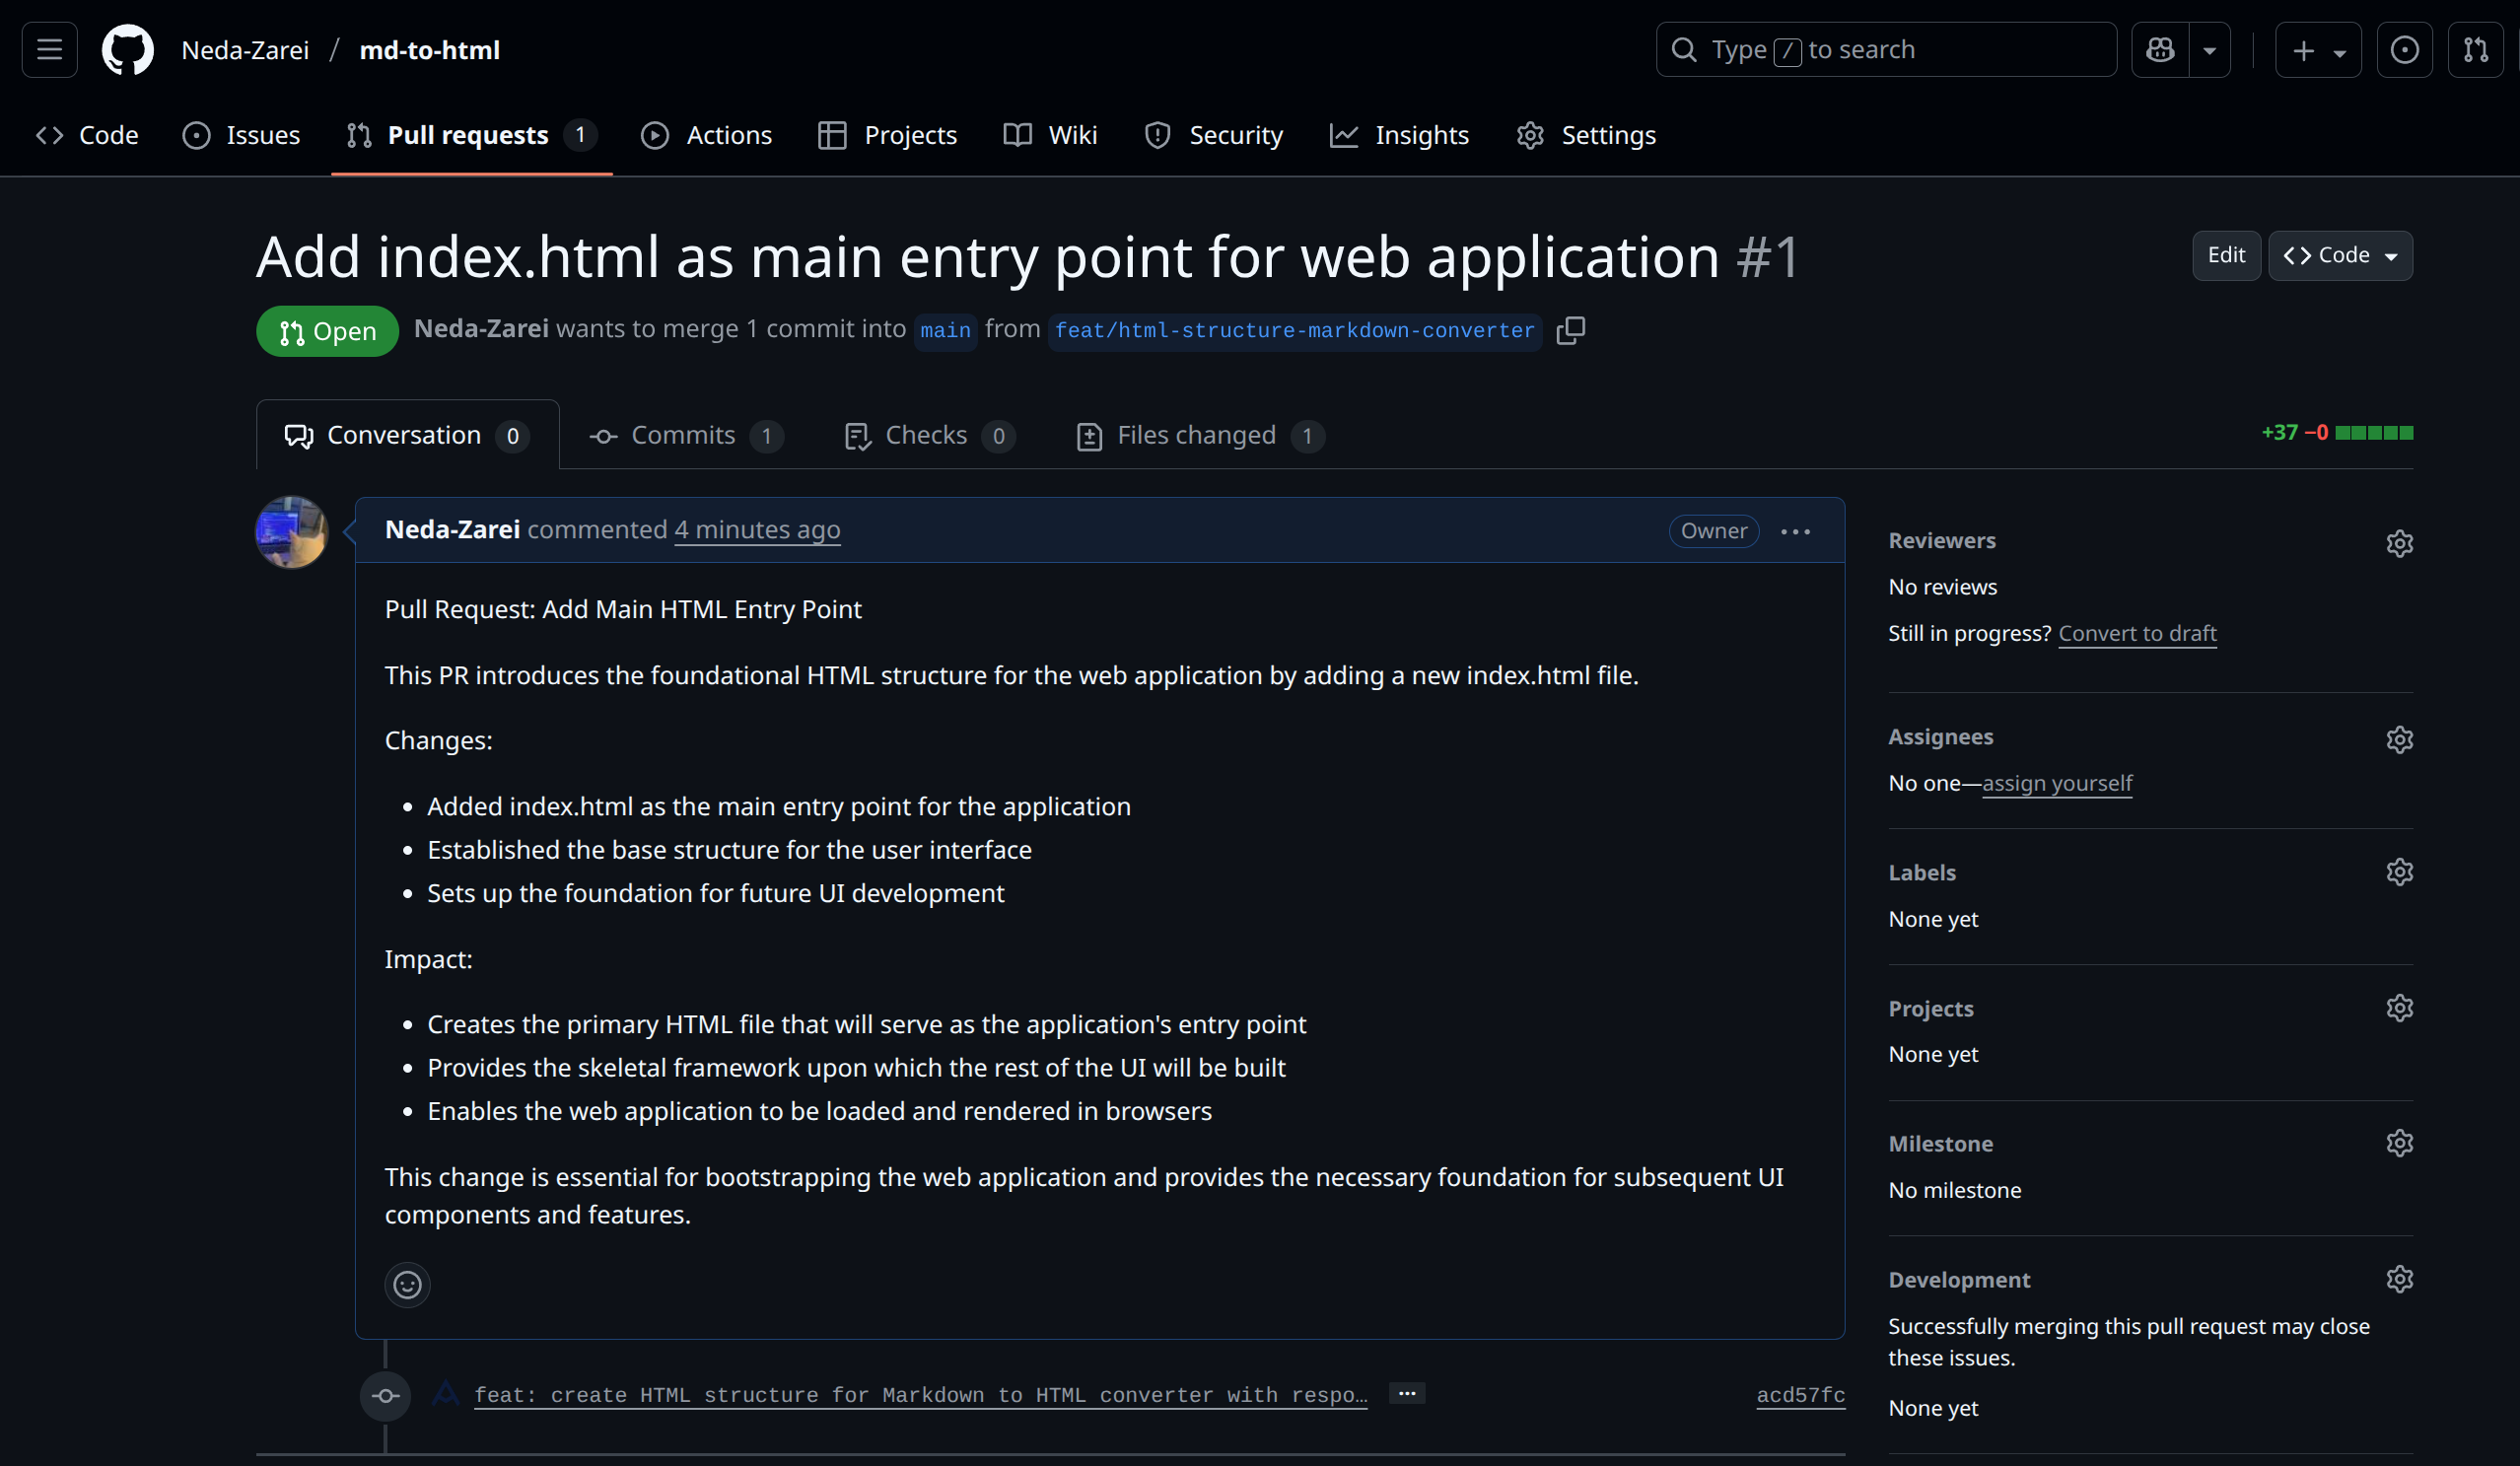
Viewing Pull Requests
When you publish changes, Artemis creates a detailed pull request on GitHub with:
- Clear description of changes made
- Impact analysis
- Technical implementation details
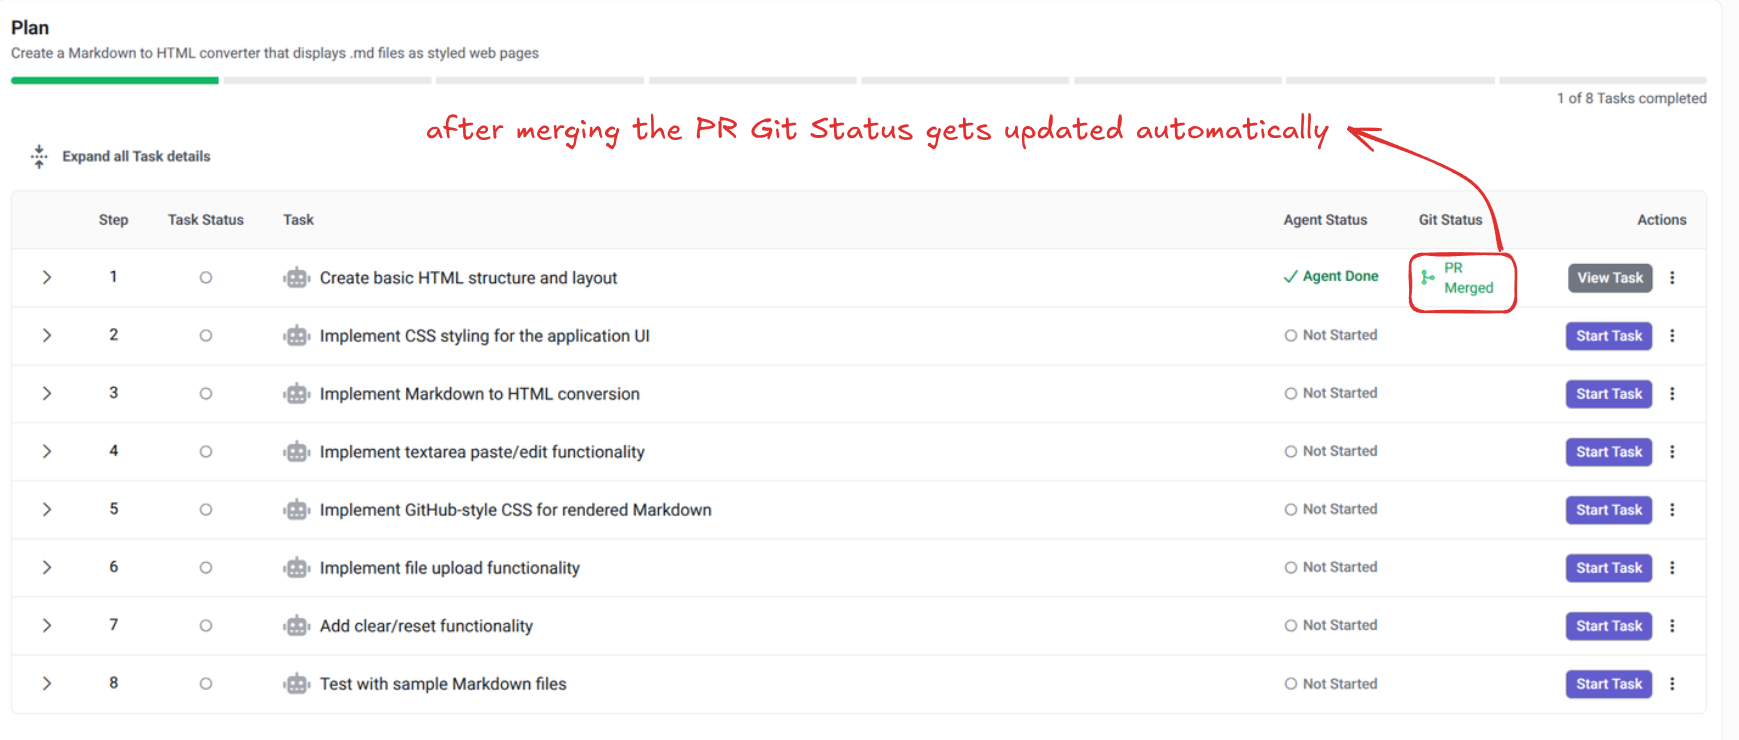
Automatic Git Synchronization
Once you merge the pull request, the Git Status in the Plan Dashboard automatically updates to PR Merged, keeping your plan status in sync with your repository.
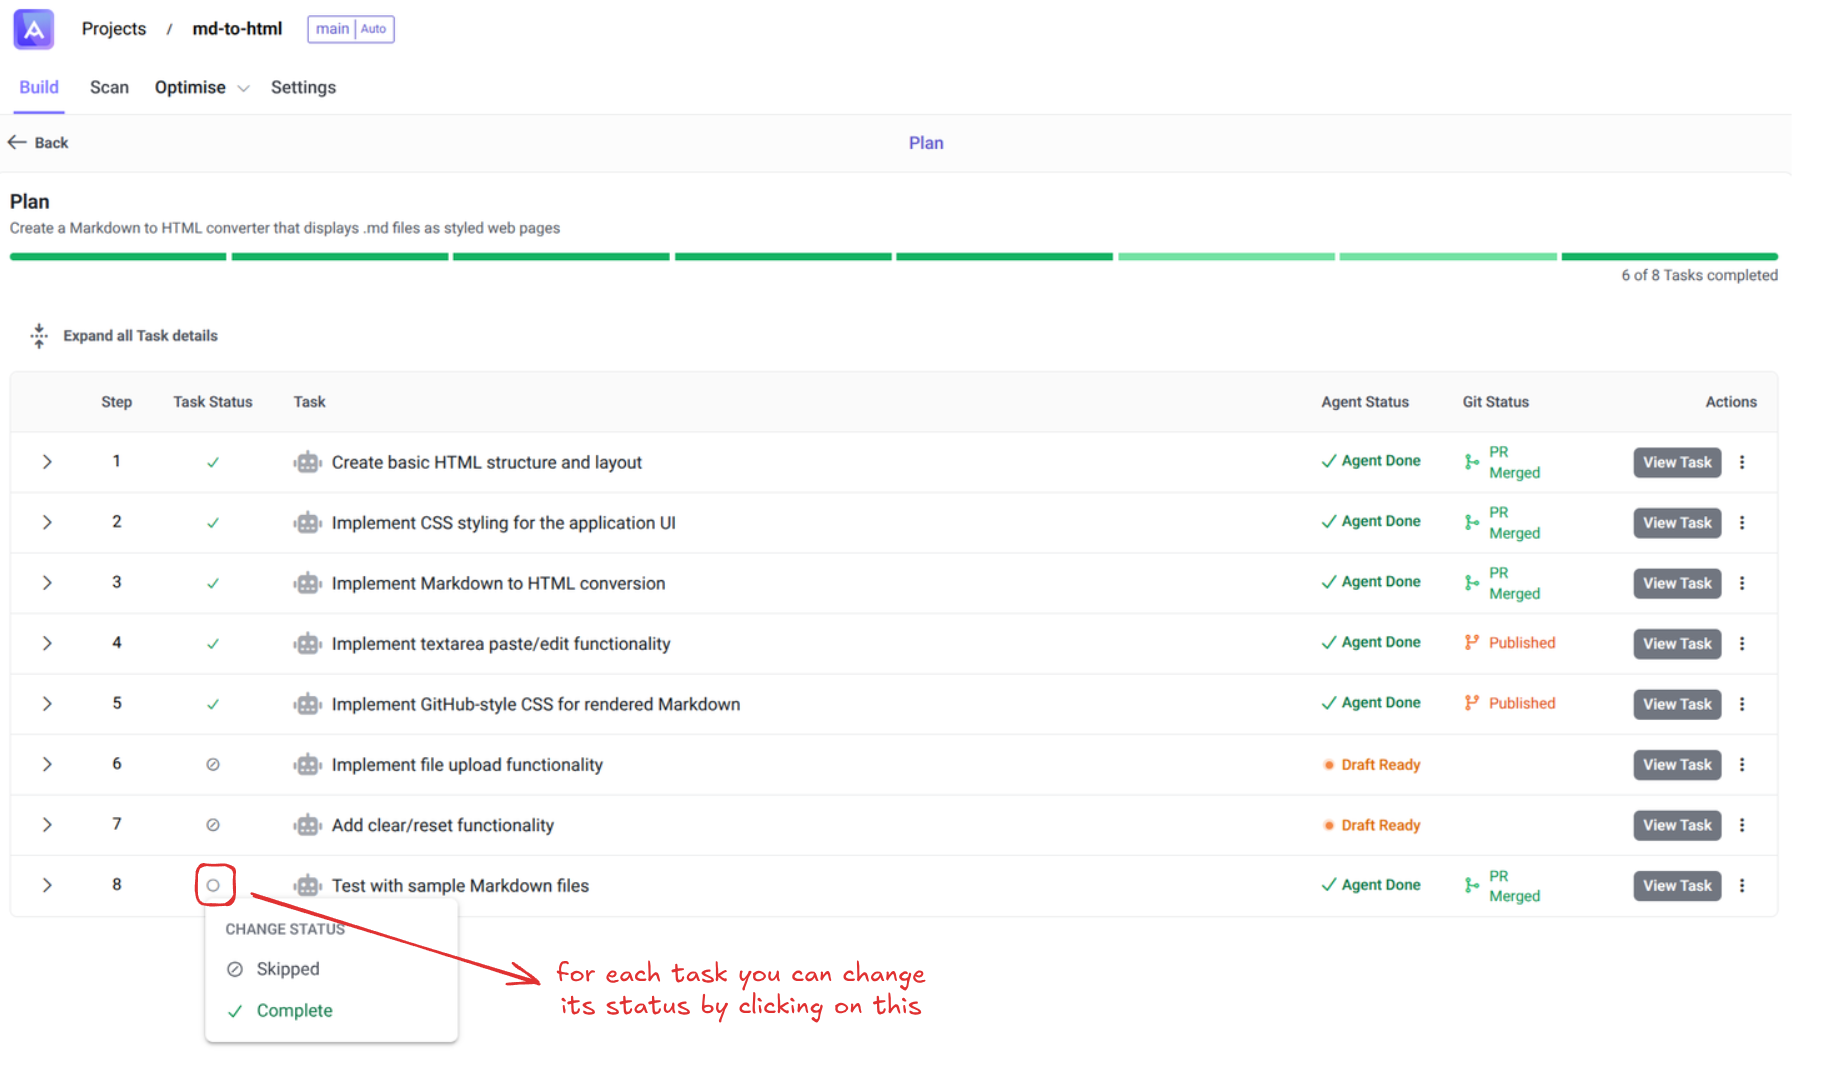
Managing Task Status
You can manually change the status of any task by clicking on the Task Status icon. This allows you to mark tasks as:
- Skipped – For tasks that are no longer needed or relevant
- Complete – To manually mark tasks as completed
This is useful for managing user tasks or adjusting the plan as your project evolves.
Plan History
All plans created for your project are saved and accessible from the Plans section. You can view:
- Active plans in progress
- Completed plans with full task history
- Search and sort through past plans