Using private code repositories
This guide walks you through creating a new Git key to interact with private Git repositories using one of three key types:
- GitHub PAT (Personal Access Token);
- GitHub App;
- SSH Key.
Git authentication type overview
When creating a new Git key, you need to select one of the following types:
- GitHub PAT (Personal Access Token): Use a token for password-less access to the GitHub API and Git operations, suitable for general use and automation.
- GitHub App: Create a GitHub App to handle specific repository-level or organisation-level operations with fine-grained permissions, suited for automating workflows and repository management.
- SSH Key: Use an SSH key to securely connect to GitHub repositories for actions like cloning and pushing without needing a password.
- For usage with a GitHub PAT or a GitHub App, you'll need to use the HTTPS URL of your repo, while creating a project.
- For usage with an SSH key, you will need to use the SSH URL of your repo, while creating a project.
Step-by-step instructions
1. Creating a GitHub PAT (Personal Access Token)
What is a GitHub PAT?
A Personal Access Token (PAT) allows you to authenticate and interact with GitHub services via API and Git commands. This is useful when performing actions like creating pull requests or managing content (code files) programmatically.
How to Create a GitHub PAT:
-
Log in to GitHub
Go to GitHub and log in with your credentials. -
Navigate to Developer Settings
- Click your profile icon in the upper-right corner.
- Select Settings.
- Scroll down and click Developer settings from the left sidebar.
-
Create a New Fine-Grained Personal Access Token
- Under Developer settings, click Personal access tokens.
- Click Fine-grained tokens.
- Click Generate new token.
-
Configure Fine-Grained Token
- Token name: Enter a name for your token (e.g., "Artemis Access Token").
- Resource owner: Select the repository or organization this token will apply to.
- Expiration: Set the token’s expiration (or select "No expiration" for long-term use).
- Repository Permissions:
- Under Repository access, select Only select repositories if you want to limit the token’s scope to specific repositories, or choose All repositories for broader access.
- Set the following repository permissions:
- Contents: Select Read and write to allow access to repository files.
- Pull requests: Select Read and write to manage pull requests.
-
Generate the Token
- Click Generate token and copy it immediately. Note that you won't be able to see this token again on Github.
-
Using the GitHub PAT in Artemis
- On Artemis, go to the
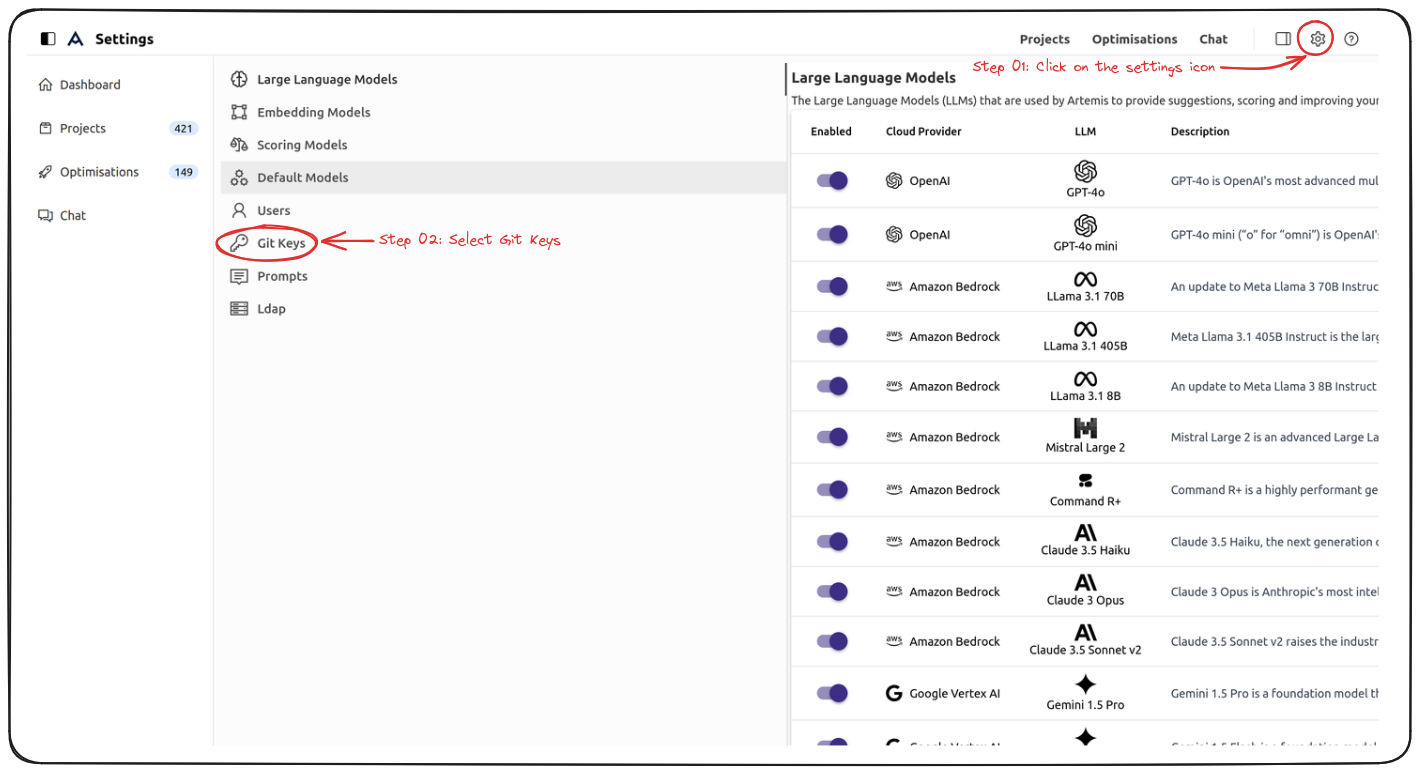
Settingsicon on top right, and click onGit Keys. See image below for reference:
- On Artemis, go to the

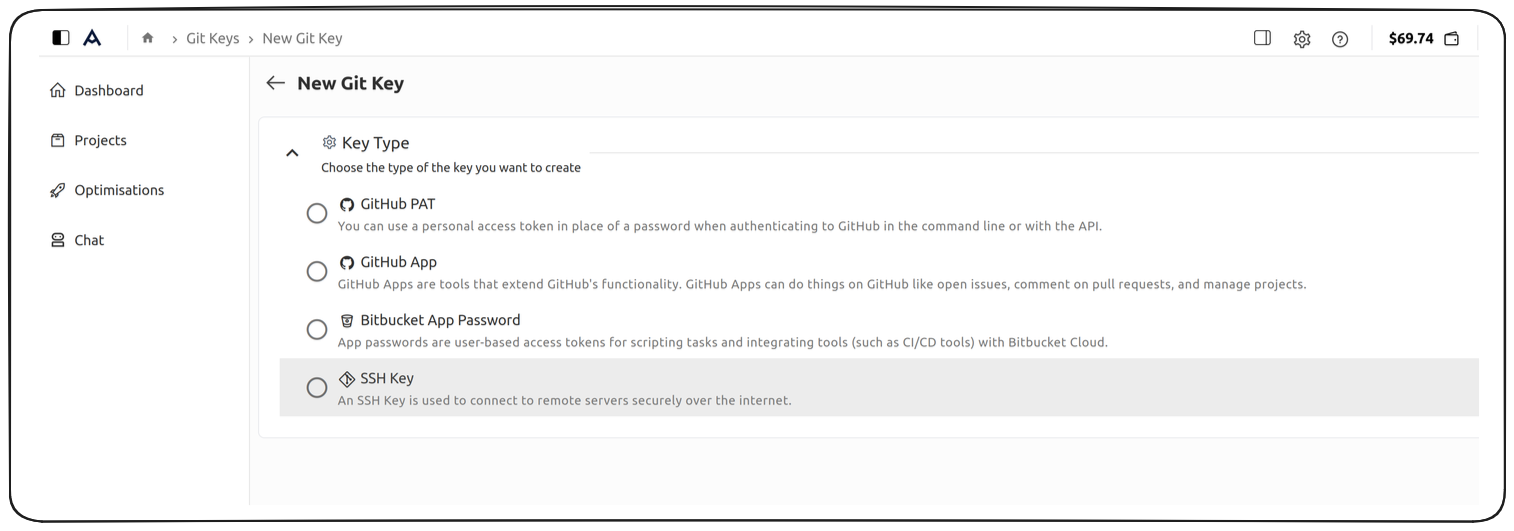
- Click on New Key, which will take you to the page shown below:

- Fill out the following fields:
- Key Name: Enter a name for the key (e.g., "My GitHub PAT").
- GitHub API URL: By default, use
https://api.github.com. - GitHub Web URL: Typically
https://github.com. - Username: Your GitHub username.
- GitHub Personal Access Token: Paste the token you copied from GitHub (See steps 1-5 for reference).
- Click Create to generate the key and start using it.
2. Creating a GitHub App Key
What is a GitHub App?
A GitHub App allows more advanced, programmatic control over GitHub repositories. It’s ideal for automating repository management, handling pull requests, and interacting with repository content. You can grant specific, fine-grained permissions to the app for a more secure and scoped access model.
How to Create a GitHub App:
-
Log in to GitHub
Go to GitHub and log in. -
Create a New GitHub App
- Go to Settings from your profile dropdown.
- Scroll to Developer settings and click on GitHub Apps.
- Click New GitHub App.
-
Configure the GitHub App
- Fill out the following details:
- GitHub App Name: Provide a name for the app (e.g., "My Artemis Integration").
- Homepage URL: Enter any URL (e.g. https://artemis.turintech.ai). This is cosmetic only and does not affect the app’s functionality.
- Uncheck the Active in the Webhook section, as this feature is not required for this App.
- Fill out the following details:
-
Define Permissions for the GitHub App
To grant your GitHub App the ability to read and write content, as well as manage pull requests, you need to configure specific permissions for the app:- Repository Permissions:
- Contents: Select Read & Write to allow the app to manage repository contents (e.g., files).
- Pull Requests: Select Read & Write to enable reading, creating, and modifying pull requests.
- Repository Permissions:
-
Click on Create GitHub App
-
Generate a Private Key for the App
- After saving your GitHub App settings, scroll down to the Private Keys section.
- Click Generate a new private key and download the file. You’ll need this private key when setting up the app on Artemis.
-
Generate a Client Secret for the App
- Go to the Client secrets section.
- Click Generate a new client secret and copy the secret generated. You’ll need it when setting up the app on Artemis.
-
Install the GitHub App
- After creating the app, browse to its settings
- Make a note of the App ID and the Client ID in the About section of the General tab (on the left).
- Click on the Install App tab (on the left) and click the button Install.
- Select the repositories (or all repositories in an organization) where the app should be installed.
- The Installation ID will be needed in the next step. It is found in the URL after the
installations/part.
-
Using the GitHub App Key in Artemis
- On Artemis’s New Git Key page, select GitHub App. See the steps below on getting to this page:

Select Github App from the list below:

-
Fill out the following fields:
- Key Name: Choose a descriptive name for this key.
- GitHub API URL: Default is
https://api.github.com. - GitHub Web URL: Typically
https://github.com. - Client ID: Enter the Client ID from the GitHub App settings.
- Client Secret: Enter the Client Secret provided by GitHub earlier.
- App ID: Enter the App ID displayed in the GitHub App settings.
- Installation ID: Enter the Installation ID from the GitHub App.
- Private Key: Paste the content of the private key file you downloaded earlier.
-
Click Create to generate the key and start using the app.
3. Creating an SSH Key
What is an SSH Key?
An SSH key is used to authenticate with GitHub securely over the SSH protocol, allowing operations like cloning repositories or pushing changes without needing a password.
How to Create an SSH Key:
-
Generate an SSH Key
If you don’t have an existing SSH key, generate one using the following command:ssh-keygen -t rsa -b 4096 -C "your_email@example.com"Follow the prompts to save the key pair, typically stored in
~/.ssh/id_rsa(private key) and~/.ssh/id_rsa.pub(public key). -
Add the SSH Key to GitHub
- Log in to GitHub.
- Go to Settings > SSH and GPG keys.
- Click New SSH key, give it a title, and paste the content of your public key (
~/.ssh/id_rsa.pub) into the provided field. - Click Add SSH key.
-
Using the SSH Key in Artemis
- On the Artemis’s New Git Key page, choose SSH Key. See the steps below:

Select SSH Key from the list below:

-
Fill out the following fields:
- Key Name: Enter a name for the key.
- Private Key: Paste the contents of your private key (located in
~/.ssh/id_rsa).
-
Click Create to generate the key.
4. Creating a Bitbucket App Password
What is a Bitbucket App Password?
A Bitbucket App Password is an alternative way to authenticate when accessing your repositories programmatically or via Git operations. It allows you to avoid using your primary account password and can be configured with specific permissions for enhanced security.
How to Create a Bitbucket App Password:
-
Log in to Bitbucket
Go to Bitbucket and log in to your account. -
Navigate to Personal Settings
- Click on the settings icon in the top-right corner.
- Select Personal Bitbucket settings.
-
Access App Passwords
- Under the Access Management section, click on App Passwords.
-
Create a New App Password
- Click Create app password.
- Enter a Label for the password (e.g., "Artemis Integration").
- Select the permissions required for Artemis operations:
- Repositories:
- Read: For cloning or reading repository content.
- Write: For pushing changes or managing repository files.
- Pull Requests:
- Read: To view pull requests.
- Write: To create or update pull requests.
- Account
- Read: Authentication and validation of the app password.
- Repositories:
-
Generate the App Password
- Click Create.
- Copy the generated password immediately, as it won’t be shown again.
-
Using the Bitbucket App Password in Artemis
- On Artemis, go to the
Settingsicon on the top right and click onGit Keys.
See image below:

- Click New Key, which will open the configuration page.
- Select Bitbucket App Password from the options. See image below:

- Fill out the following fields:
- Key Name: Enter a name for the key (e.g., "My Bitbucket App Password").
- Bitbucket API URL: Default is
https://api.bitbucket.org. - Username: Your Bitbucket username.
- Bitbucket App Password: Paste the App Password you generated earlier.
- Click Create to generate the key and start using it.
- On Artemis, go to the
Using the Git Key You Created
Once you've created a Git key (GitHub PAT, GitHub App, or SSH key), you can use it when creating a new project on the platform. Follow these simple steps:
-
Go to the New Project Page
Navigate to the New Project form on the platform. -
Fill in Project Details
- Name: Enter your project's name.
- Description: Optionally describe the project.
- Source: Select Git.
- Git URL: Enter the repository URL (e.g.,
https://github.com/username/repository.gitfor GitHub PAT and Apps, orgit@github.com:username/repository.gitfor SSH). - Branch: Specify the branch or leave it as the default.
-
Select Git Key
From the Git Key dropdown, choose the key you created (PAT, GitHub App, or SSH Key). -
Create the Project
Click Create Project to authenticate and set up your repository using the selected Git key.
Make sure your Git key has the necessary permissions for repository access (content read/write, PR read/write).