Artemis Custom Runner
A custom runner enables you to validate your code by running builds, tests, and benchmarks on your local machine. The Artemis Tools Bundle provides a unified way to download and use the Artemis Runner in a secure and isolated environment, allowing you to run code outside the platform safely and efficiently.
- Artemis Custom Runner
Learn how Artemis Custom Runner works and how to set it up
Accessing Runner Setup
There are two ways to access the custom runner setup:
Method 1: Via Runners Section
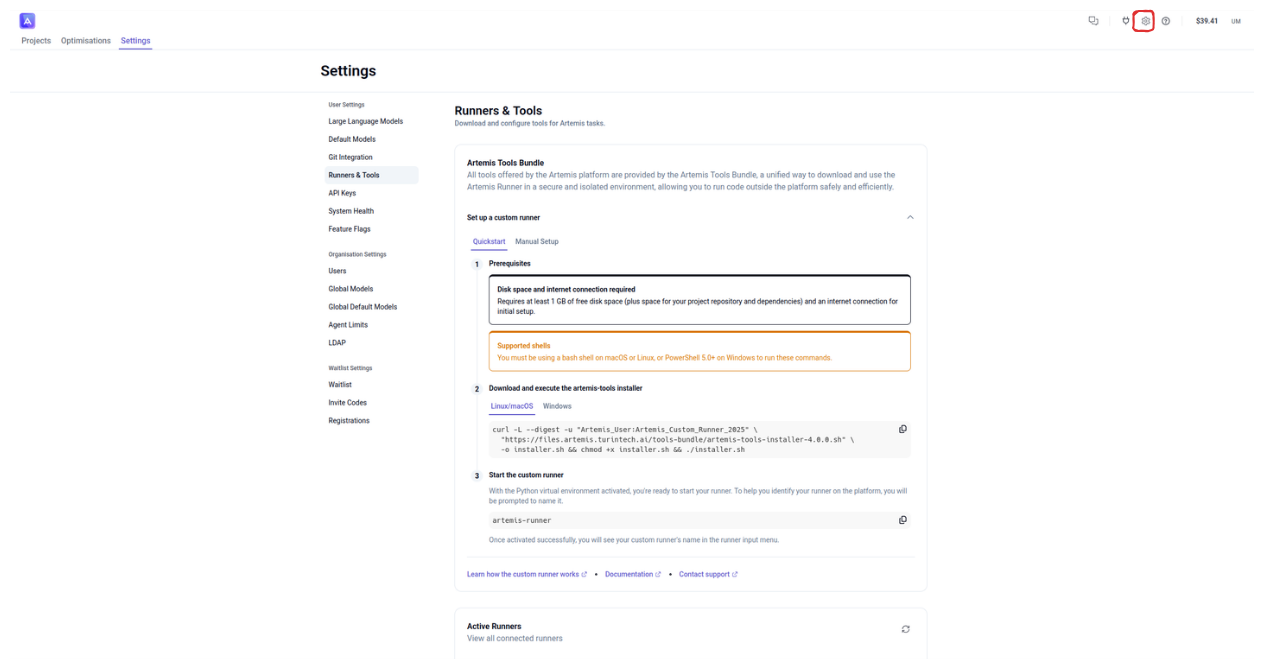
- Navigate to the Settings section in the header bar
- Go to the Runners & Tools section in the left sidebar
- Click "Set up a custom runner" to begin configuration
Method 2: Via Project Settings
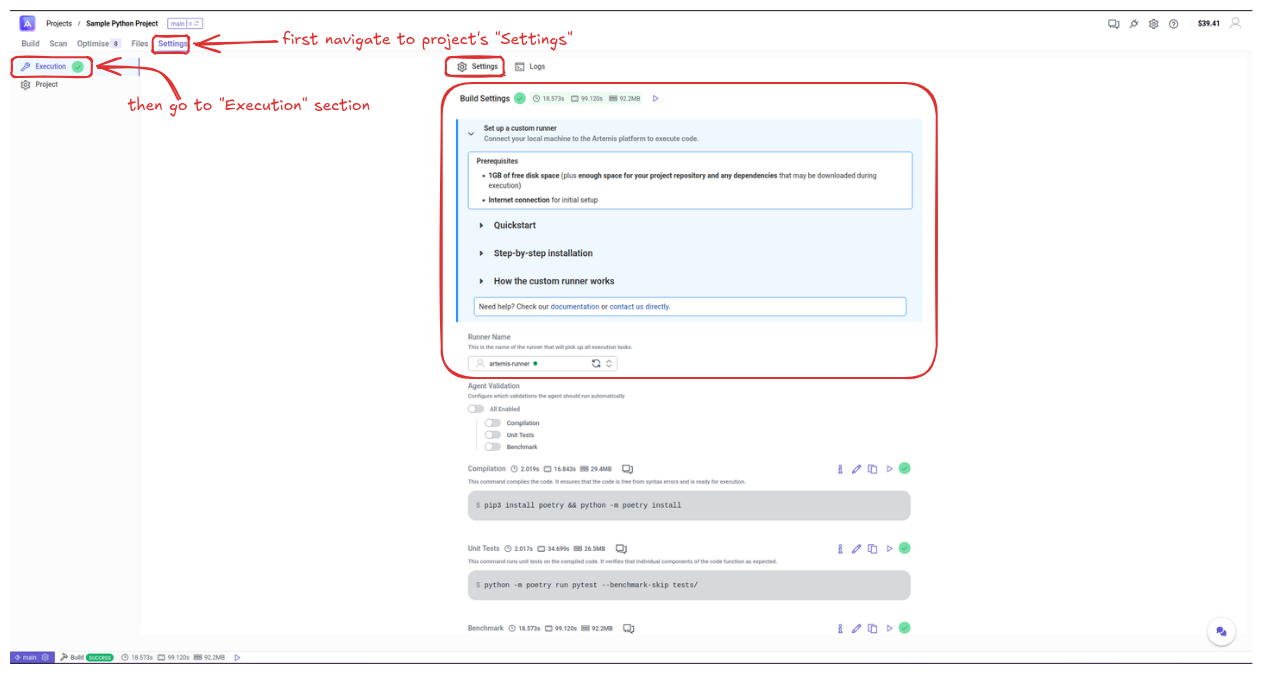
- Navigate to your project's Settings tab in the top navigation
- Go to the Execution section in the left sidebar
- Look for the "Set up a custom runner" section in the Build Settings
This method allows you to set up a custom runner directly from your project's build configuration.
Quickstart
You must be using a bash shell on macOS or Linux, or PowerShell 5.0+ on Windows to run these commands.
-
Download and execute the artemis-tools installer
curl -L --anyauth -u "Artemis_User:Artemis_Custom_Runner_2025" \"https://files.artemis.turintech.ai/tools-bundle/artemis-tools-installer-4.0.0.sh" \-o installer.sh && chmod +x installer.sh && ./installer.sh -
Start the custom runner
With the Python virtual environment activated, you're ready to start your runner. To help you identify your runner on the platform, you will be prompted to name it.
artemis-runner start interactiveOnce activated successfully, you will see your custom runner's name in the runner input menu.
Step by step installation
You must have Python 3.11 with virtual environment support and pip installed to run these commands.
-
Download Artemis Tools compressed folder
curl --anyauth -u 'Artemis_User:Artemis_Custom_Runner_2025' \"https://files.artemis.turintech.ai/tools-bundle/artemis-tools-4.0.0.tar.gz" \-o artemis-tools-latest.tar.gz -
Extract the custom runner files
tar -xzf artemis-tools-latest.tar.gzcd artemis-tools -
Create a virtual environment and install the runner
python3.11 -m venv .venvsource .venv/bin/activatepip install --find-links wheels/ artemis-runner -
Start the custom runner
With the virtual environment activated, you're ready to start your runner. You will be prompted to enter your account credentials and name your runner. Your configuration will be saved to
.env.credentialsand.env.settingsfiles for future use.artemis-runner start interactiveOnce activated successfully, you will see your custom runner's name in the runner input menu.
How the Custom Runner Works
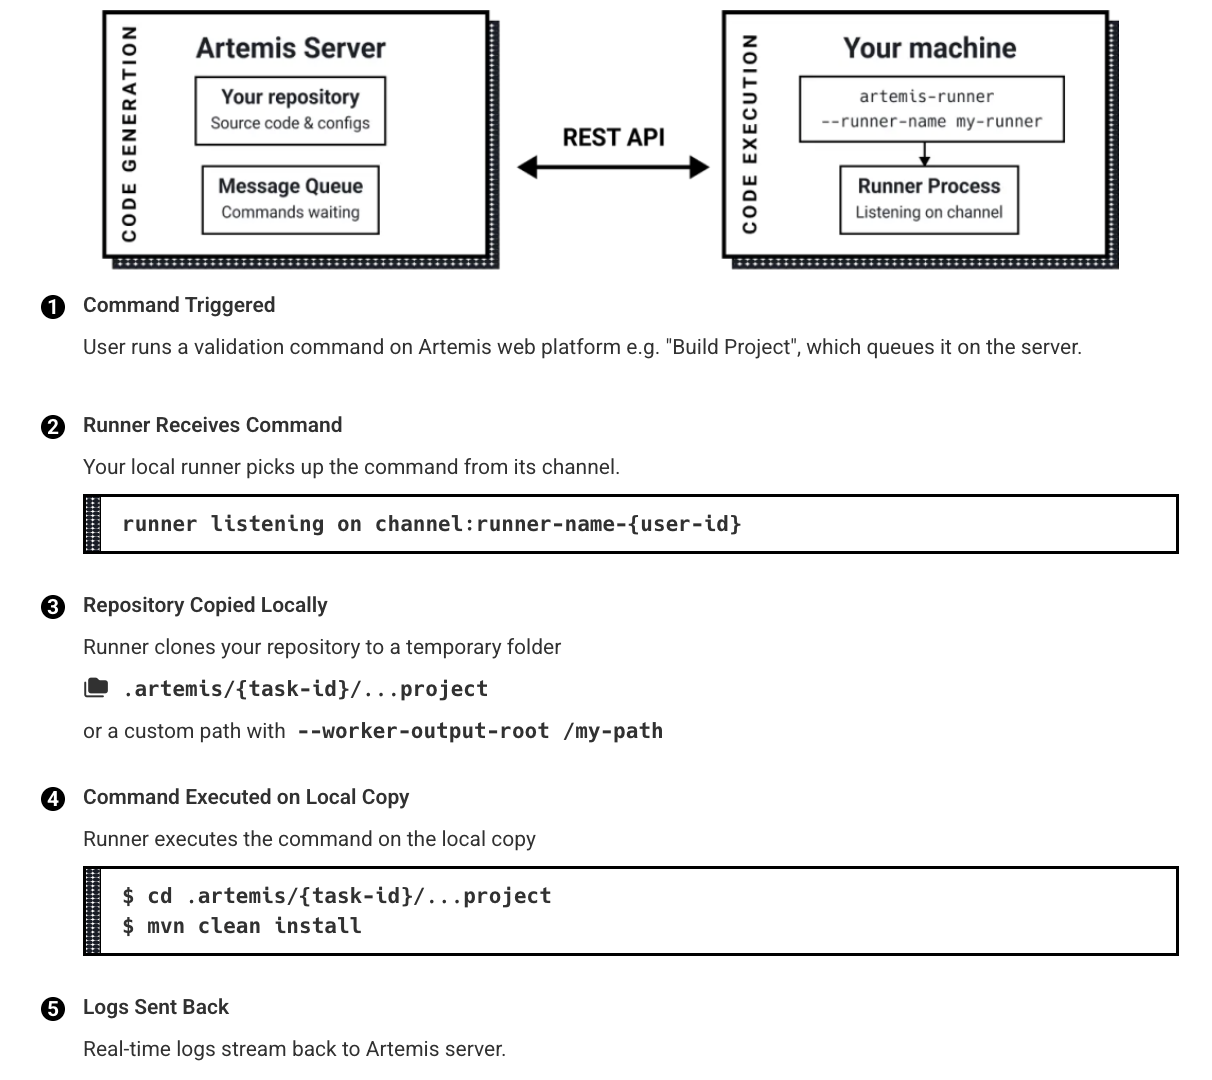
The custom runner operates through a secure REST API communication:
- Command triggered — User runs a validation command on the Artemis web platform
- Runner receives command — Your local runner picks up the command from the channel
- Repository copied locally — Runner clones your repository to a temporary folder
- Command executed — Runner executes the command on the local copy
- Logs sent back — Real-time logs stream back to the Artemis server
Configuration Options
The runner supports interactive and non-interactive modes. Interactive mode (default) guides you through setup step-by-step and saves settings to .env.credentials and .env.settings files.
Custom Environment Support
For on-premise deployments, select "custom" as the environment when running the interactive configuration. The runner will guide you through generating the .env.custom file automatically.
Alternatively, you can generate configuration files first:
artemis-runner config generate
# Select "custom" when prompted for environment
# The runner will prompt you for the base URL and generate .env.custom
The .env.custom file contains required microservice configurations:
- THANOS (Authentication service)
- THOR (File storage)
- FALCON (Code analysis)
- VISION (LLM service)
- LOKI (Task orchestration)
SSL Configuration
Configure SSL certificate verification:
export ARTEMIS_SSL_VERIFY=true    # Use system CA certificates
export ARTEMIS_SSL_VERIFY=false   # Disable SSL verification
export ARTEMIS_SSL_VERIFY=/path/to/ca/certificates.pem  # Custom CA certificates
Usage Tips
- Ensure your runner has adequate disk space for project dependencies
- Keep your virtual environment activated when running the custom runner
- Save credentials in
.env.credentialsfor convenience - Monitor runner logs to troubleshoot any connection issues
- Use meaningful runner names to identify them in the platform
Advanced Usage
This section covers advanced usage scenarios for the Artemis runner, including isolated installation and resource management.
Isolated Installation with pipx
When your project uses a different Python version than the one required by the Artemis runner (Python 3.11), you can use pipx to install the runner in an isolated environment. This prevents any conflicts between your project's Python dependencies and the runner's requirements.
Installing pipx
pipx is a tool for installing and running Python applications in isolated environments. Install it via PyPI:
pip install --user pipx
Installing the Artemis Runner with pipx
-
Download the zip file from the downloads page
-
Extract the zip file
-
Install the runner using pipx
cd artemis-toolspipx install --pip-args "--find-links $PWD/wheels" --python=3.11 artemis-runner
Running the Isolated Runner
After installation, you can start the Artemis runner from any directory without activating any virtual environment:
artemis-runner start interactive
- Isolates the runner's Python 3.11 environment from your project
- Prevents dependency conflicts
- Allows you to run the runner from any directory
- Makes it easier to manage multiple Python versions on your system
Resource Management
Limiting RAM Usage
You can control the amount of RAM available to your evaluations using the ARTEMIS_RAM_LIMIT_MB environment variable. This is particularly useful on systems with limited resources or when you need consistent resource usage across environments.
# Set RAM limit to 4GB (4096MB)
export ARTEMIS_RAM_LIMIT_MB=4096
artemis-runner start non-interactive
The RAM limit is specified in megabytes (MB). For example:
- 1GB = 1024MB
- 2GB = 2048MB
- 4GB = 4096MB
- 8GB = 8192MB
Setting the RAM limit too low may cause evaluations to fail if they require more memory than allocated. Monitor your evaluations' memory usage to determine appropriate limits.
Proxy Configuration
If you're experiencing connection issues in a corporate environment with a proxy, configure no_proxy to allow direct connections to your Artemis deployment.
Environment Variables
no_proxy/NO_PROXY: Comma-separated list of hosts to bypass the proxy
Troubleshooting Connection Issues
For SaaS Artemis (artemis.turintech.ai)
export no_proxy=localhost,127.0.0.1,artemis.turintech.ai
artemis-runner start interactive
Direct connections to Artemis can be faster and more reliable than going through a corporate proxy.
For On-premise Artemis
# For domain-based deployment
export no_proxy=localhost,127.0.0.1,artemis.internal.company.com

# For IP-based deployment
export no_proxy=localhost,127.0.0.1,192.168.41.1

artemis-runner start interactive
Testing Connectivity
Before starting the runner, verify connectivity:
# Test direct connection (with no_proxy)
curl -v https://artemis.turintech.ai

# Test internal deployment
curl -v https://artemis.internal.company.com
Diagnosing proxy issues
-
Verify
no_proxyis set correctlyecho $no_proxy -
Check if the proxy is blocking Artemis — SSL certificate errors may indicate proxy SSL inspection; connection timeouts may indicate proxy blocking
Next Steps
Once your custom runner is configured and running, you can:
- Set up build commands in Project Settings
Troubleshooting
If you encounter connection issues:
- Verify your credentials in
.env.credentials - Check your internet connection
- Ensure Python 3.11 is properly installed
- Confirm the runner name is unique on your account
- Review SSL certificate configuration if using HTTPS