Using Private Code Repositories
This comprehensive guide walks you through setting up Git authentication to connect Artemis with your private repositories. We support multiple authentication methods to accommodate different security requirements and organizational policies.
Supported Authentication Methods
Artemis supports four primary Git authentication methods:
- GitHub PAT (Personal Access Token) - Token-based authentication for GitHub repositories
- SSH Key - Key-based authentication for secure, password-less access
- Bitbucket App Password - Bitbucket-specific authentication method
Authentication Method Overview
| Method | Security Level | Setup Complexity | Best For |
|---|---|---|---|
| GitHub PAT | High | Low | Individual developers, small teams |
| SSH Key | Very High | Medium | Technical users, multi-platform access |
| Bitbucket App Password | High | Low | Bitbucket users, simple setup |
Repository URL Requirements
- GitHub PAT & GitHub App: Use HTTPS URLs (e.g.,
https://github.com/username/repository.git) - SSH Key: Use SSH URLs (e.g.,
git@github.com:username/repository.git) - Bitbucket App Password: Use HTTPS URLs (e.g.,
https://bitbucket.org/username/repository.git)
Method 1: GitHub PAT (Personal Access Token)
What is a GitHub PAT?
A Personal Access Token provides secure, password-less authentication for GitHub API operations and Git commands. It's ideal for individual developers and offers granular permission control.
Creating a GitHub PAT
Step 1: Access GitHub Developer Settings
- Log in to GitHub at GitHub.com
- Navigate to Settings:
- Click your profile icon (top-right corner)
- Select Settings
- Scroll down to Developer settings (left sidebar)
Step 2: Generate Fine-Grained Token
- Under Developer settings, click Personal access tokens
- Select Fine-grained tokens
- Click Generate new token
Step 3: Configure Token Permissions
Basic Configuration:
- Token name: Enter descriptive name (e.g., "Artemis Code Analysis")
- Resource owner: Select target repository owner/organization
- Expiration: Choose appropriate duration (90 days recommended)
Repository Access:
- Selected repositories: Choose specific repositories, OR
- All repositories: For broader access (use cautiously)
Required Permissions:
- Contents: Read and write (access repository files)
- Pull requests: Read and write (manage PRs)
- Metadata: Read (basic repository information)
Step 4: Generate and Secure Token
- Click Generate token
- Copy the token immediately - you won't see it again
- Store securely (password manager recommended)
Configuring GitHub PAT in Artemis
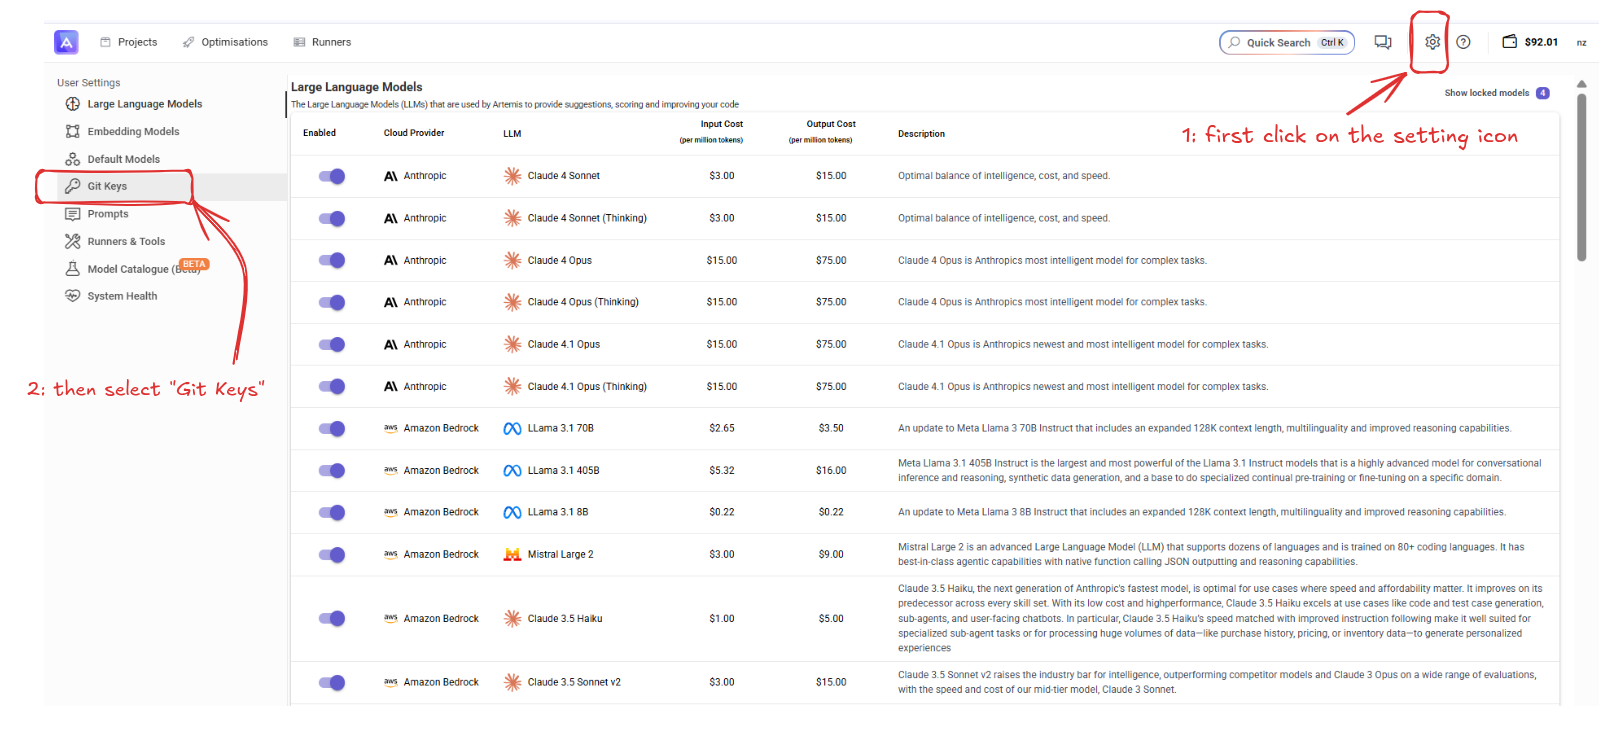
Step 1: Access Git Keys Settings
- In Artemis, click the Settings icon (top-right)
- Select Git Keys from the menu
Step 2: Create New Git Key
- Click New Key
- Select GitHub PAT from the authentication options
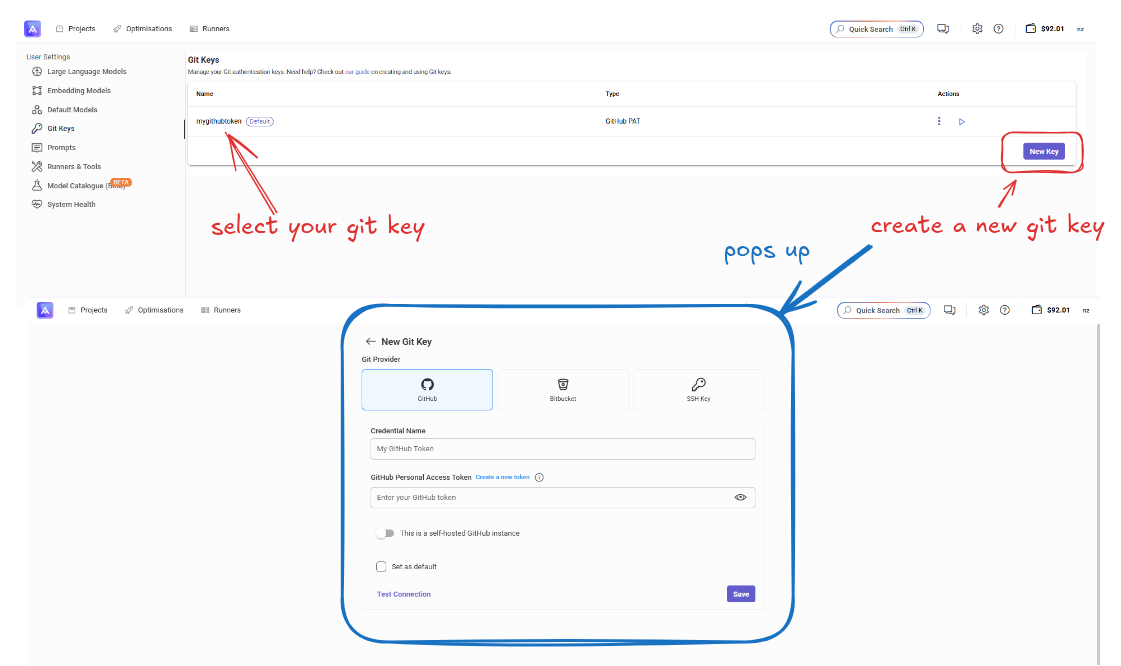
Step 3: Configure PAT Settings
Required Fields:
- Key Name: Descriptive identifier (e.g., "My GitHub PAT")
- GitHub API URL:
https://api.github.com(default) - GitHub Web URL:
https://github.com(default) - Username: Your GitHub username
- GitHub Personal Access Token: Paste your generated token
Advanced Configuration (Optional):
- Default Branch: Specify if different from repository default
- Organization Settings: Additional permissions for org-owned repos
Step 4: Test and Save
- Click Test Connection to verify authentication
- If successful, click Create to save the key
- Your new Git key is now available for project imports
- GitHub PAT Documentation
- Video Tutorial: Creating GitHub PATs (Watch 1:23-4:16)
Method 2: SSH Key Authentication
What is SSH Authentication?
SSH keys provide cryptographic authentication without passwords, offering high security and seamless Git operations across multiple platforms and repositories.
Creating and Configuring SSH Keys
Step 1: Generate SSH Key Pair
Linux/macOS/WSL:
ssh-keygen -t rsa -b 4096 -C "your_email@example.com"
Windows (PowerShell):
ssh-keygen -t rsa -b 4096 -C "your_email@example.com"
Configuration Options:
- Key location: Accept default (
~/.ssh/id_rsa) or specify custom path - Passphrase: Optional additional security layer
- Key comment: Email or identifier for key management
Step 2: Add Public Key to GitHub
- Copy public key content:
cat ~/.ssh/id_rsa.pub
- Add to GitHub:
- Navigate to Settings → SSH and GPG keys
- Click New SSH key
- Paste public key content
- Add descriptive title
- Click Add SSH key
Step 3: Test SSH Connection
Verify connectivity:
ssh -T git@github.com
Expected response: Hi username! You've successfully authenticated...
Configuring SSH Key in Artemis
Step 1: Create SSH Git Key
- In Artemis: Settings → Git Keys → New Key
- Select SSH Key from authentication options
Step 2: Configure SSH Settings
Required Fields:
- Key Name: Descriptive identifier
- Private Key: Paste contents of your private key file (
~/.ssh/id_rsa)
Security Notes:
- Never share your private key
- Use key passphrases for enhanced security
- Regularly rotate SSH keys per security policy
Step 3: Test and Save
- Click Test Connection to verify SSH authentication
- Confirm successful connection to your repositories
- Click Create to save the SSH key configuration
Method 3: Bitbucket App Password
What is a Bitbucket App Password?
Bitbucket App Passwords provide secure, permission-specific authentication for Bitbucket repositories, offering an alternative to account passwords with enhanced security controls.
Creating a Bitbucket App Password
Step 1: Access Bitbucket Settings
- Log in to Bitbucket at Bitbucket.org
- Click Settings icon (top-right) → Personal Bitbucket settings
- Navigate to Access Management → App Passwords
Step 2: Generate App Password
- Click Create app password
- Label: Enter descriptive name (e.g., "Artemis Integration")
- Select Permissions:
Required Permissions:
- Repositories:
- Read: Repository access and cloning
- Write: File modifications and commits
- Pull Requests:
- Read: View existing pull requests
- Write: Create and modify pull requests
- Account:
- Read: Authentication validation
Step 3: Secure App Password
- Click Create to generate password
- Copy immediately - password won't be shown again
- Store securely in password manager
Configuring Bitbucket App Password in Artemis
Step 1: Create Bitbucket Git Key
- Settings → Git Keys → New Key
- Select Bitbucket App Password from authentication options
Step 2: Configure App Password Settings
Required Fields:
- Key Name: Descriptive identifier (e.g., "Bitbucket Main Repos")
- Bitbucket API URL:
https://api.bitbucket.org(default) - Username: Your Bitbucket username
- Bitbucket App Password: Paste the generated app password
Advanced Settings:
- Default Workspace: Specify workspace for organization repositories
- Repository Filter: Limit access to specific repository patterns
Step 3: Validate and Save
- Click Test Connection to verify authentication
- Confirm access to your Bitbucket repositories
- Click Create to save the app password configuration
Using Your Git Keys with Projects
Once you've created any Git key, you can use it to import private repositories into Artemis projects.
Creating Projects with Git Authentication
Step 1: Start New Project
- From Dashboard: Click the [New project] button
- From Code Analysis: Navigate to Code Analysis page and choose your analysis method
Step 2: Configure Project Source
Project Details:
- Name: Enter project name (required)
- Description: Optional project description
- Language: Select primary programming language
Git Repository Configuration:
- Source: Select Git
- Git URL: Enter repository URL in appropriate format:
- HTTPS:
https://github.com/username/repository.git(for PAT, GitHub App, Bitbucket) - SSH:
git@github.com:username/repository.git(for SSH keys)
- HTTPS:
- Branch: Specify branch or use default
- Git Key: Select from your configured authentication keys
Step 3: Advanced Import Options
Repository Settings:
- Submodules: Include Git submodules in analysis
- LFS Files: Handle Git Large File Storage content
- Historical Analysis: Analyze commit history for trends
Access Control:
- Team Sharing: Configure project visibility for team members
- Read-Only Mode: Import without modification capabilities
Step 4: Create and Import
- Validate Settings: Click Test Connection to verify repository access
- Create Project: Click Create Project to begin import
- Monitor Progress: Track import status in real-time
Best Practices Summary
For Individual Developers:
- Use GitHub PAT with minimal required permissions
- Enable GitHub two-factor authentication
- Regularly rotate access tokens (90-day maximum)
- Monitor repository access patterns
For Teams and Organizations:
- Implement GitHub Apps with fine-grained permissions
- Establish key rotation schedules and procedures
- Use separate keys for development and production
- Maintain centralized key management and documentation
For Enterprise Deployments:
- Integrate with corporate identity providers
- Implement automated key lifecycle management
- Establish security monitoring and alerting
- Regular security reviews and compliance audits
Next Steps: