Changesets
Changesets in Artemis are AI-powered code improvement workflows that automatically analyze, fix, and validate changes to your codebase. This guide walks you through the complete changeset process.
Changesets allow you to:
- Create AI-generated code improvements with custom prompts or pre-defined templates
- Validate changes with automated testing
- Create branches and pull requests directly from the Artemis interface
- Track the history of all code modifications
Getting Started
Creating a New Changeset
- Navigate to the Optimise -> Changesets tab in your project
- Click the "+ New changeset" button
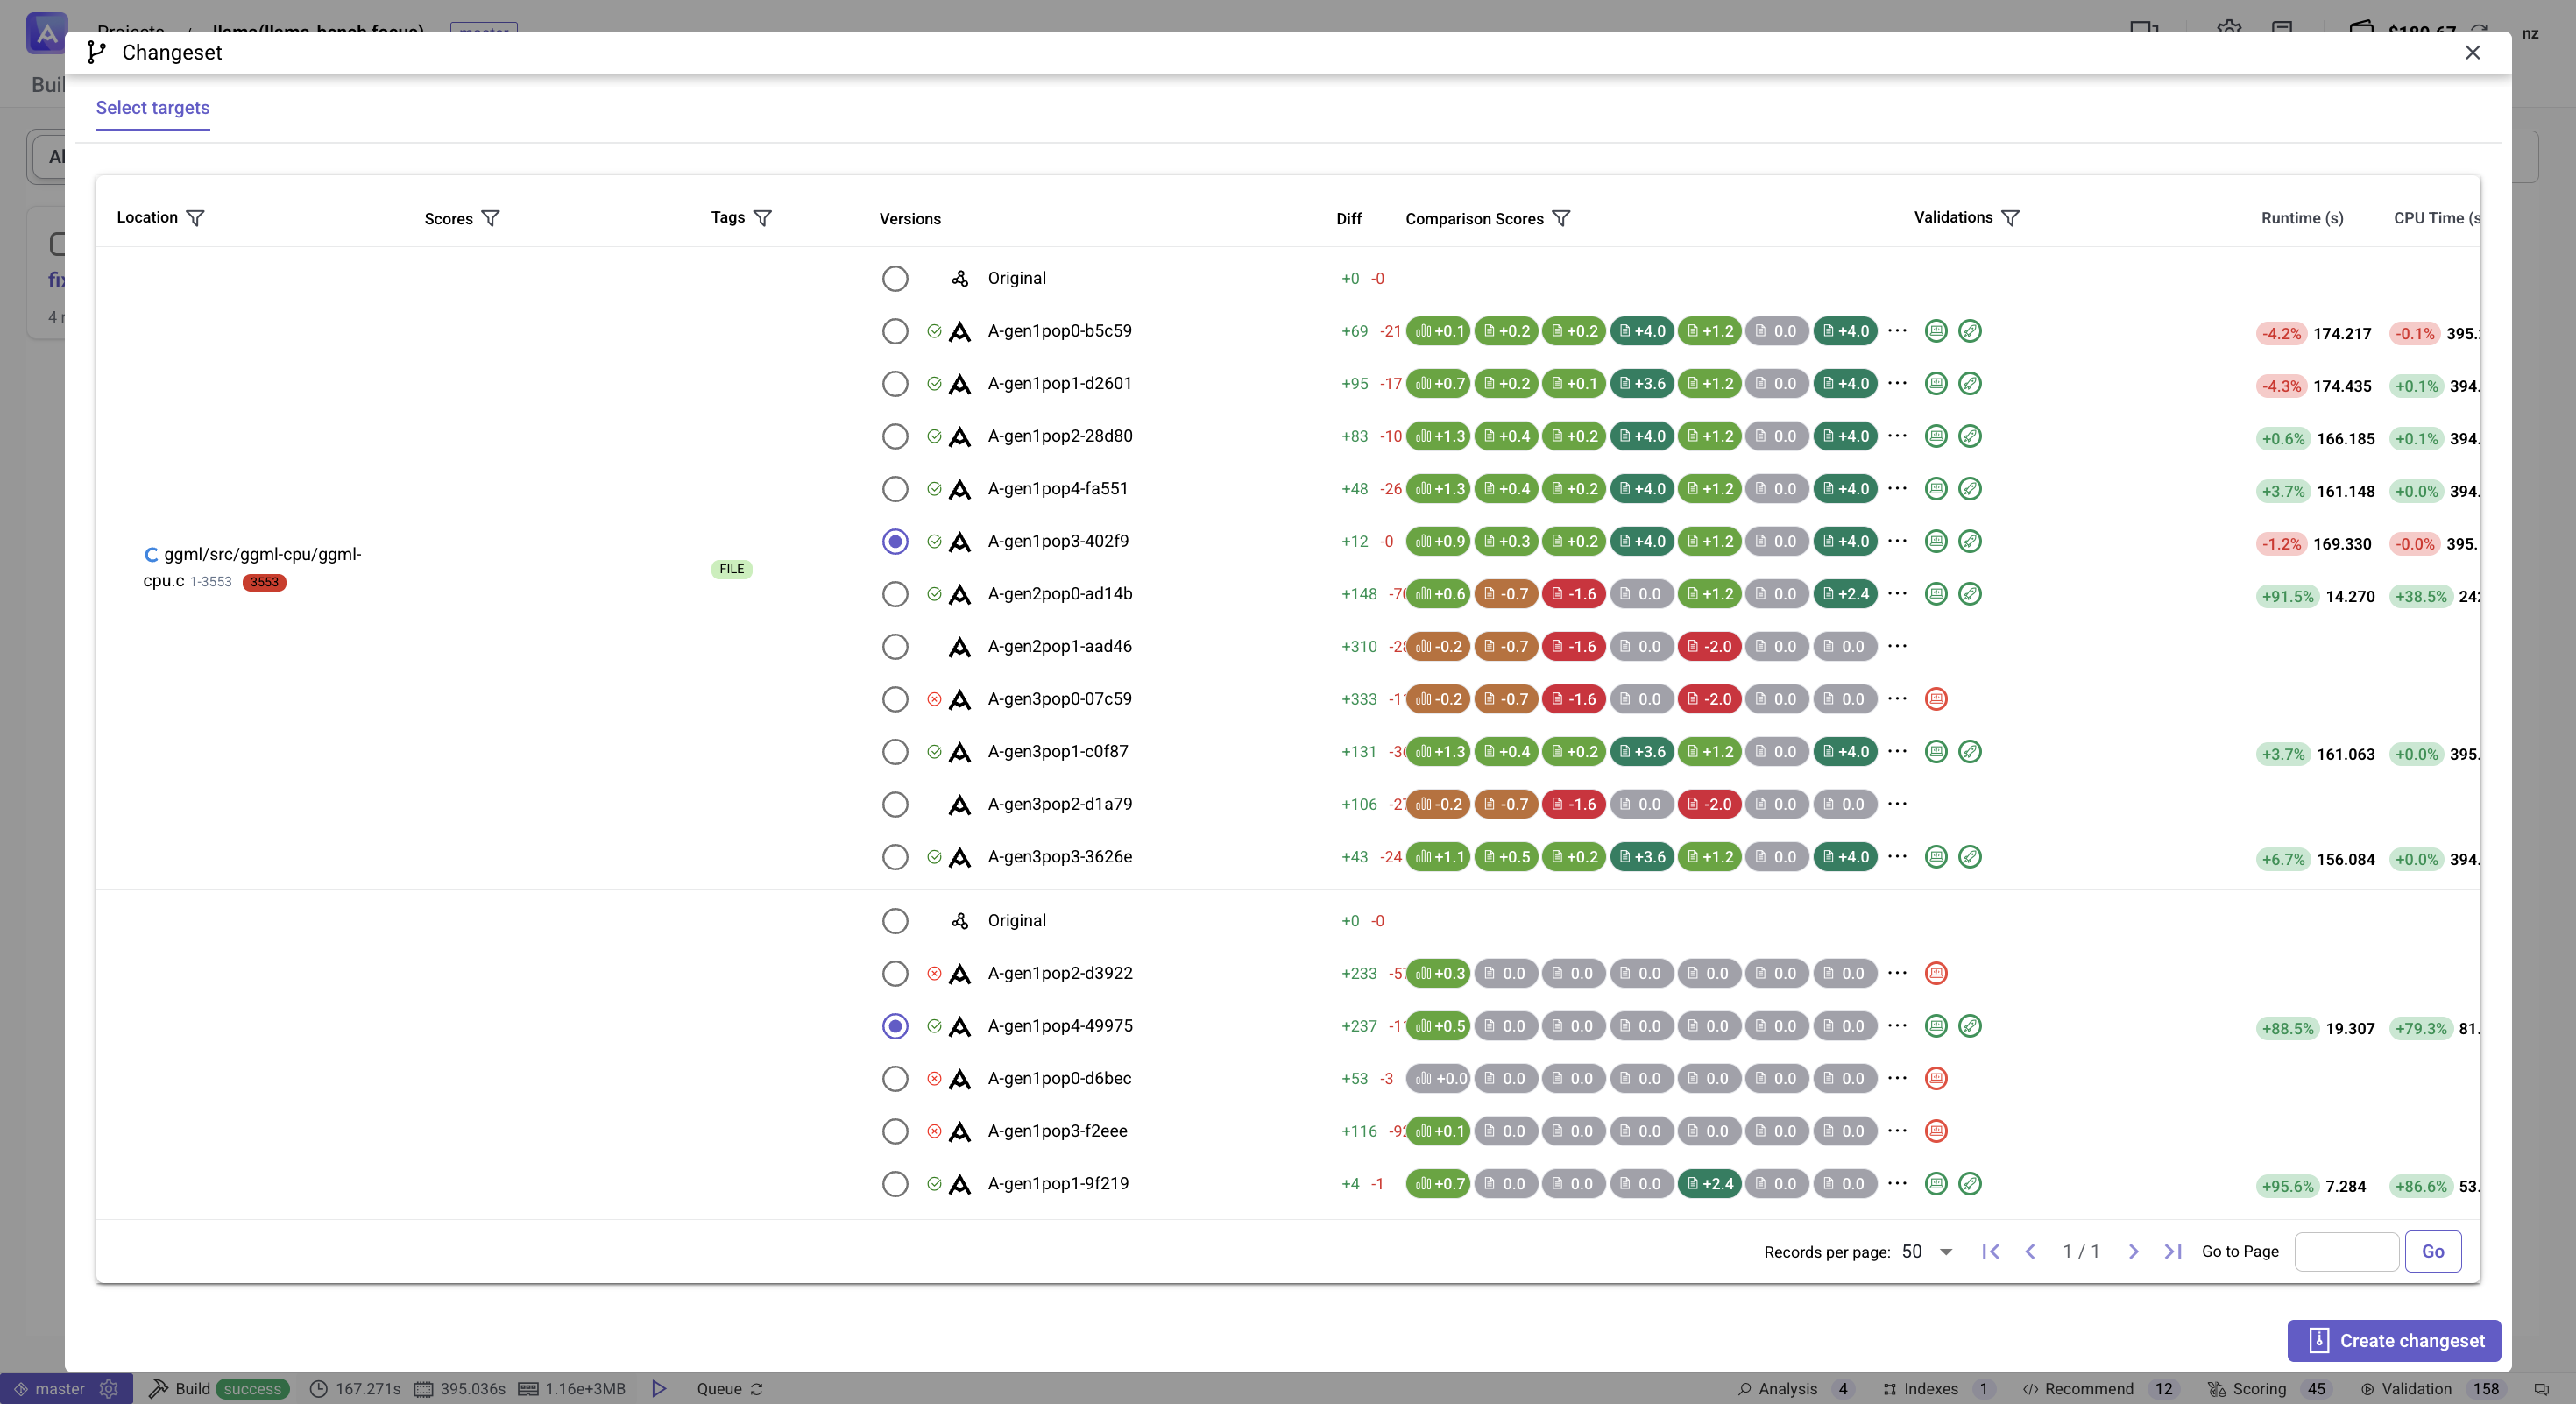
- You'll see the changeset creation interface with the tab: Select targets
This target selection interface is a key component of the using changesets in Optimize workflow where you can apply AI-powered improvements to specific parts of your codebase.
Prerequisites
Before using this feature, you must:
-
Extract your targets - Identify and extract the specific code elements you want to optimize. Learn how to extract targets
-
Generate at least one new version - Create alternative implementations for your extracted targets. The changeset system uses these versions as the foundation for generating improvements. Learn how to generate versions
How It Works
Once you have targets and versions prepared:
- Select one or more targets from your extracted code elements
- Choose which generated versions to include in the changeset
- Artemis will analyze the selected targets and their versions to create comprehensive improvement plans
This targeted approach ensures that changesets focus on the specific code areas you want to optimize, leveraging the AI-generated alternatives you've already validated as potential improvements.
Plan Generation
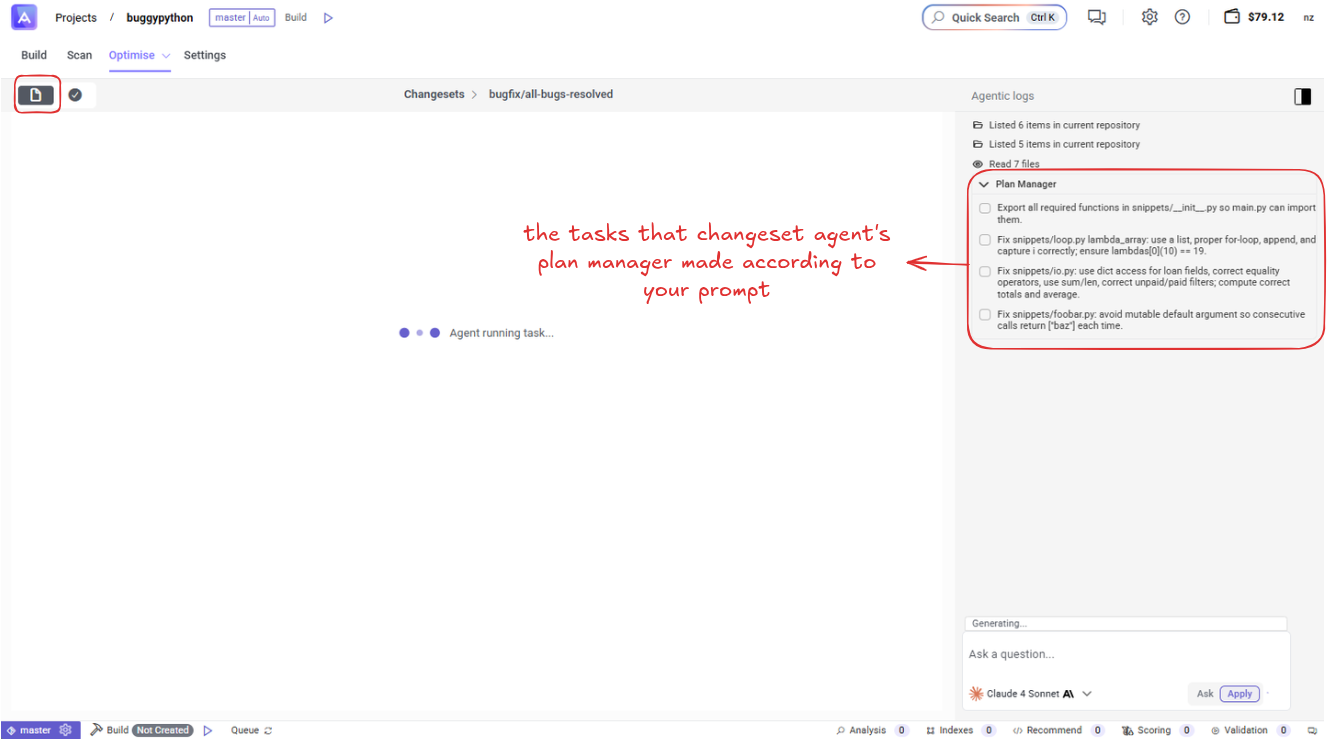
After submitting your prompt:
- Artemis analyzes your codebase and creates a Plan Manager
- The plan shows specific tasks the agent will perform
- Tasks are displayed as checkboxes showing what will be modified
Working with Changesets
Changeset States
Changesets progress through several states:
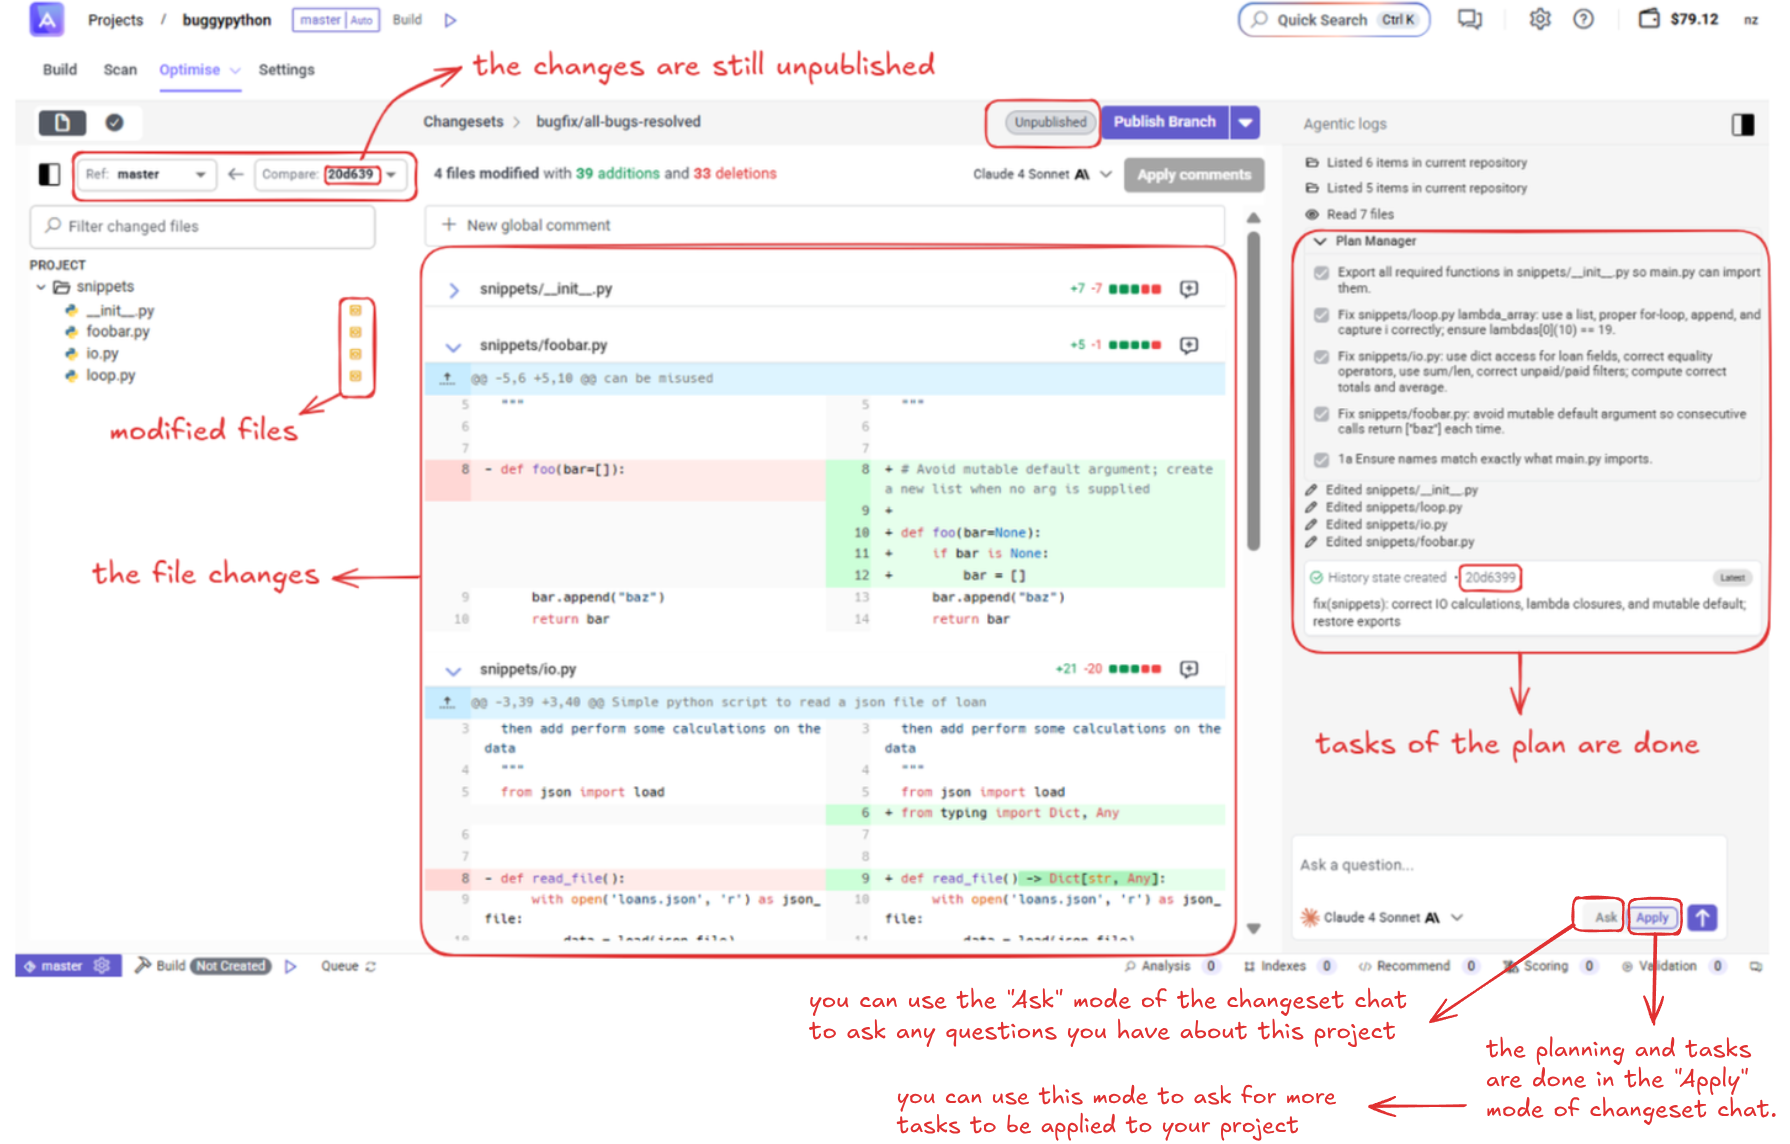
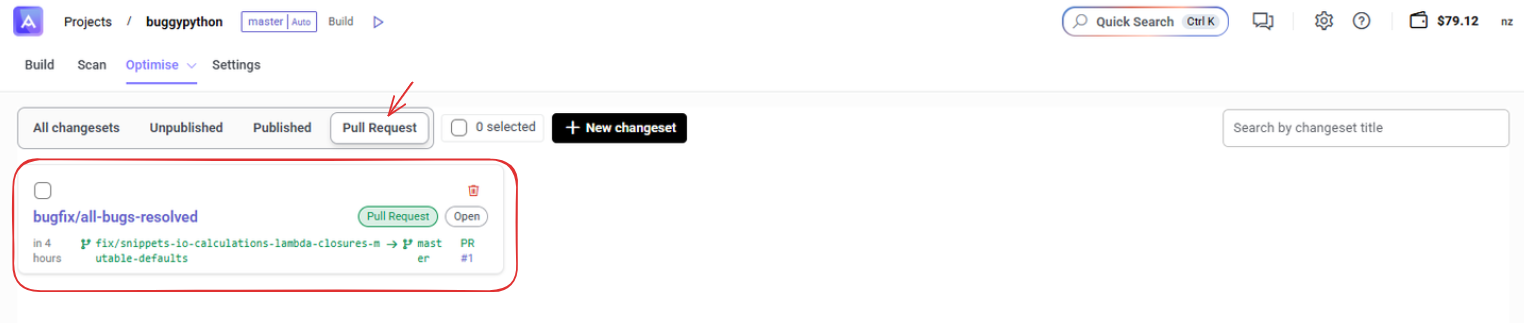
- Unpublished - Initial state after creation
- Pull Request - When a PR has been created
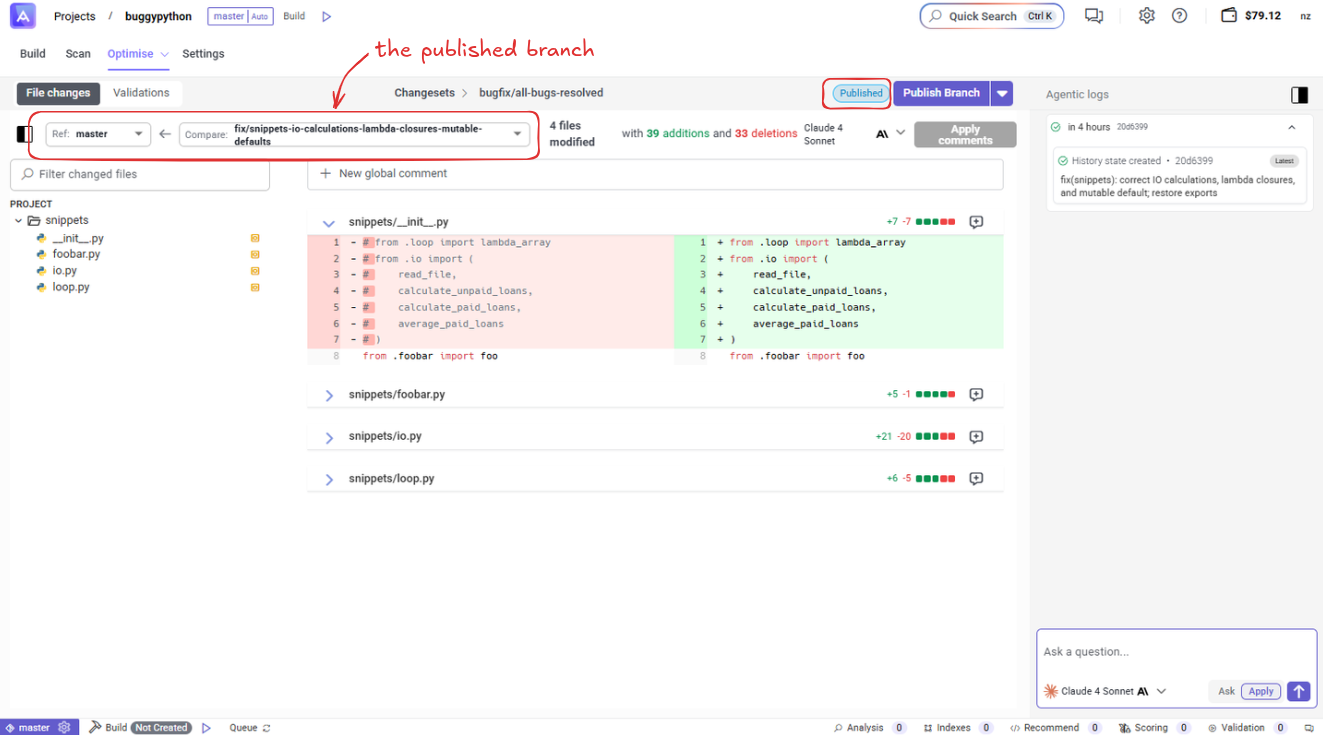
- Published - When changes have been published to a branch
Viewing Changeset Details
Once a changeset is created, you can:
- View the Agentic logs showing the AI's reasoning and progress
- See File changes with detailed diff views
- Track Plan Manager task completion
- Monitor validation results
Code Changes and Validation
The interface shows:
- Modified files with addition/deletion counts (e.g., +39 -33)
- File-by-file diff views with syntax highlighting
- Before and after code comparisons
- Validation status for each change
Validation and Testing
Setting Up Validation
Navigate to the Validations tab in your changeset:
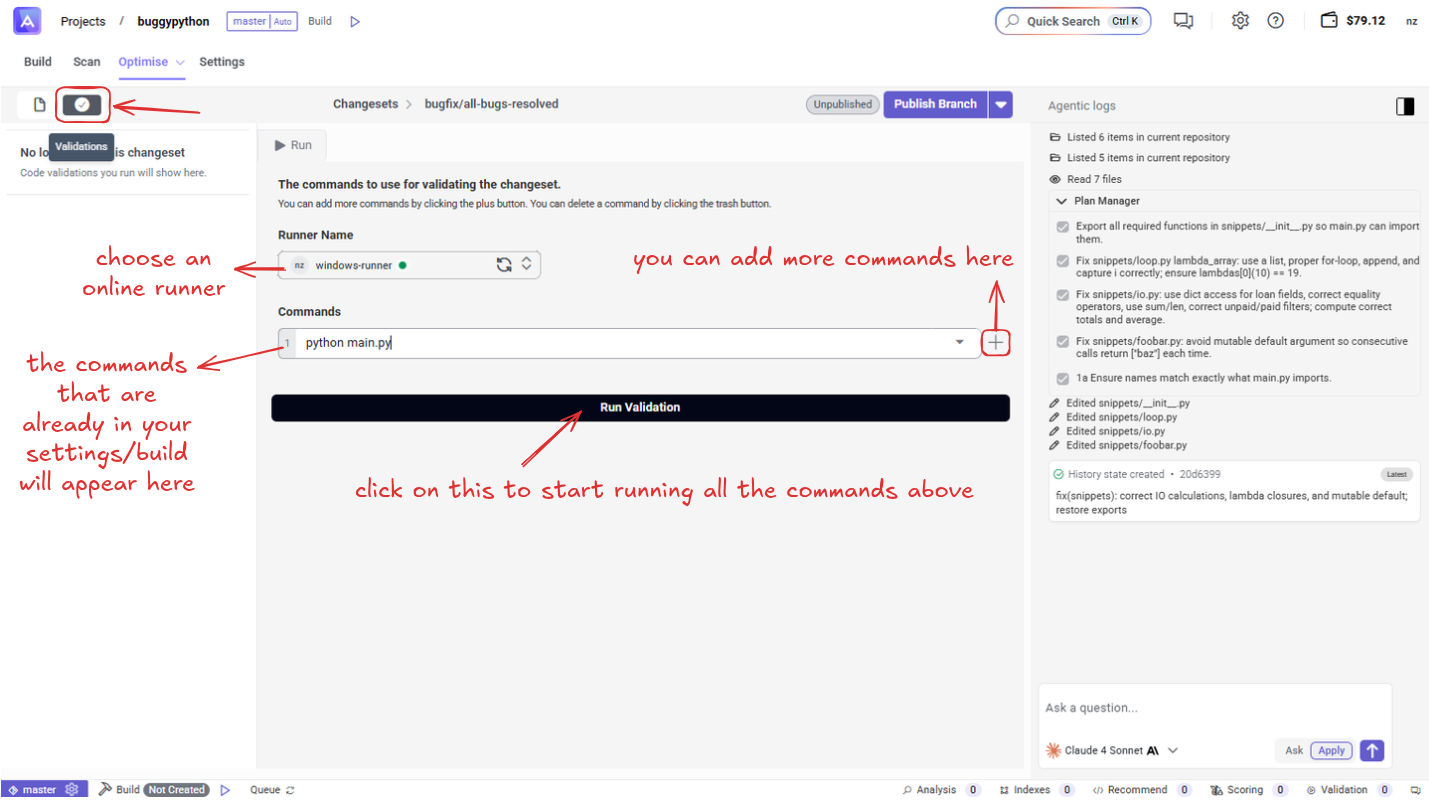
- Choose an online runner or configure your own
- Add validation commands:
- Commands from your existing build settings appear automatically
- Add additional commands using the "+" button
Running Validations
- Click "Run Validation" to execute all commands
- View results in real-time during execution
- After completion, see the validation results
Validation Results
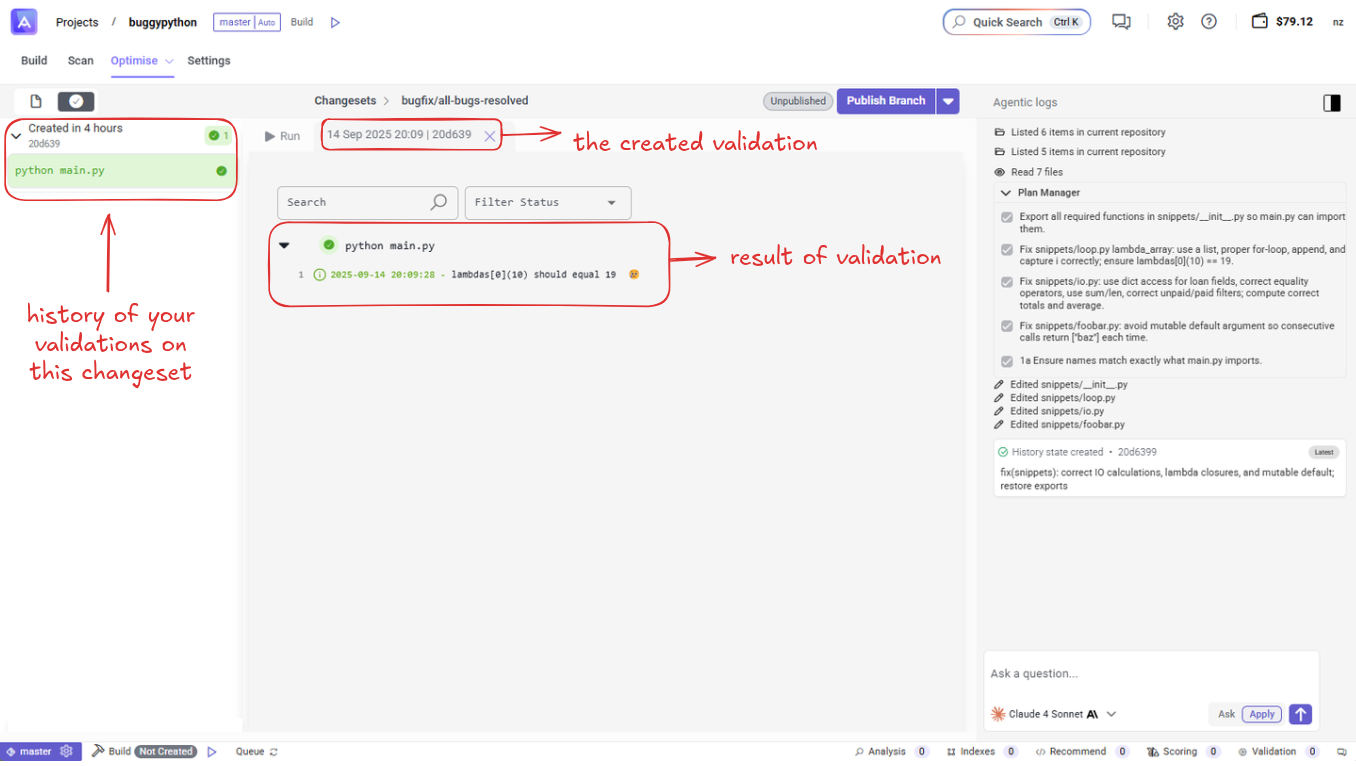
- Validation history is preserved for reference
- Successful validations show green status indicators
- View detailed logs and results for each validation run
Publishing Changes
Publishing a Branch and Creating a Pull Request
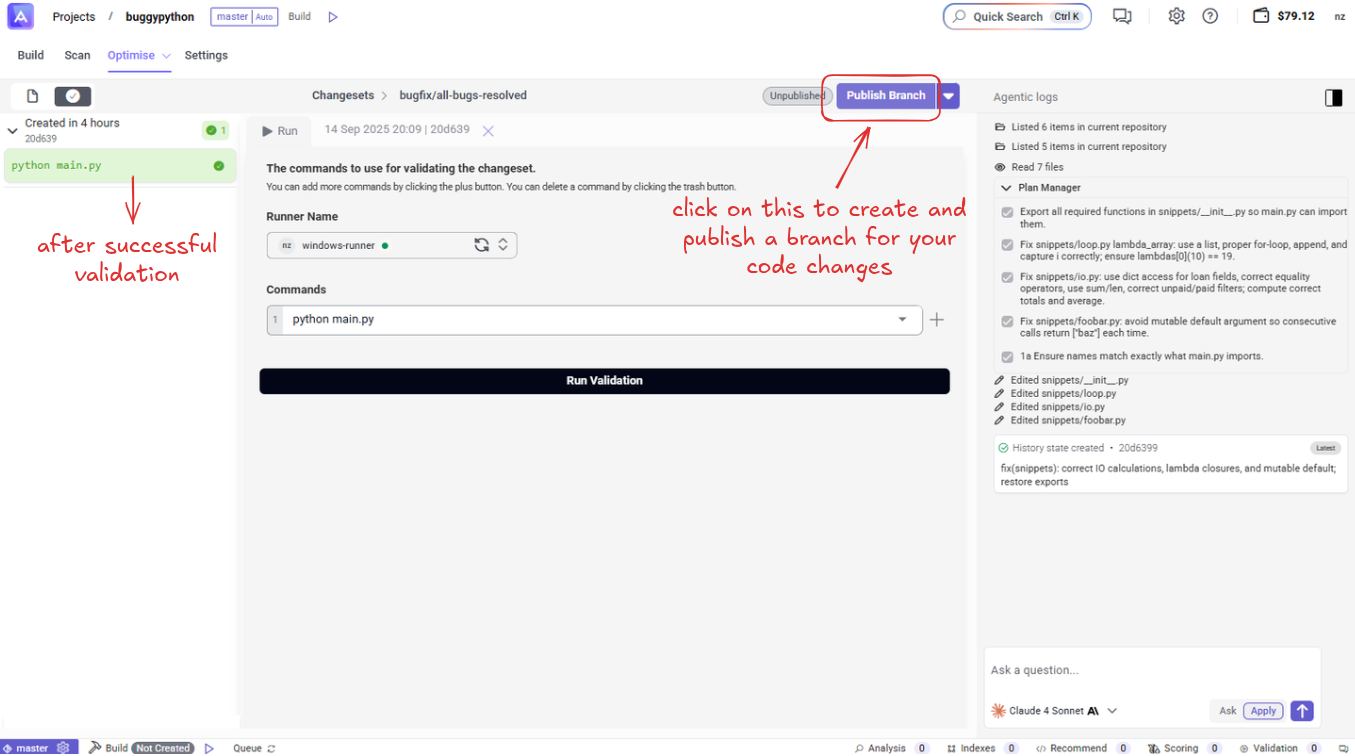
- After validation passes, click "Publish & Create Pull Request"
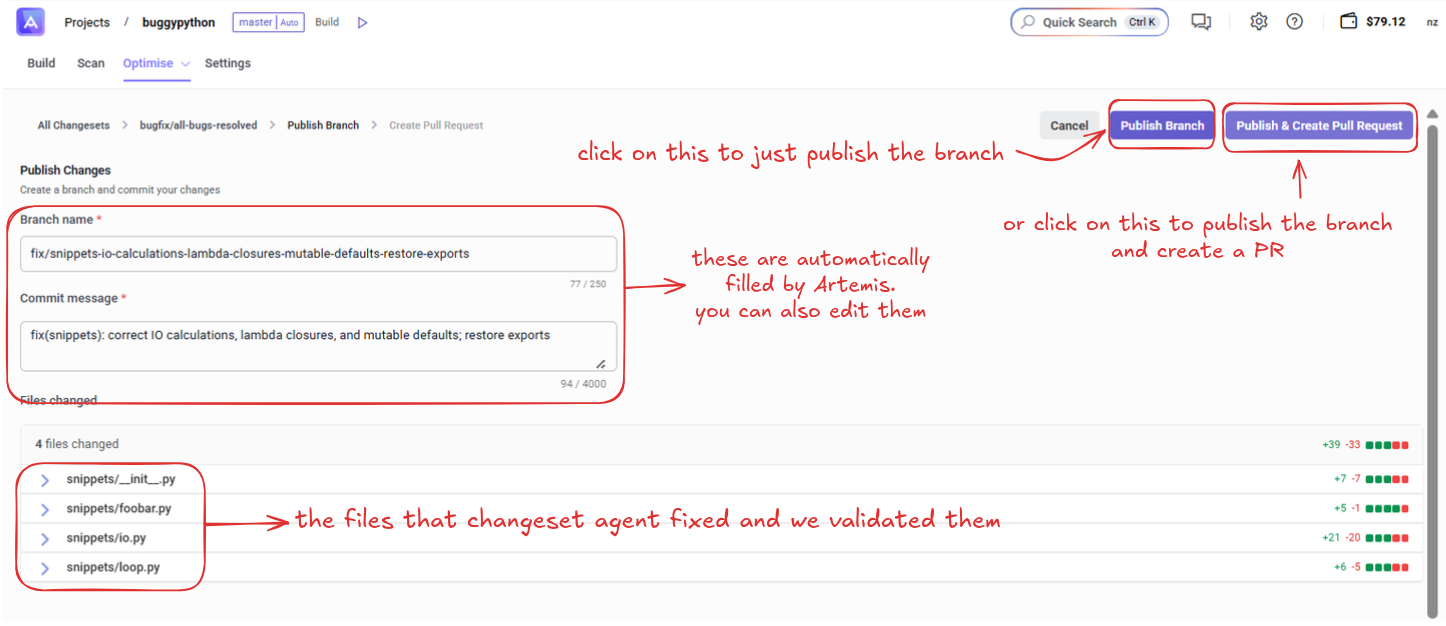

- Artemis automatically fills in:
- Title: Descriptive summary of changes
- Description: Detailed explanation of improvements made
- You can edit these fields before submitting
- Choose between:
- "Submit PR" - Create pull request immediately
- "Publish Branch" - Just create the branch without PR
Branch Management
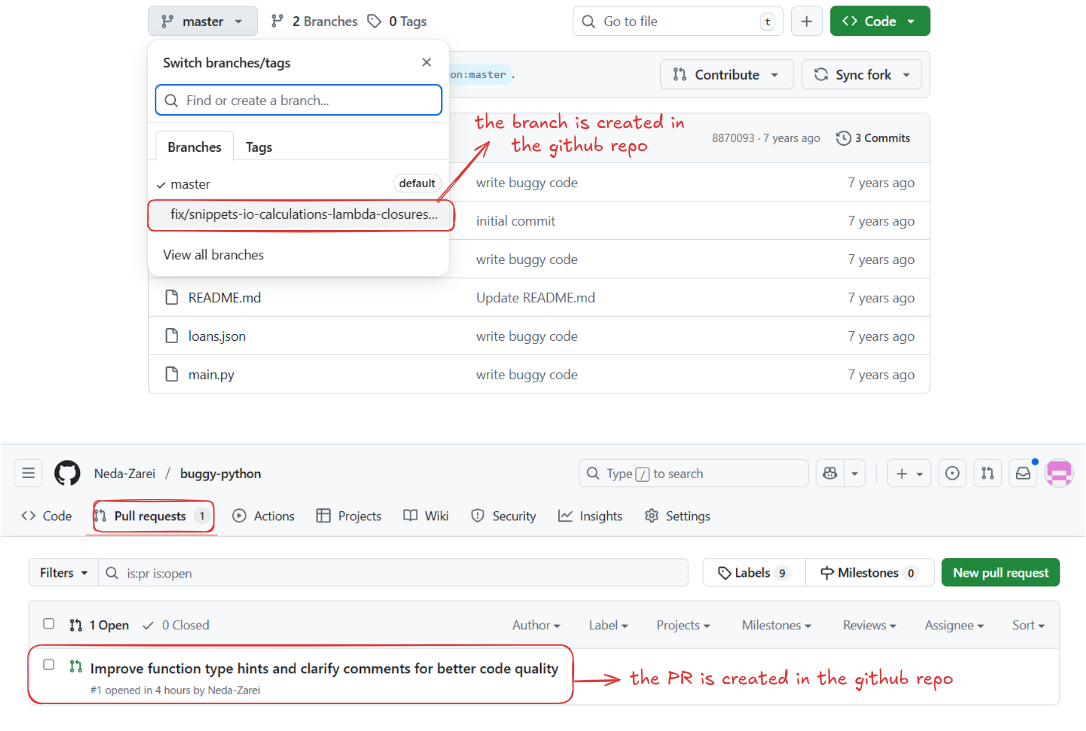
Branches are automatically created in your Git repository:
- Branches are automatically named
- The branch appears in your Git repository
- Pull requests are created in your connected Git platform (GitHub, GitLab, etc.)
Best Practices
Writing Effective Prompts
- Be specific about the issues you want to address
- Mention specific files or functions if relevant
- Describe the desired outcome clearly
- Use technical terminology appropriate for your codebase
Review Process
- Always review the generated plan before proceeding
- Check the file changes in the diff view
- Ensure validation passes before publishing
- Review the auto-generated PR description and edit if needed
Managing Multiple Changesets
- Use descriptive names/prompts for easy identification
- Track changeset status in the main Optimize view
- Archive or clean up old changesets as needed
Troubleshooting
Validation Failures
- Check the validation logs for specific error messages
- Verify your runner configuration
- Ensure all dependencies are properly set up
- Re-run validation after making manual corrections
Branch Conflicts
- Pull latest changes from main branch before creating changesets
- Resolve any merge conflicts in your Git platform
- Consider rebasing the changeset branch if needed
Integration with Git Platforms
Changesets integrate seamlessly with:
- GitHub (pull requests, branch management)
- GitLab (merge requests)
- Other Git platforms through standard Git workflows
The created branches and pull requests maintain full Git history and can be managed through your normal Git workflow alongside Artemis.