Artemis Navigator VS Code Extension
Artemis Navigator is the official VS Code extension that brings intelligent planning into your IDE. Unlike generic AI coding tools that guess your intent, Artemis Navigator captures your requirements through targeted questions, generates structured plans, and delivers reliable results without the prompt ping-pong.
Artemis Planning is done online inside Artemis Cloud, can be shared across devices, and doesn't stop if you shut down your machine. Plan new projects without switching branches, start multiple plans in parallel and kick off side tasks without disrupting your local code.
- Watch Atemis Navigator in action
Artemis official VS Code extension
Why Artemis Navigator?
Traditional AI coding assistants often produce quick but unfocused results because they work from vague prompts. Artemis Navigator solves this by:
- Capturing Intent: Interactive Q&A ensures the AI understands exactly what you need
- Strategic Planning: Breaking complex features into structured, manageable tasks
- Context-Aware: Questions are targeted to YOUR codebase, not generic templates
- Adaptive Plans: Plans evolve with your project, allowing manual adjustments for both human and AI tasks
- AI-Ready Prompts: Auto-generates highly optimized, repo-aware instructions for any AI coding tool
This is the difference between "vibe coding" and agentic engineering—Artemis transforms AI development from guesswork into a systematic process you can trust.
Installation & Authentication
Download the Extension
Download and install Artemis Navigator from either of these marketplaces:
After installing the extension, you'll need to authenticate with your Artemis account. The setup process includes:
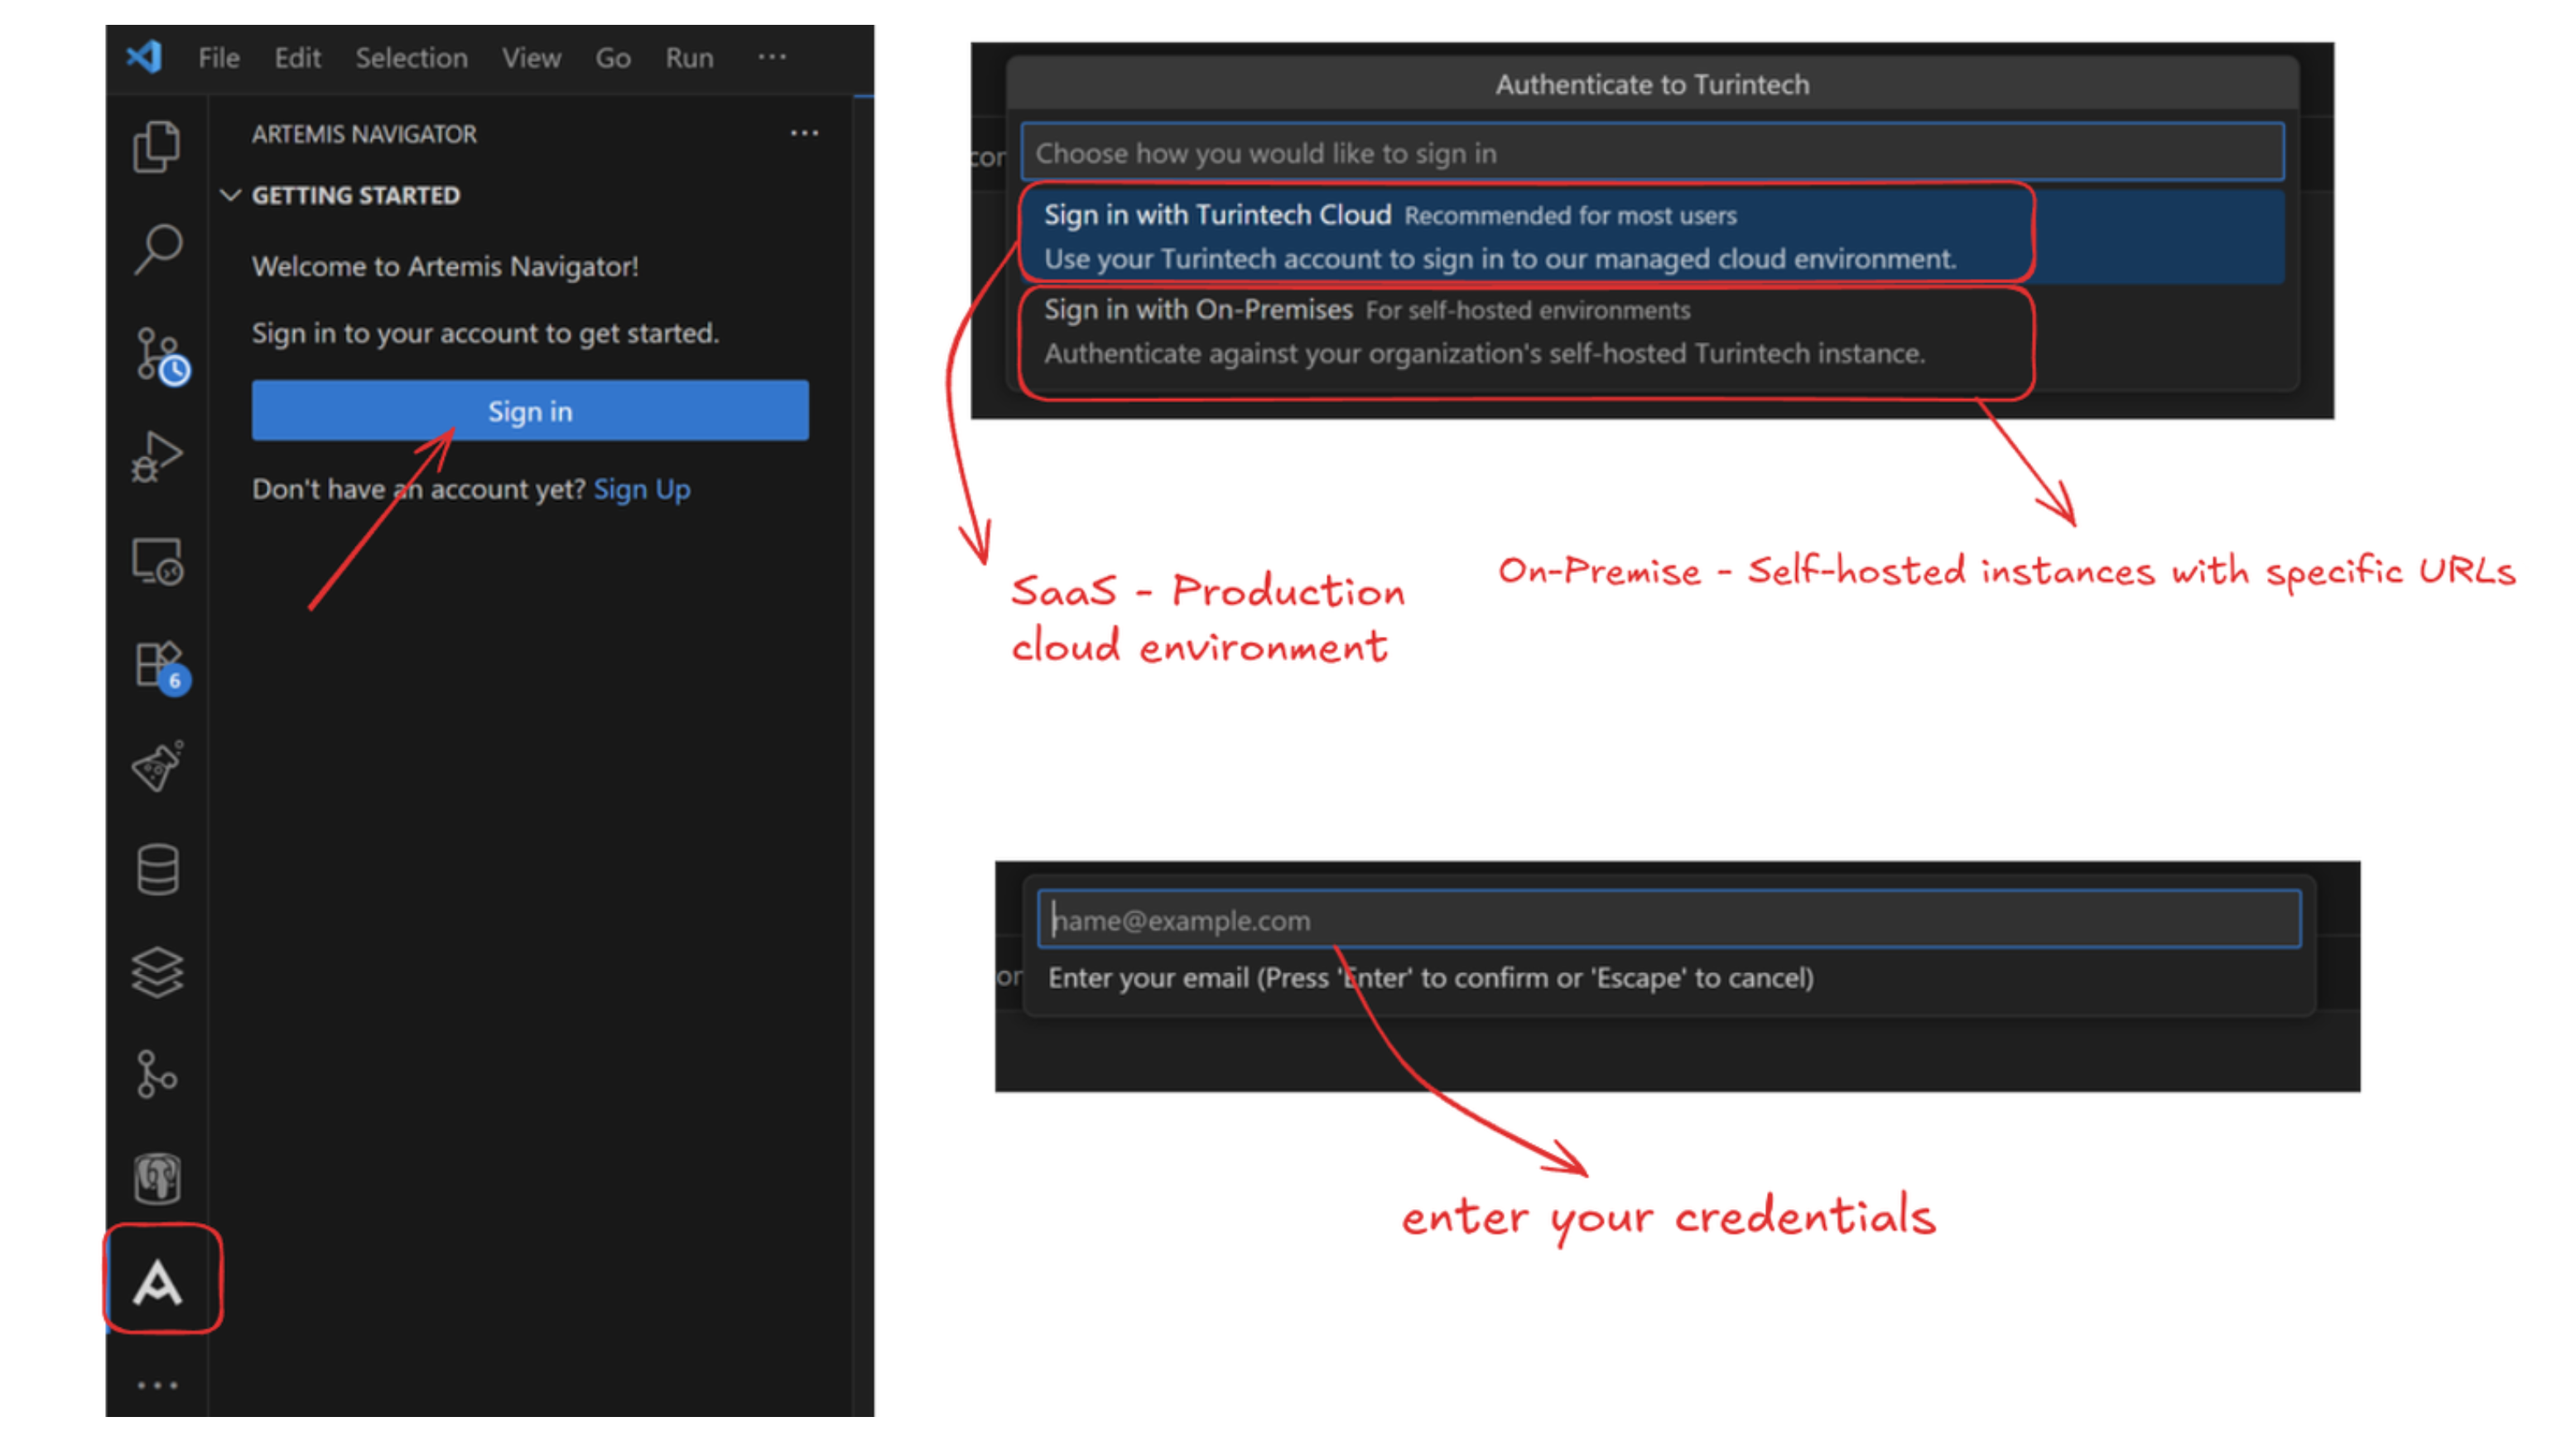
1. Sign In to Your Artemis Account
Click the Sign in button in the Getting Started panel, or click "Don't have an account yet? Sign Up" to create a new account.
2. Select Your Authentication Method
Choose how you would like to authenticate:
- Sign in with Turintech Cloud (Recommended): For most users accessing the production SaaS environment
- Use your Turintech account: For users with managed cloud environments
- Sign in with On-Premises: For self-hosted environments. Requires your organization's specific Turintech instance URL
3. Enter Your Credentials
Enter your email address and password, then complete the authentication flow.
Once authenticated, you'll have access to all your Artemis projects directly in VS Code.
Getting Started
1. Access Your Projects
Once the extension is installed and you've signed in, you'll see the Artemis Navigator icon in the sidebar. Click it to view all your projects.
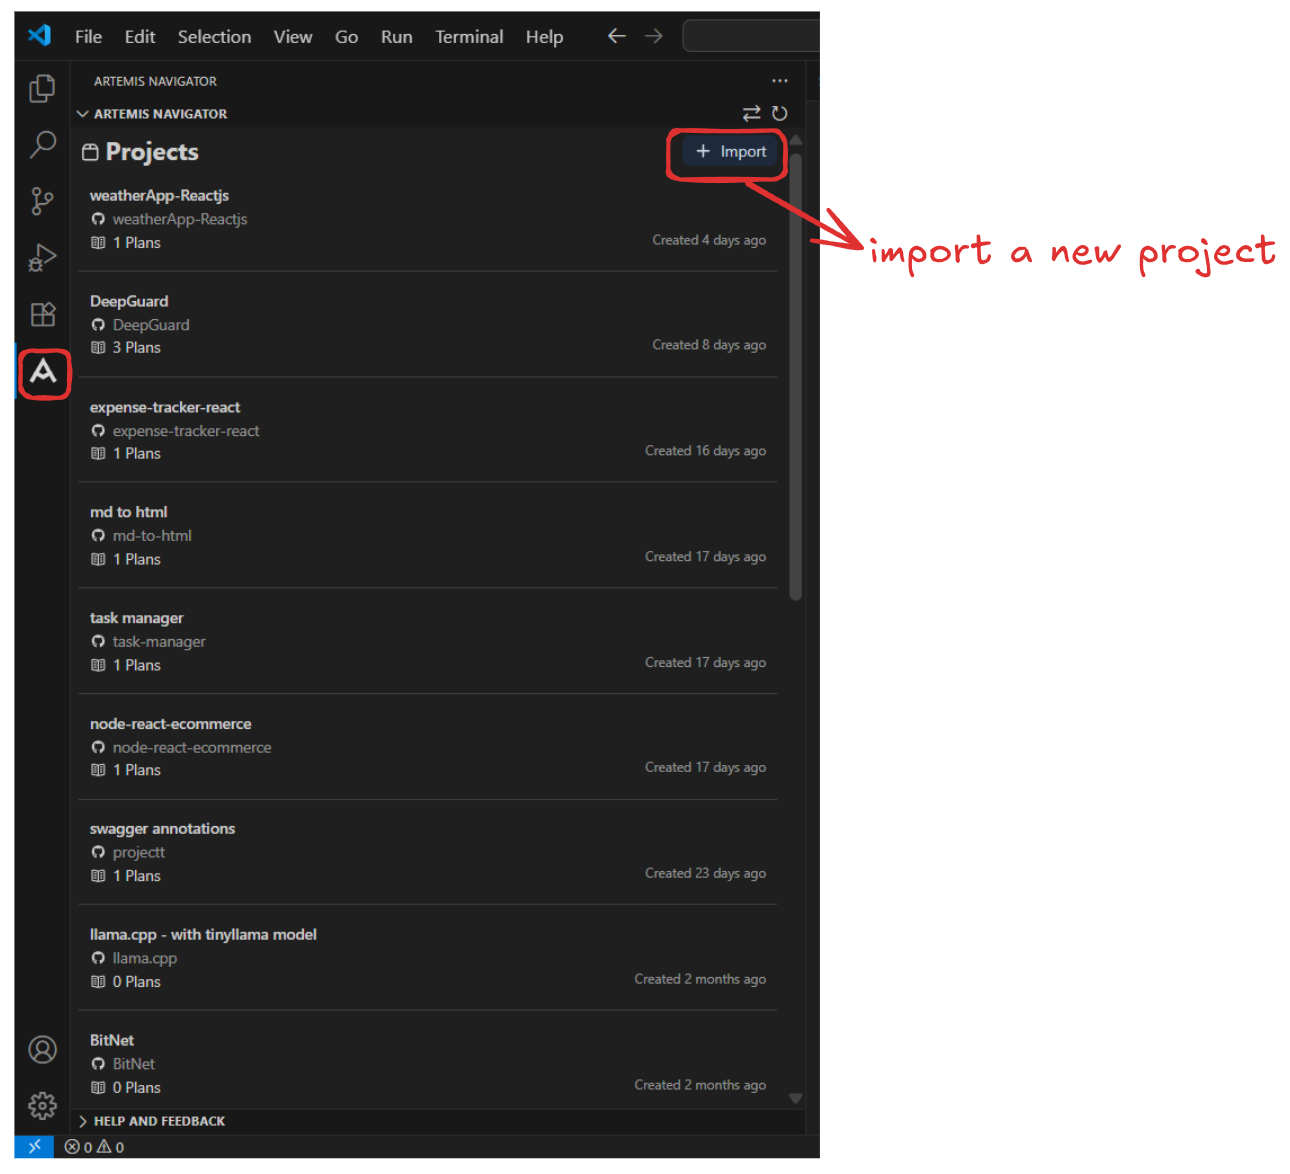
Here you can:
- Browse all your Artemis projects
- Import new projects using the + Import button
- See project creation dates and associated plans
- Access project repositories and plan history
2. Create a Plan
Select a project to open it, then use the input field to describe your feature, refactoring task, or structural change.

Step 1: Write your prompt in the text field (e.g., "Add AI assistant that gives personalized advice based on the weather")
Step 2: Click the submit button to start the planning process
This is where Artemis differs from generic AI tools—instead of immediately generating code, it enters Plan mode to understand your requirements.
3. Interactive Requirements Gathering
Artemis asks intelligent, context-aware questions to capture your intent and requirements.
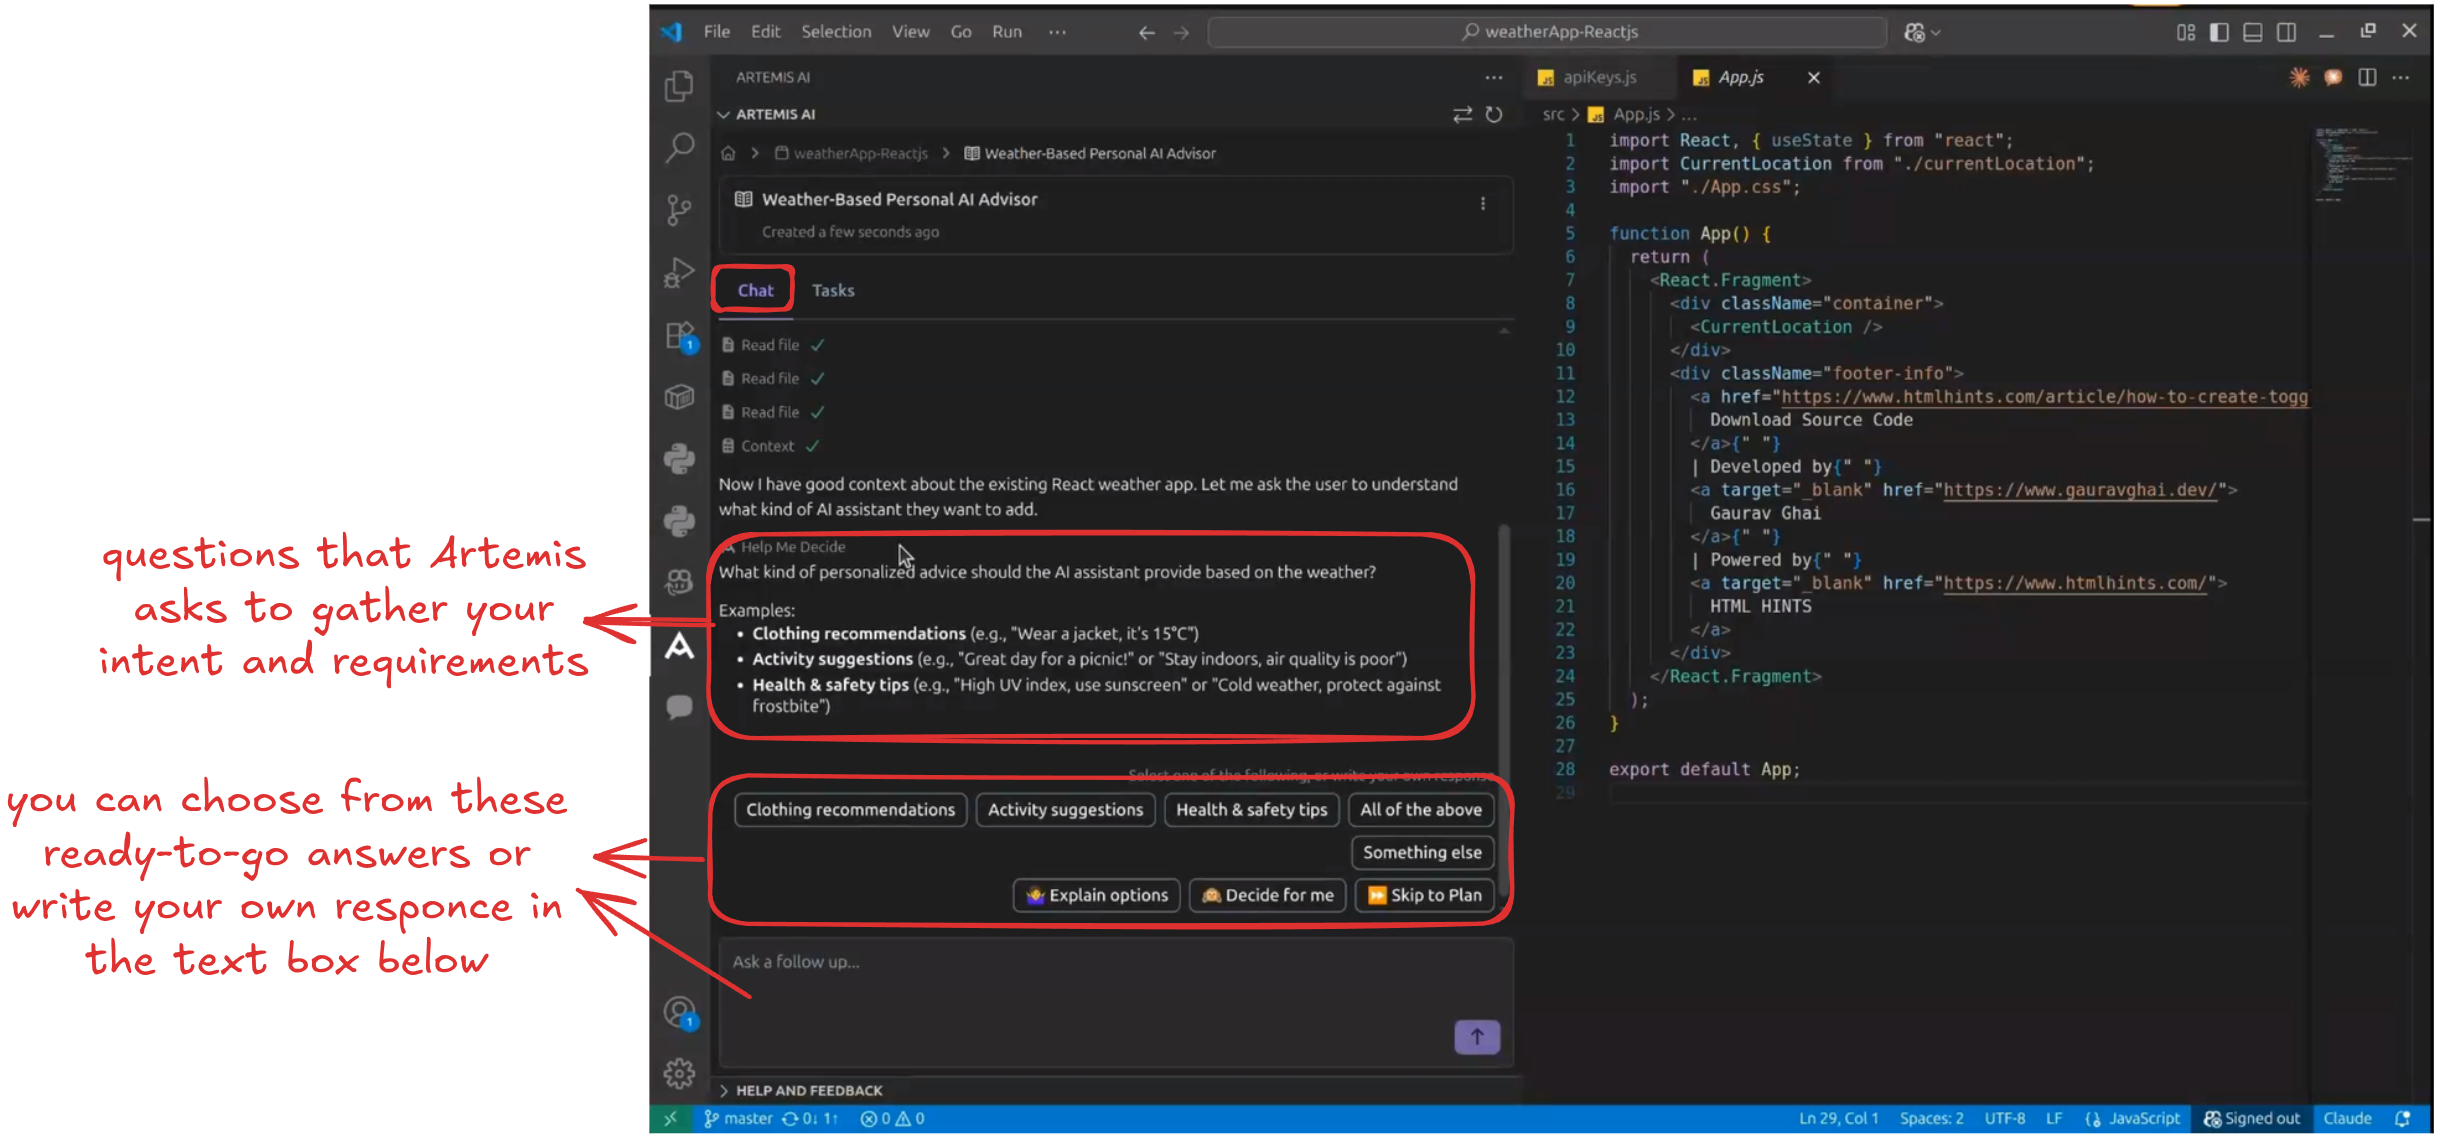
These questions are:
- Codebase-specific: Based on YOUR project structure, not generic templates
- Teaching moments: Revealing feature possibilities and architectural considerations you might not have considered
- Flexible: Choose from suggested options or type your own custom response
For example, when asked "What kind of personalized advice should the AI assistant provide?", Artemis shows you distinct categories you might not have initially considered—helping you think through the feature more thoroughly.
4. Review Plan Summary
Before generating the detailed plan, Artemis creates a summary with decision checkpoints.
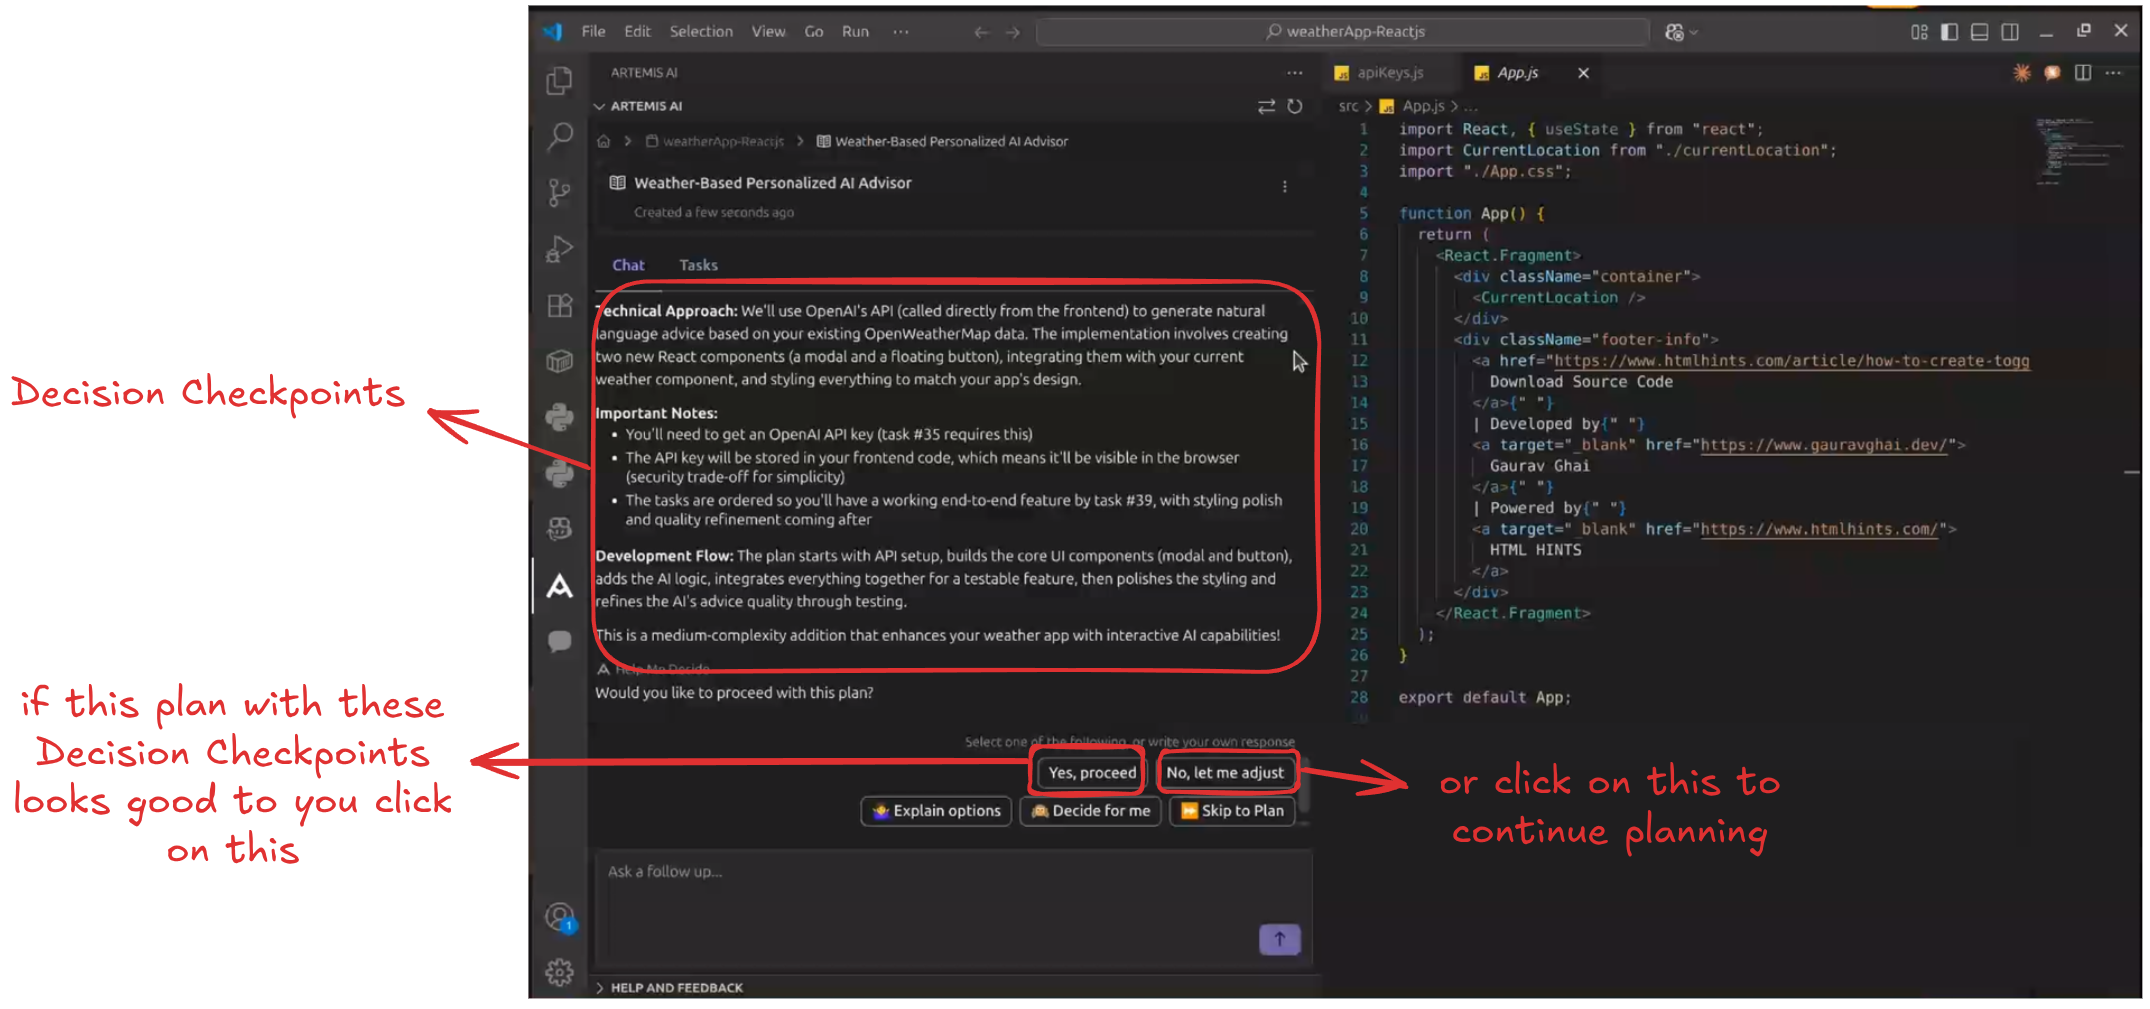
This summary includes:
- Technical Approach: Architectural decisions and implementation strategy
- Important Notes: Critical considerations like API keys, security, and dependencies
- Development Flow: Step-by-step execution plan
This is your chance to catch costly mistakes early. It doubles as lightweight documentation, so you can show exactly what was agreed upon.
Review and decide:
- Click "Yes, proceed" if the plan looks good
- Click "No, let me adjust" to continue refining requirements
5. View the Plan Dashboard
Once approved, Artemis generates a comprehensive task breakdown grouped by phase if the plan requires multiple phases.
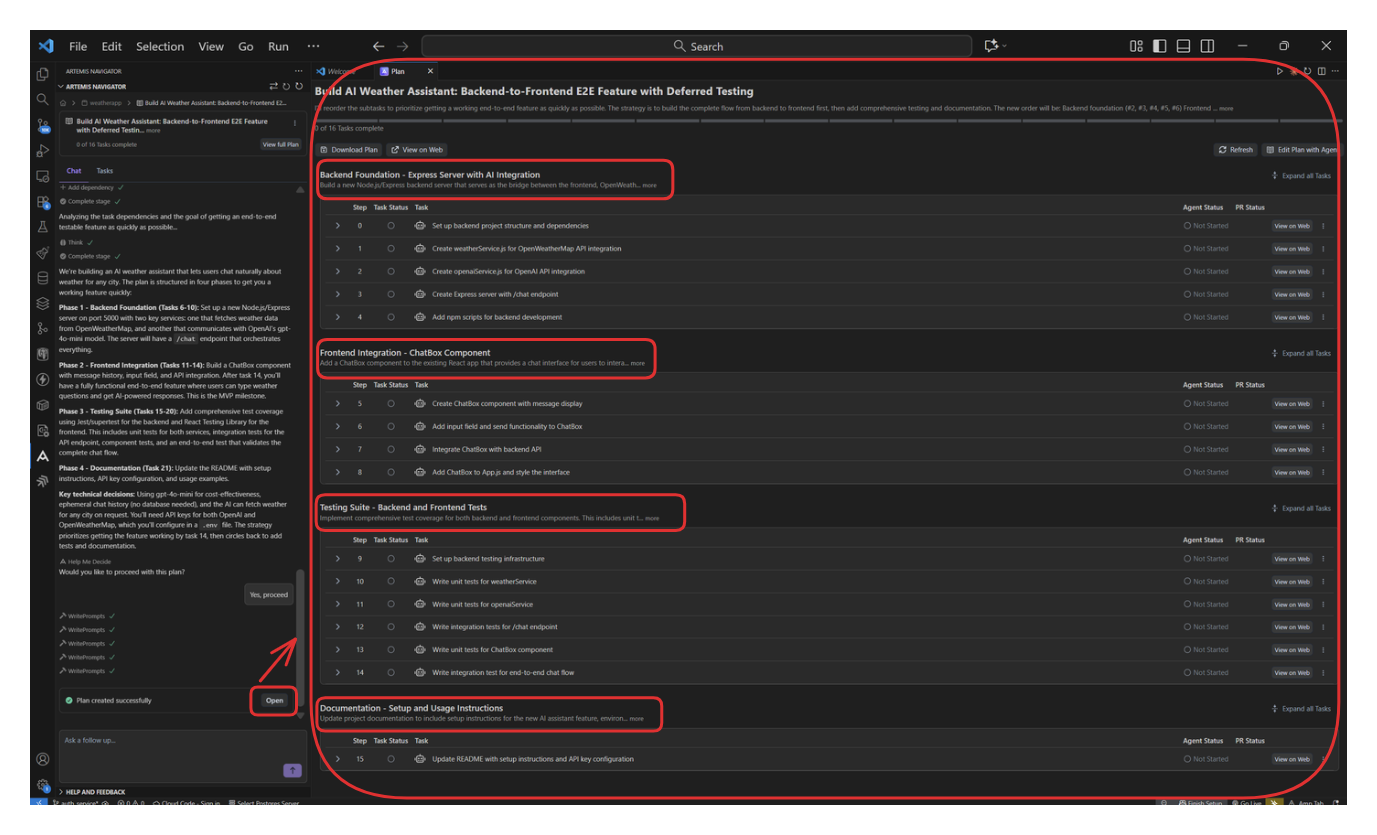
The Plan Dashboard includes:
- Progress bar: Visual tracking of completed vs. remaining tasks.
- Task hierarchy grouped by phase: Tasks are structured into phases. Inside each phase, subtasks are presented in a clear hierarchy which gives you an organized view of scope, dependencies, and logical execution flow.
- Task assignees: Each task is marked as assigned to either the User or the Agent.
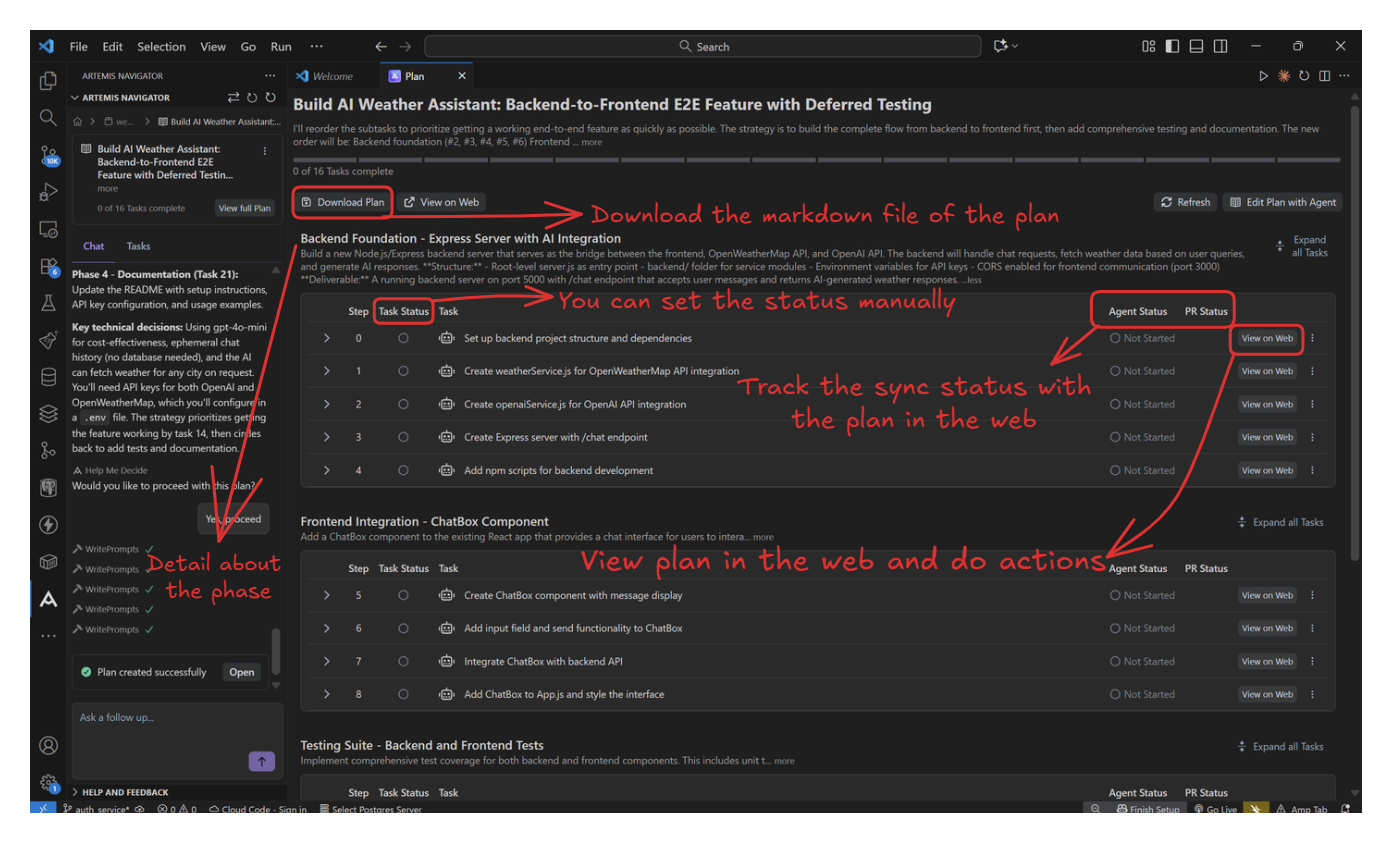
- View on Web: Opens the selected task directly in the Artemis Web App for actions, execution, and git operations.
- Task status: You can manually set any task as complete or skipped.
- Agent status: Shows the sync state between VS Code and the Artemis Web plan.
Additional actions:
- Download Plan (Markdown) Exports the entire plan including phases, task hierarchy, task descriptions, and assignments as a clean Markdown file. Useful for documentation, review, knowledge sharing and using external AI tools.
- Edit plan with agent Ask the agent to refine or reorganize the plan when needed.
And note: Not every task is assigned to the Agent. Artemis assigns tasks based on their nature, splitting work between human and AI where it makes the most sense.
Subtask steps may not appear in strict sequential order.
It's because Artemis groups tasks by detailed, categorized phases to improve clarity.
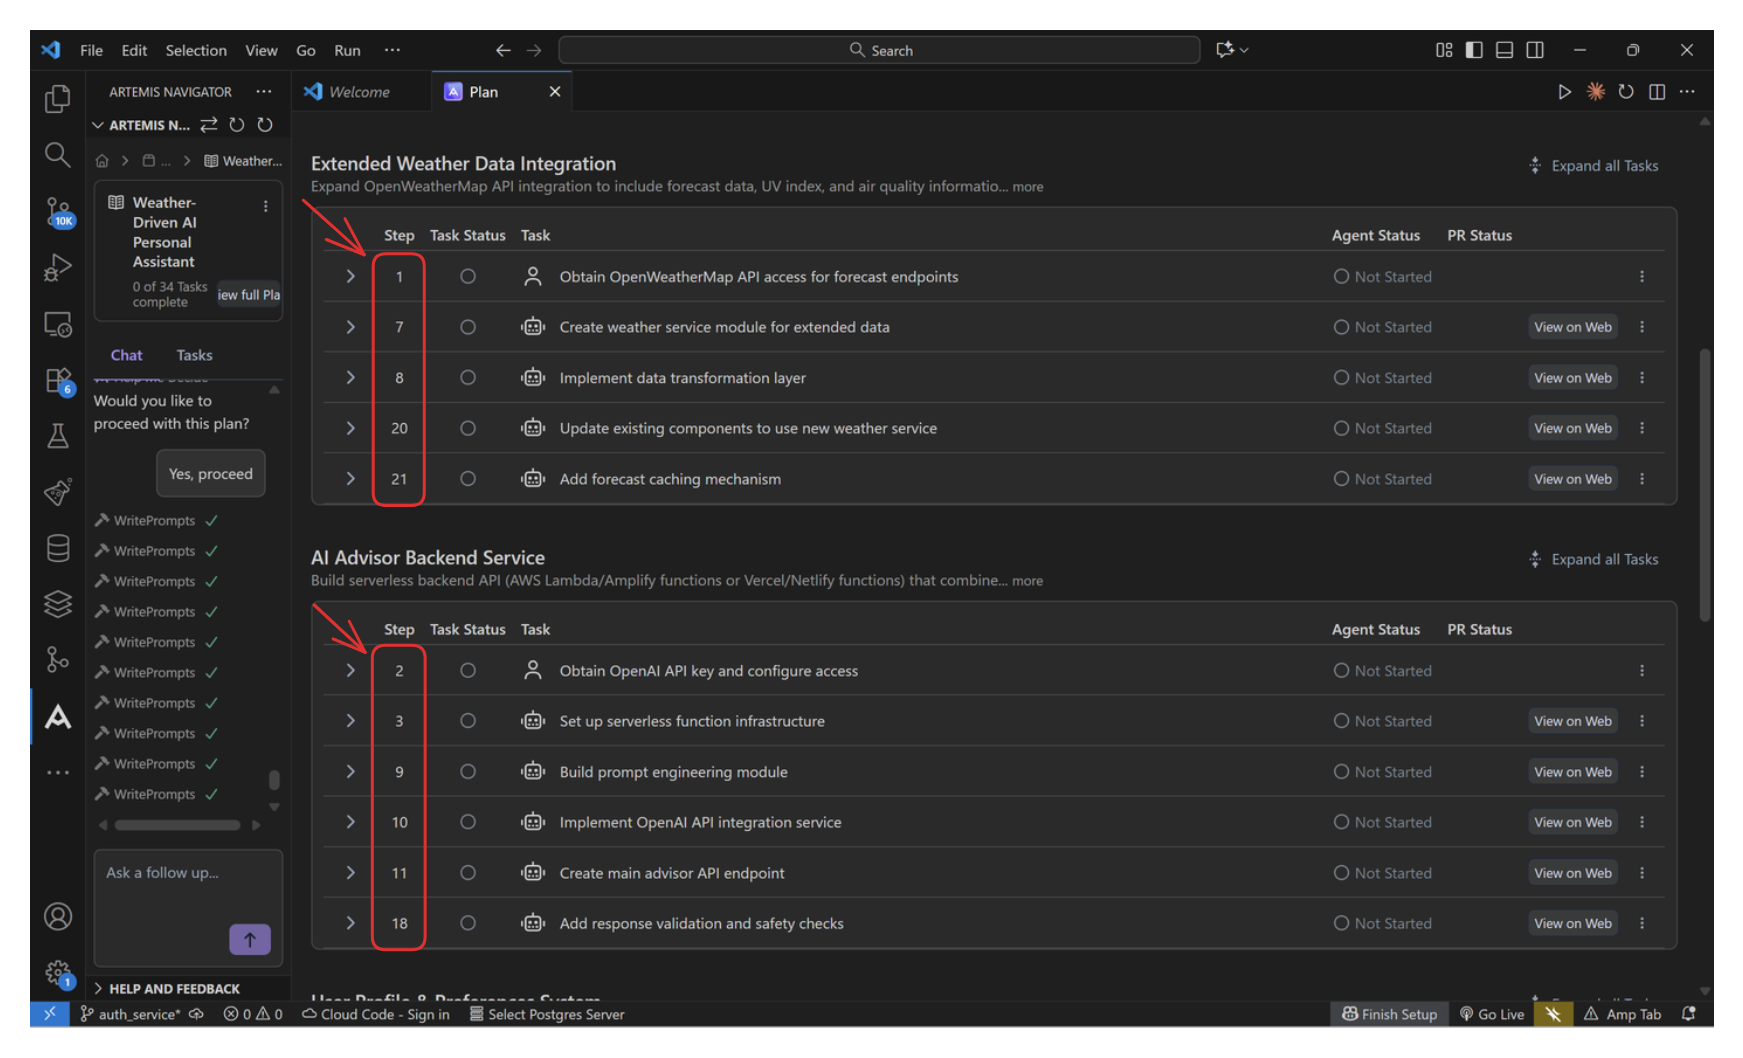
In the Artemis Web you can choose how to see the subtasks.

6. Working with Individual Tasks
Click on any task to expand its details and access AI-optimized prompts.
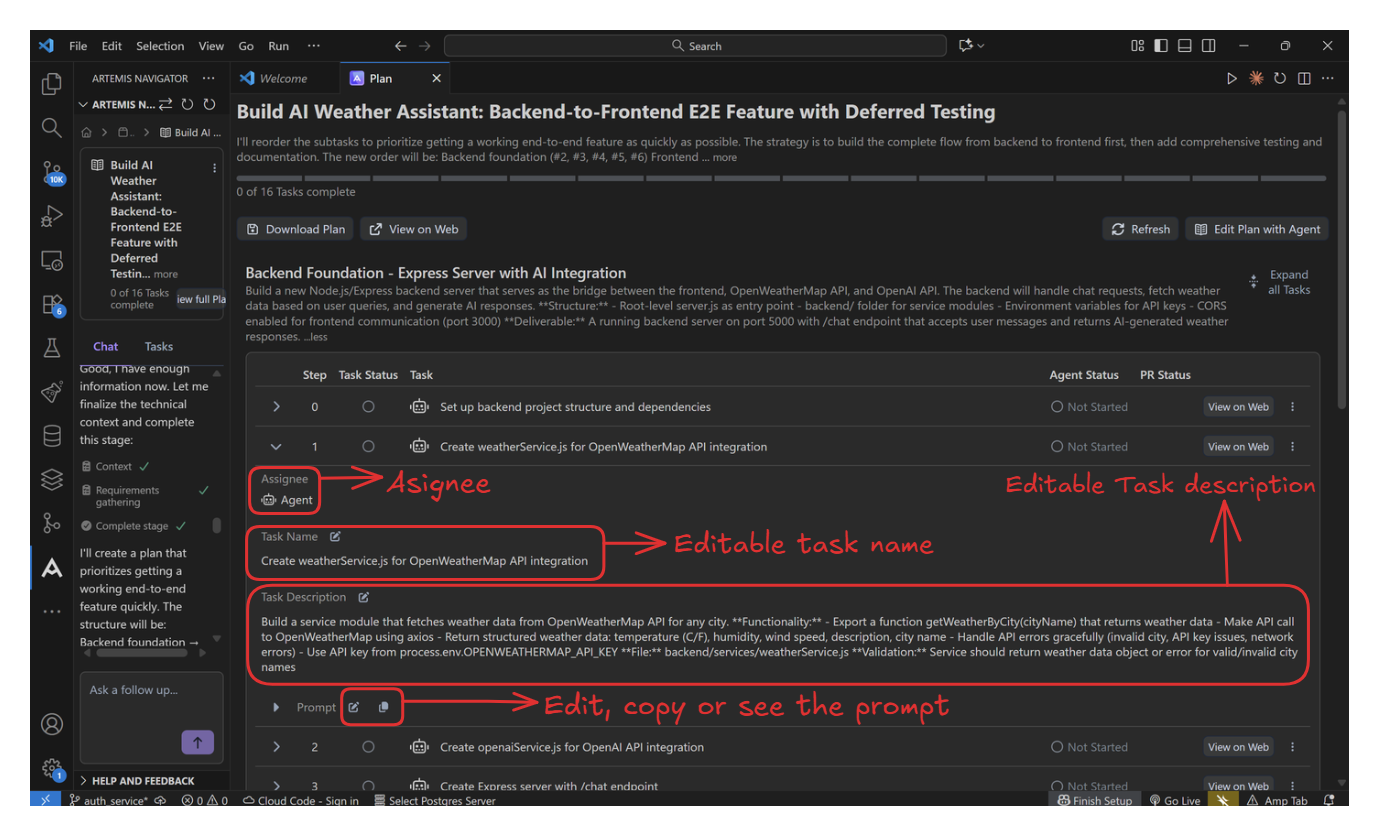
Each task includes:
- Task Name: Clear, actionable description.
- Assignee: User or Agent assignment.
- Task Description: Detailed requirements and specifications.
- Prompt: AI-ready instructions you can copy.
The secret sauce: These auto-generated prompts are precise, repo-aware instructions designed to give AI agents the clearest, most efficient path to success. No more vague instructions.
7. Dynamic Task Management
Plans are flexible and can evolve with your project.
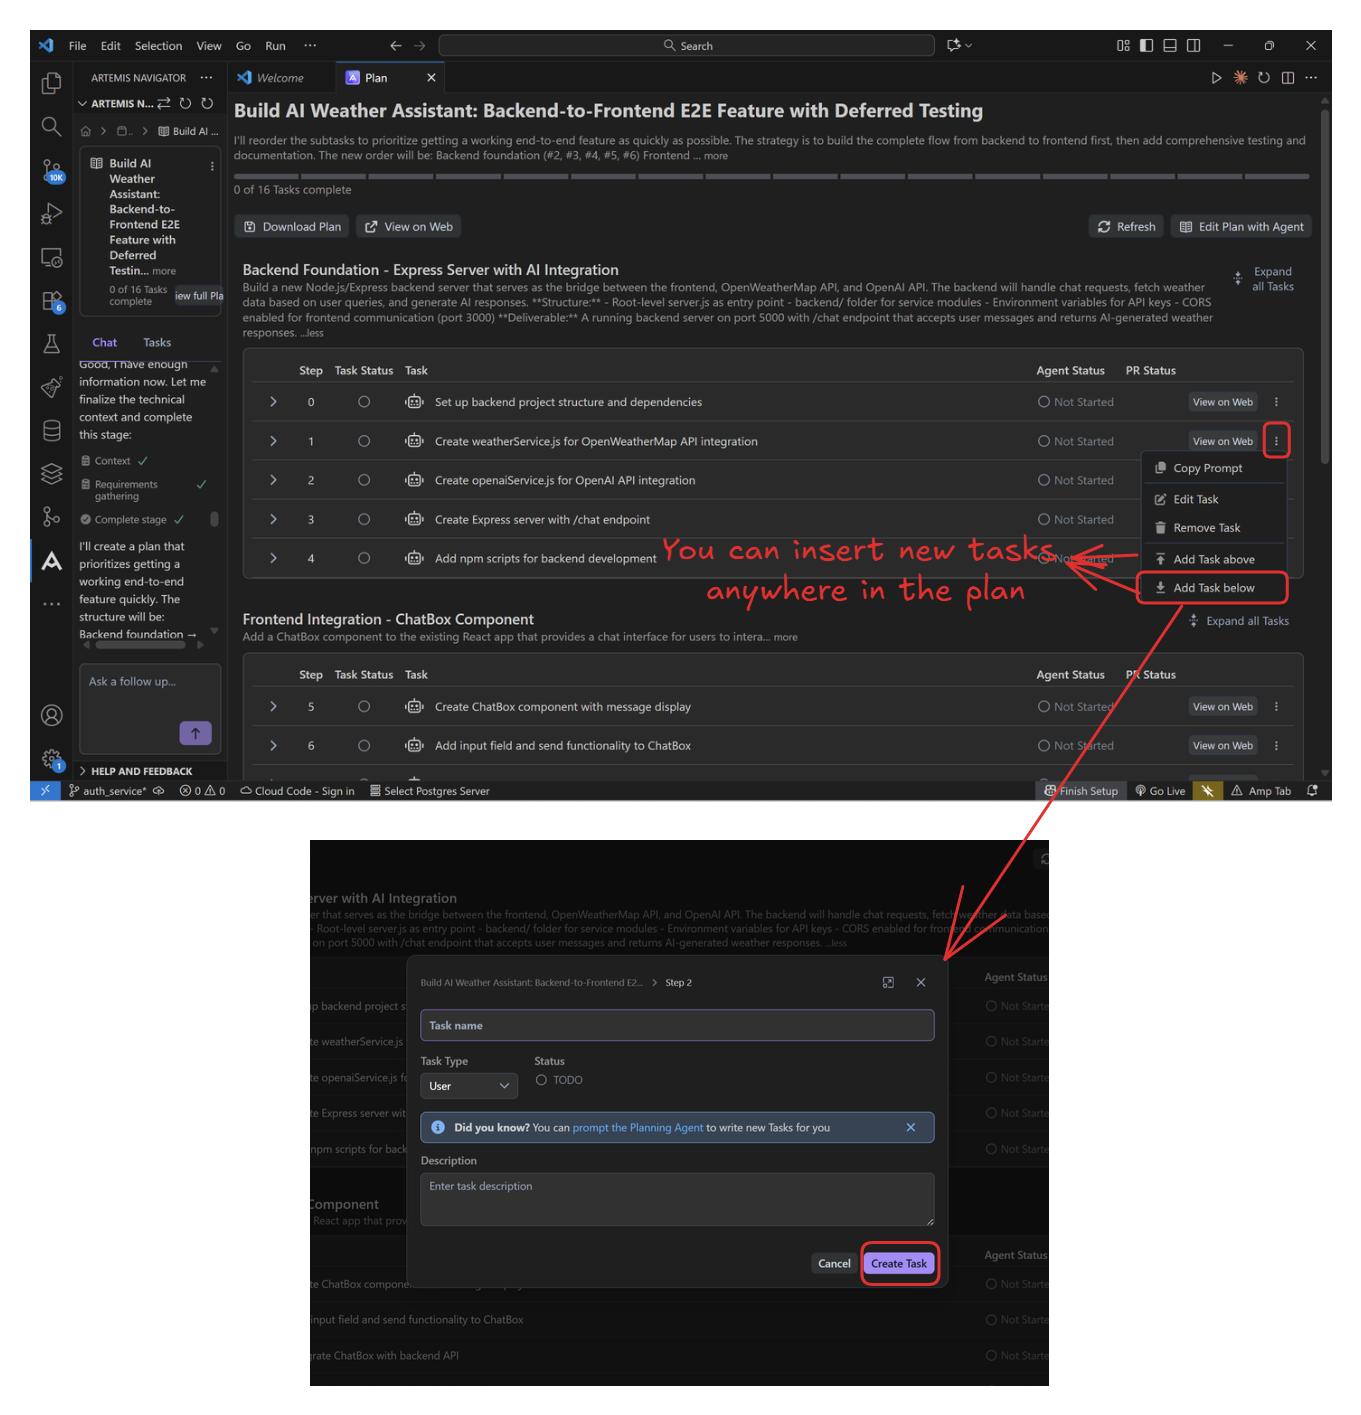
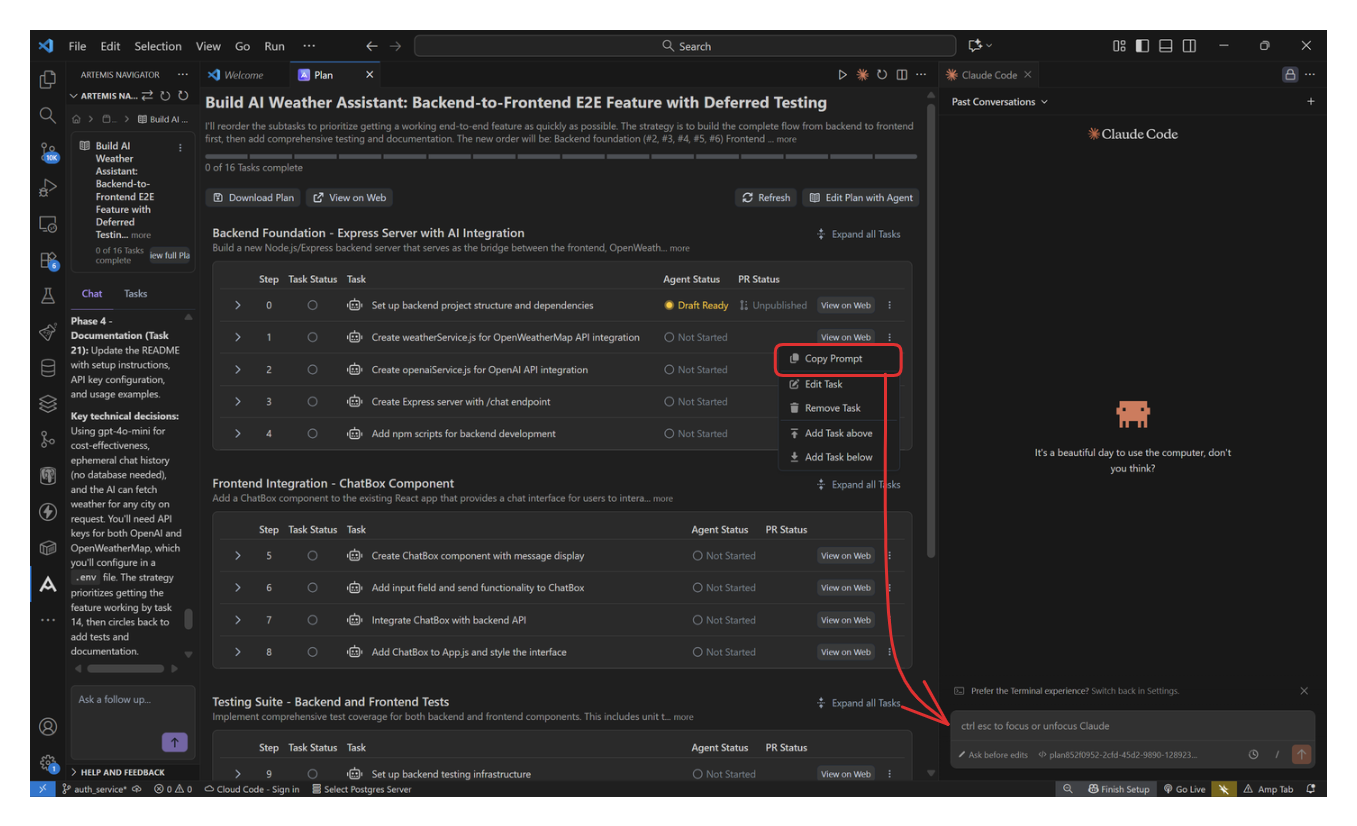
From the task menu (⋮), you can:
- Copy Prompt: Get the AI-optimized prompt for any coding tool.
- Edit Task: Modify task details or descriptions.
- Remove Task: Delete tasks that are no longer relevant.
- Add Task above/below: Insert new tasks anywhere in the plan.
You can also manually add new tasks at any point—either for yourself or for the Agent. The bottom image shows creating a custom user task with its own description.
8. Execute Tasks
You can execute subtasks either directly in Artemis Web or through your preferred AI coding tool.
-
Using your preferred AI coding tool
Steps:
- Copy the Prompt
Copy the Artemis-generated prompt from the task. - Paste into AI Tool
Paste the prompt into your preferred AI coding tool (e.g., Claude Code). - Execute
Let the AI process and execute the instructions with full context. - Review & Test
Review the generated code and test the implementation.
-
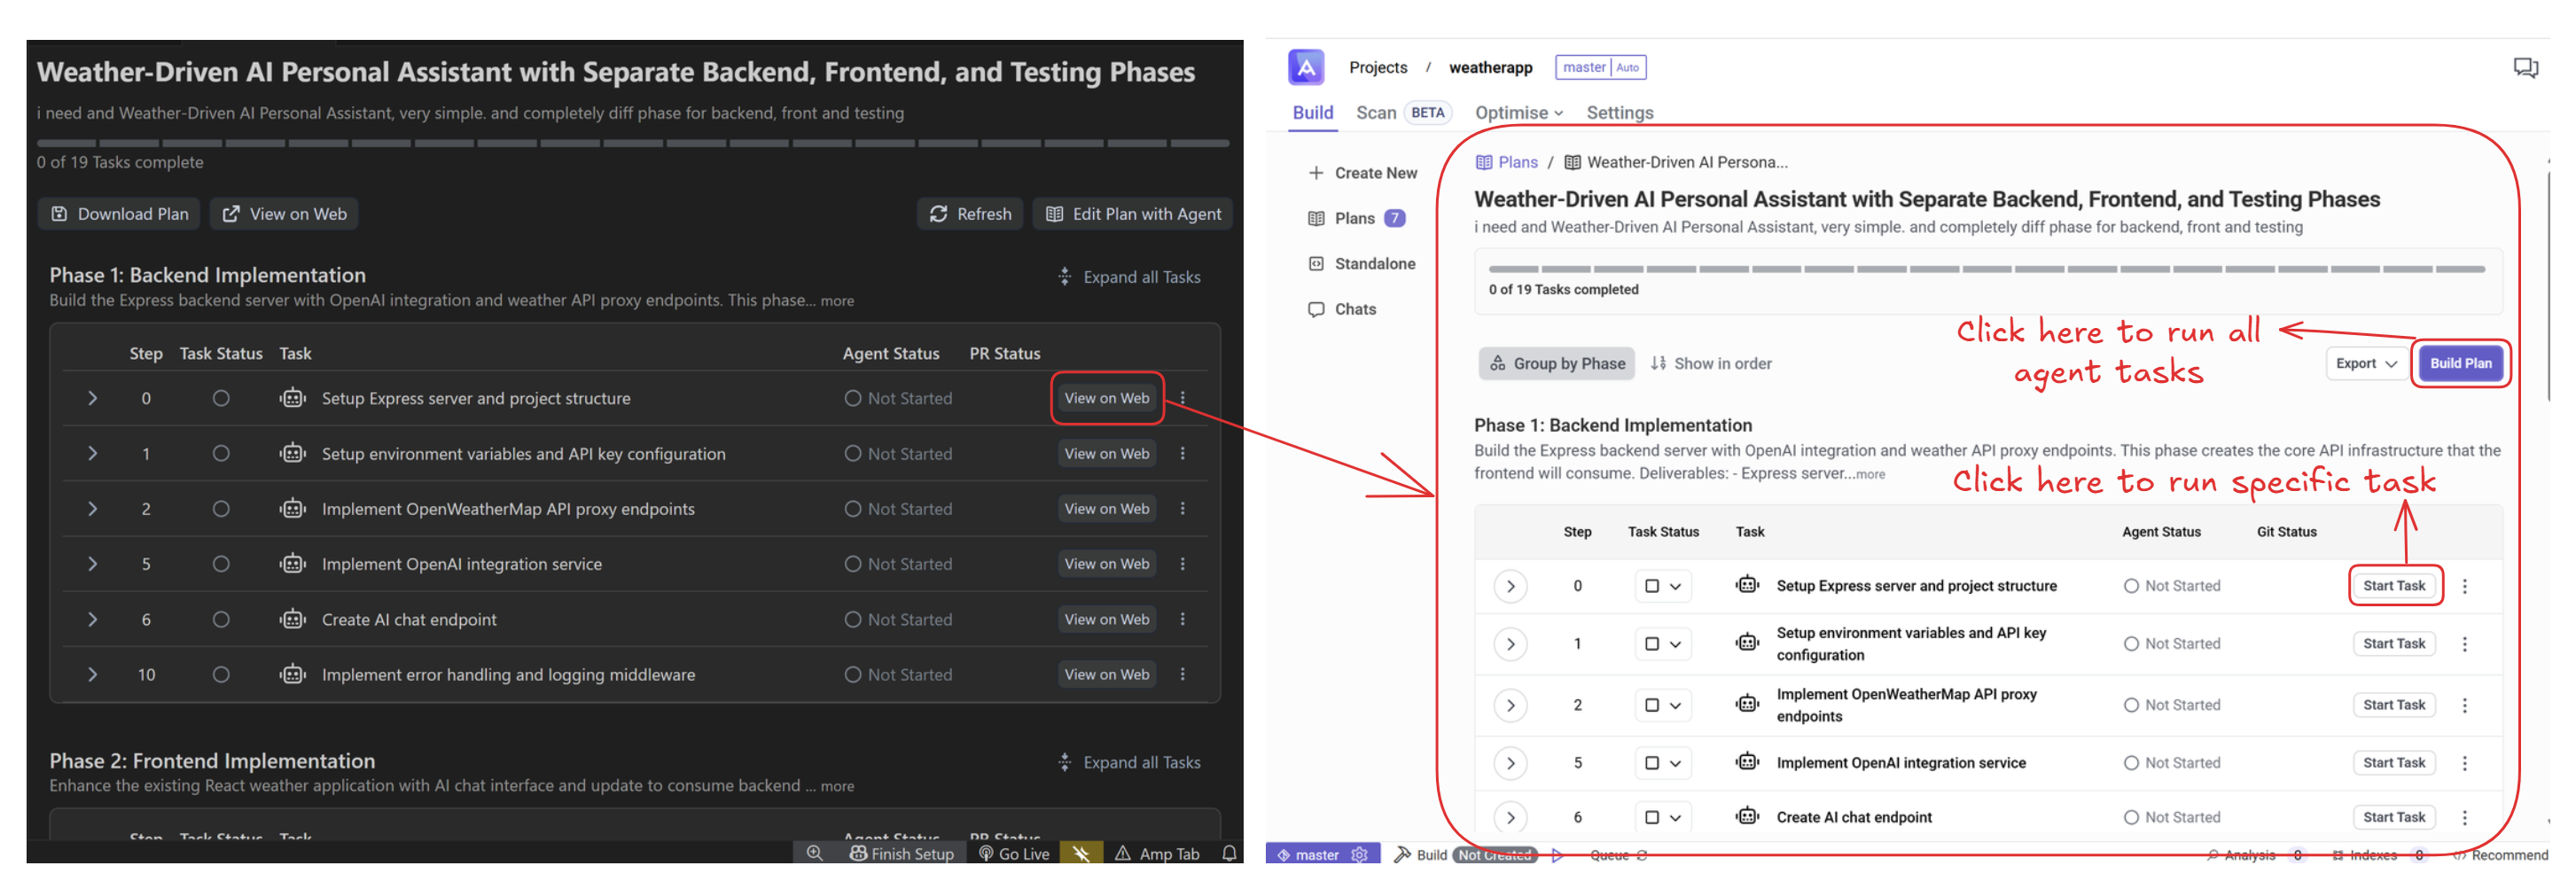
Using Artemis agent
Steps:
-
Access the Interface
Click View on Web to begin. -
Select Build Method
Choose how you want to build the plan:- Task-by-Task Build
Click Start Task on individual tasks. You can begin with the first task and run additional tasks in parallel when they have no dependencies. - Full Plan Build
Click Build Plan to run all agent tasks in the complete workflow.
- Task-by-Task Build
Once the draft is ready, you can handle all validations and Git actions directly in Artemis Web, while tracking task progress in both the extension and the web interface. Learn more about the planner in Artemis Web.
9. Final Results
When all tasks are complete, you'll have a fully implemented feature with clean commits and zero broken builds.
Key Improvements Delivered:
- Relevance: Context-aware prompts ensure advice matches specific conditions
- Quality: Structured format with guidelines improves response consistency
- Robustness: 4-layer parsing fallback handles edge cases gracefully
- Efficiency: 400 token limit optimizes cost while maintaining quality
- Testing: 10 diverse scenarios with documented expected outcomes
- Documentation: Complete testing guide for validation and future improvements
This is how AI development should work—strategic thinking first, then precise execution.
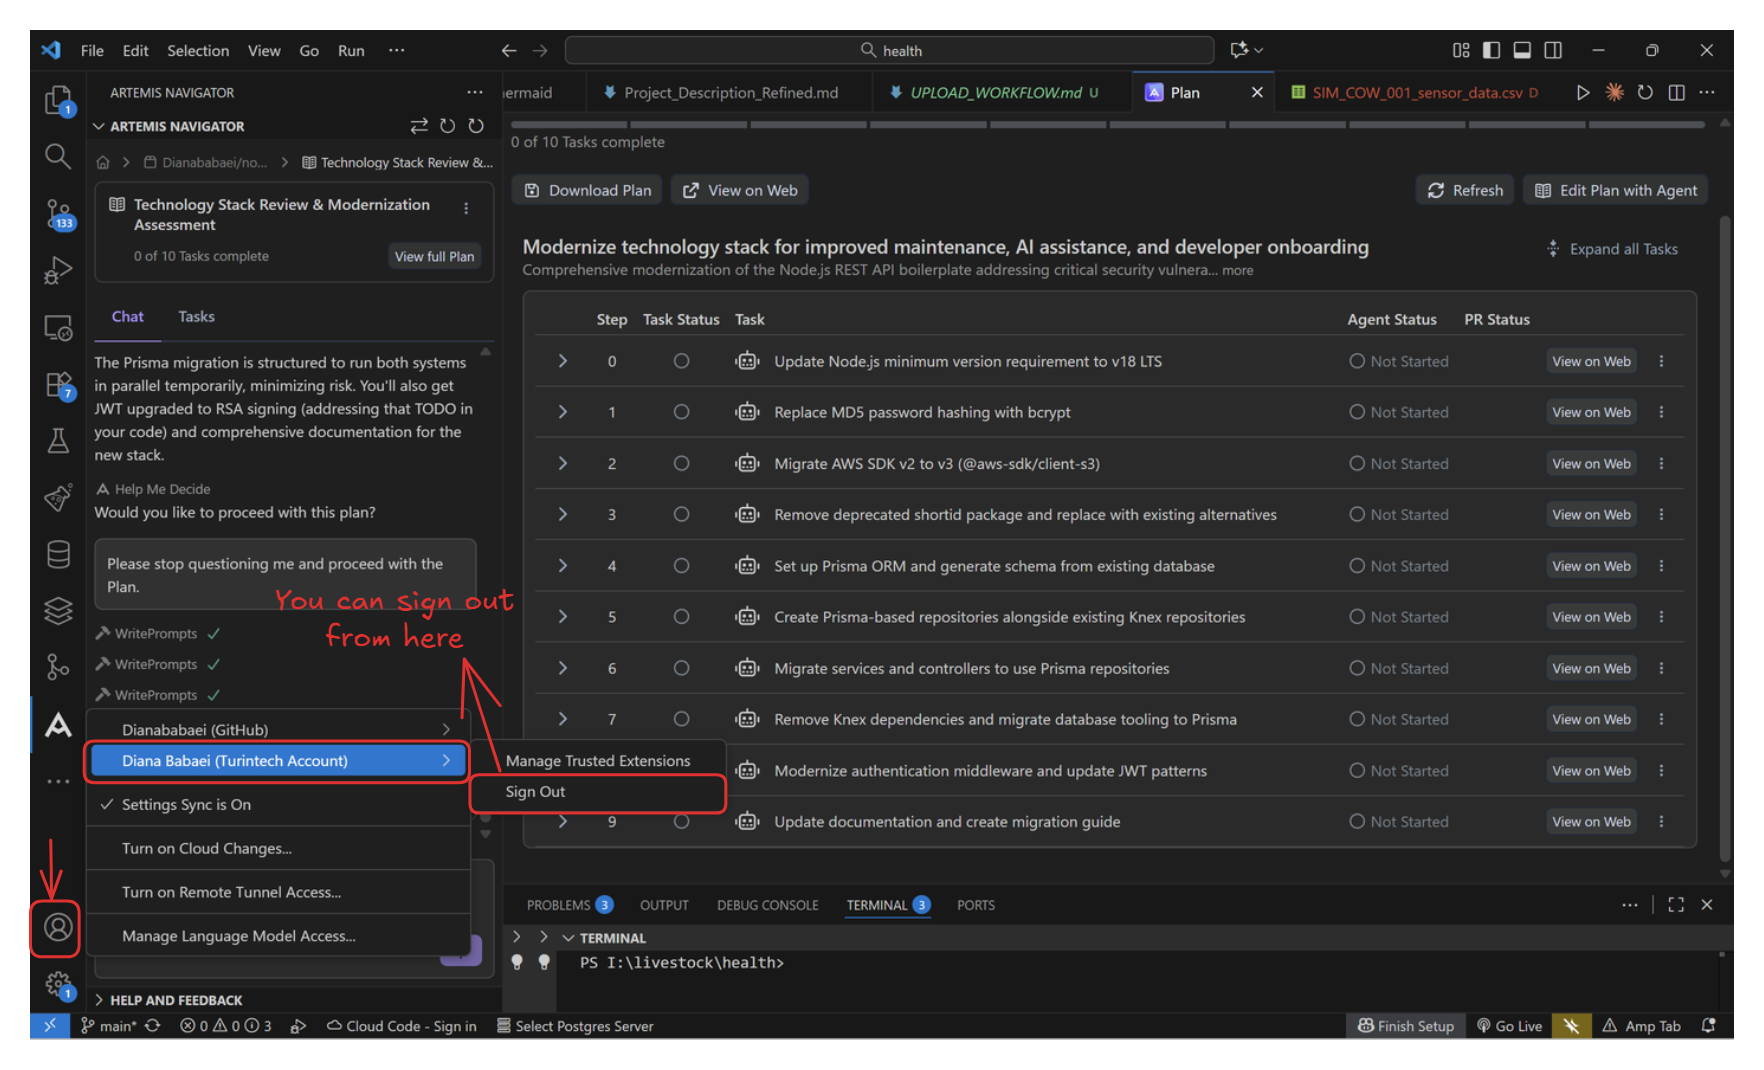
10. Sign out (if needed)
When you need to sign out of Artemis Navigator, click the button at the bottom-left corner (above the Settings button). Select your TurinTech account and choose Sign out.
Configuration
Available Commands
Access these commands via the command palette (Ctrl + Shift + P):
- Artemis Navigator: Enable Debug Logging - Enable detailed logs for troubleshooting
- Artemis Navigator: Open Logs - View extension logs
- Artemis Navigator: Sign Out - Disconnect from your Artemis account
Tips & Best Practices
- Think Before Coding: Use Plan mode for complex features to ensure clarity before implementation
- Review Decision Checkpoints: The plan summary is your opportunity to catch mistakes early
- Commit Incrementally: Complete and test each task before moving to the next
- Use Optimized Prompts: Copy Artemis prompts to use with any AI coding tool for better results
- Track Progress: Mark tasks complete to maintain visibility into your project status
- Stay Flexible: Add or remove tasks as your understanding of the feature evolves
Troubleshooting
Enable Debug Logging
For troubleshooting issues:
- Open the command palette (
Ctrl + Shift + P) - Select "Artemis Navigator: Enable Debug Logging"
- Reproduce the issue
- Access logs via "Artemis Navigator: Open Logs"
Common Issues
- Authentication failures: Verify you're using the correct environment URL and credentials
- Extension conflicts: Uninstall old versions completely before installing the new version
- Connection issues: Check your network connection and firewall settings
Feedback & Support
We value your feedback and are committed to continuously improving Artemis Navigator.
- Rate us on the VS Code Marketplace
- Feature Requests - Share your ideas for new features
- Bug Reports - Help us improve by reporting issues
Your input helps us make Artemis Navigator better for everyone!