Code Audit
Follow this workflow to run comprehensive code audits on a locally deployed Artemis instance that uses the on-device Qwen 3 4B model for AI assistance.
Prerequisites
Artemis is installed on a high-performance Intel® laptop with local GPU acceleration (see Deployment Options). All large language models are running locally (this example uses Qwen 3 4B model). Internet access is optional; audit scans run entirely offline.
Outline
This guide covers the following steps:
Step 1: Import and Open the Project: Set up your project for scanning.
Step 2: Register the Local Runner: Configure the runner for validations and benchmarks.
Step 3: Review and Configure Rules: Adjust rule importance levels and enable/disable rules.
Step 4: Add Custom Rules with Local AI Assistance: Create custom rules using the local Qwen 3 4B model.
Step 5: Run the Analysis: Trigger scan and select files to analyze.
Step 6: Review Findings: Examine identified issues by category and severity.
Step 7: Prioritise with AI (BETA): Use AI to rank issues by impact and effort.
Step 8: Code Audit Findings: Choose remediation path for identified issues.
Step 9: Fix as Background Task: Queue automated fixes using background tasks.
Step 10: Fix as Planning Task: Use Planning Agent to design resolution strategies.
Step 11: Fix as Target: Send issues to Standalone Optimisation workflow using Artemis Intelligence.
Step 12: Integrate Optimisations: Export, download, or create a pull request for your optimisations.
Workflow
Step 1: Import and Open the Project
Select one of the following options to add code to Artemis:
- Import a sample project:
- Click
Import Projectto use a pre-existing sample (see Figure 1). - Select a project and click
Import(see Figure 2). If the import isn't working, set up git credentials or disableUse Git Credentials. - Open the imported project (see Figure 3).
- Click
- Upload a project zip file:
- Click
New Project. - Click
Upload a zip file with your code. - Open the uploaded project (see Figure 3).
- Click
- Import an existing project from GitHub:
- Click
New Project. - Select an existing project from your GitHub repository. For details on setting up git credentials, see the project setup guide.
- Open the imported project (see Figure 3).
- Click
- Create a new project with planning:
- Click
Plan New Repoto start a completely new project using the planner (BETA). For more details, see the planning guide. - Once the project is created, open it (see Figure 3).
- Click
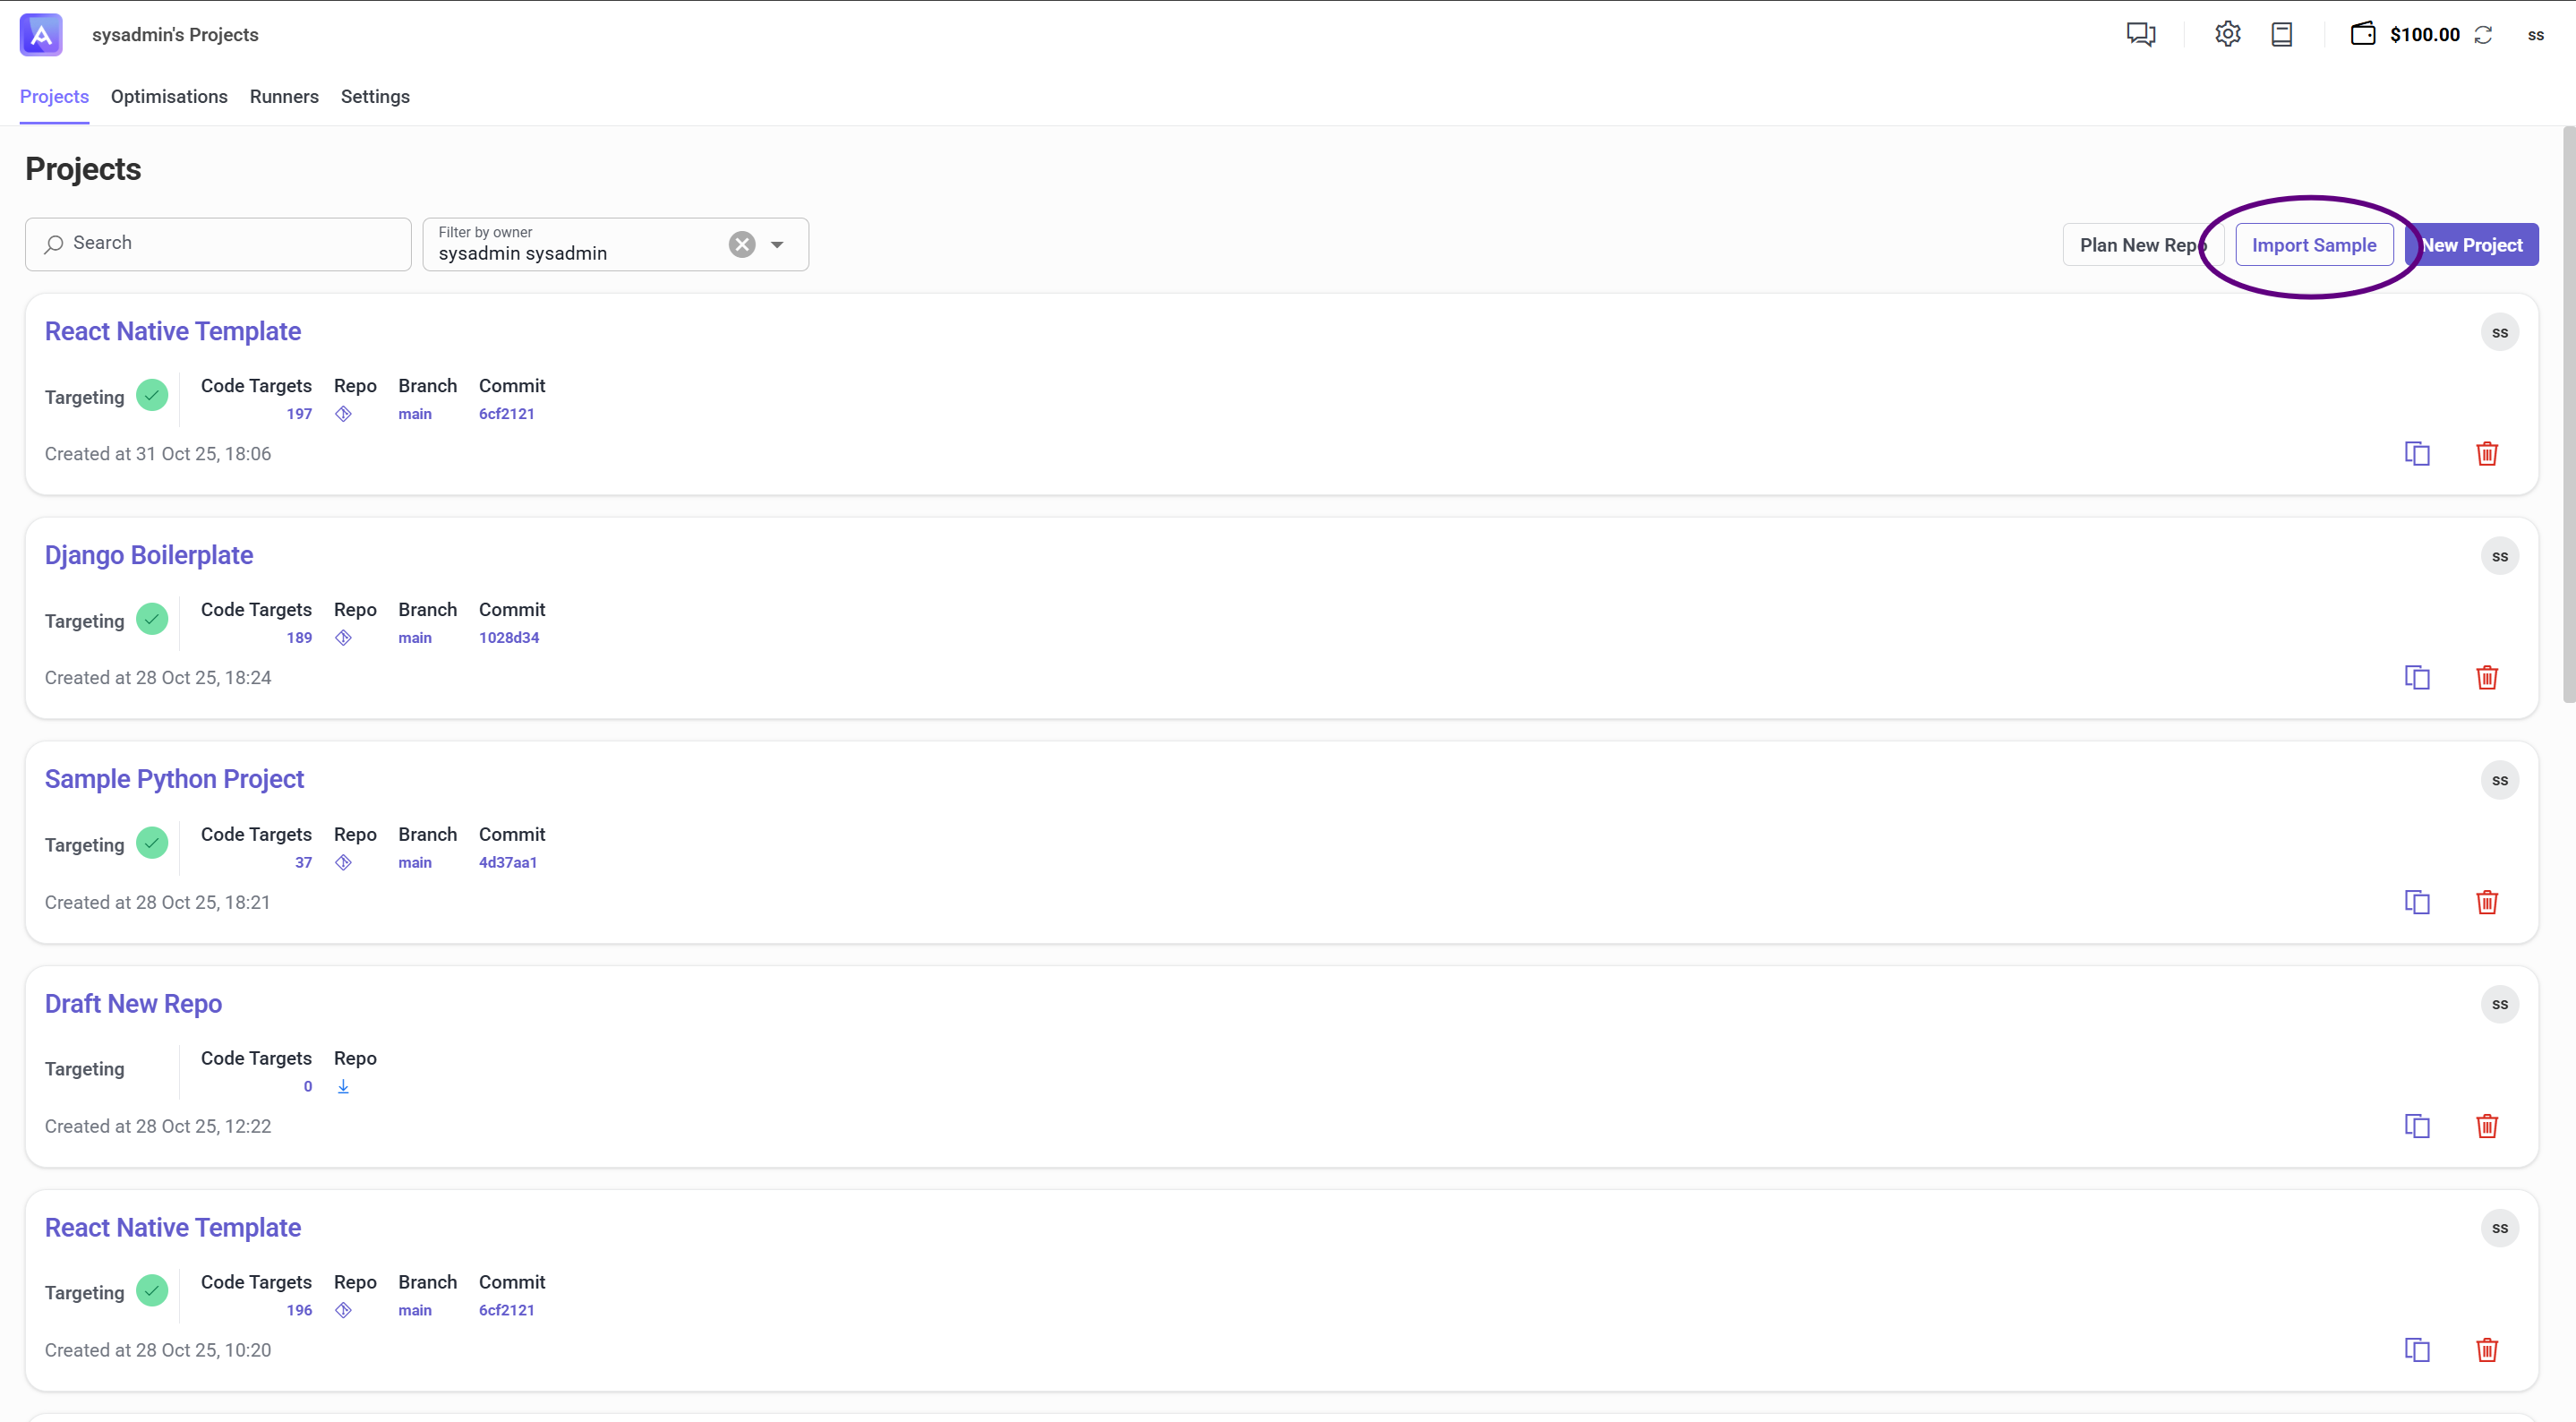
Figure 1: Select a sample project to import
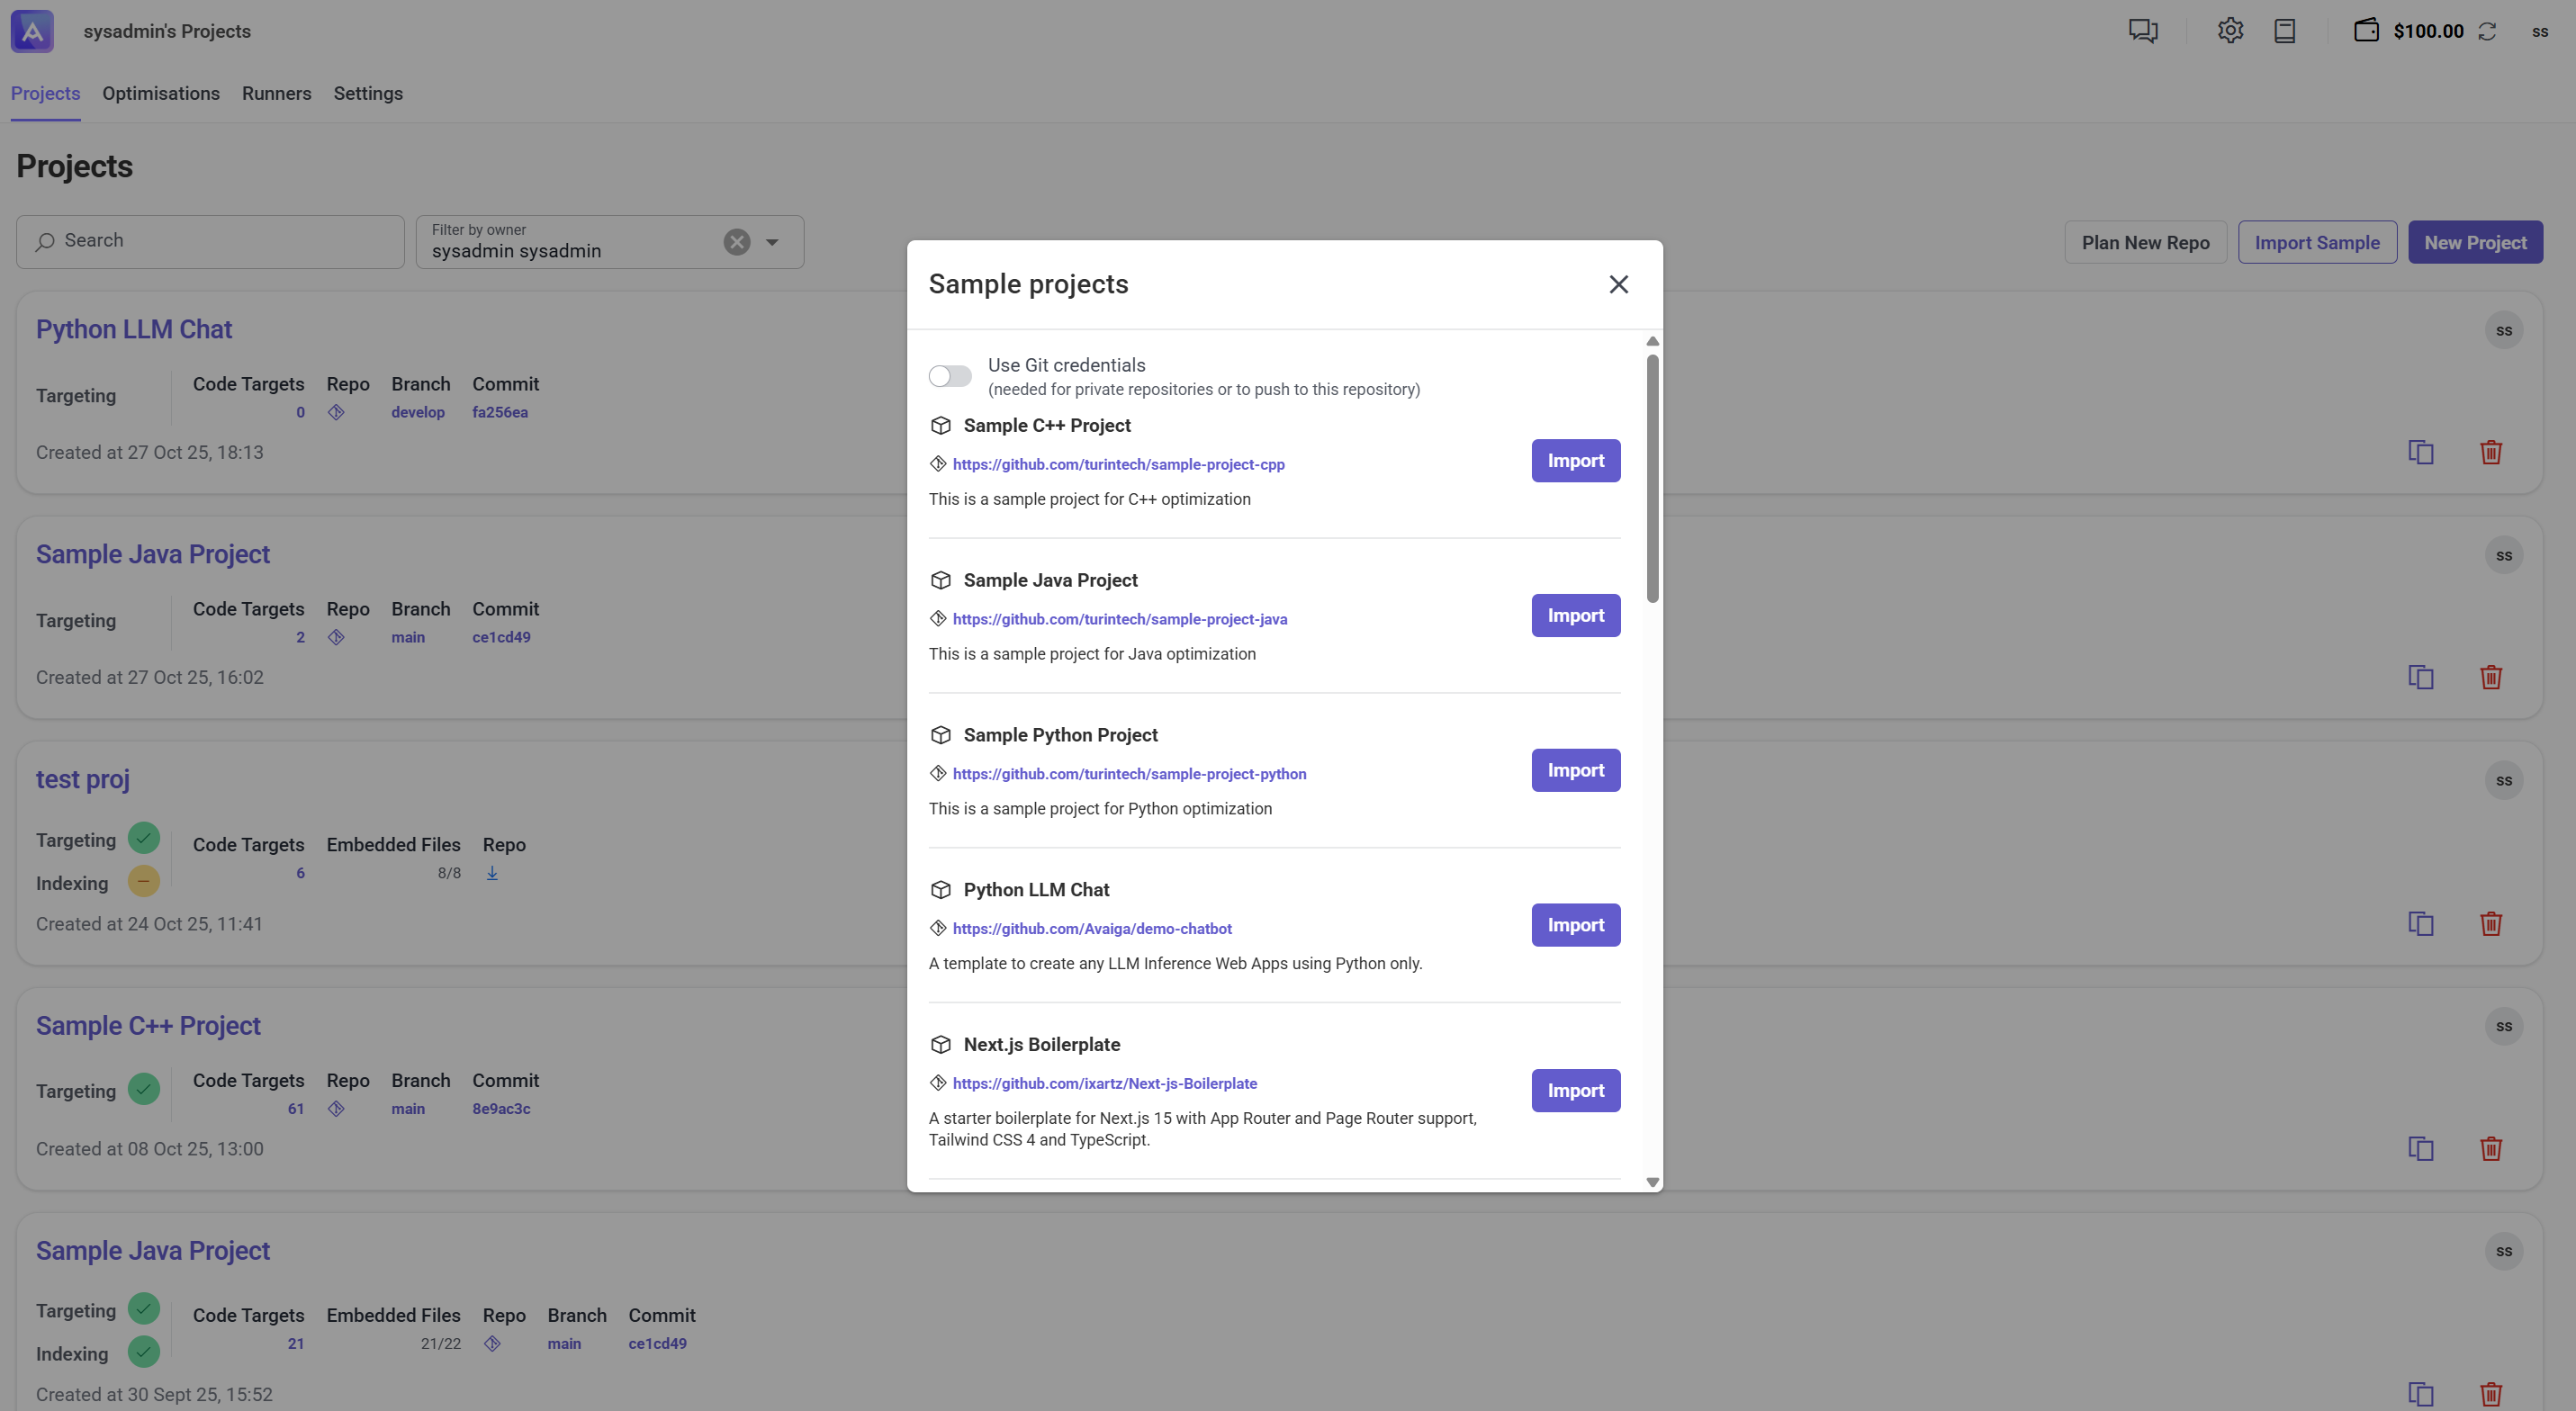
Figure 2: Sample project ready to import
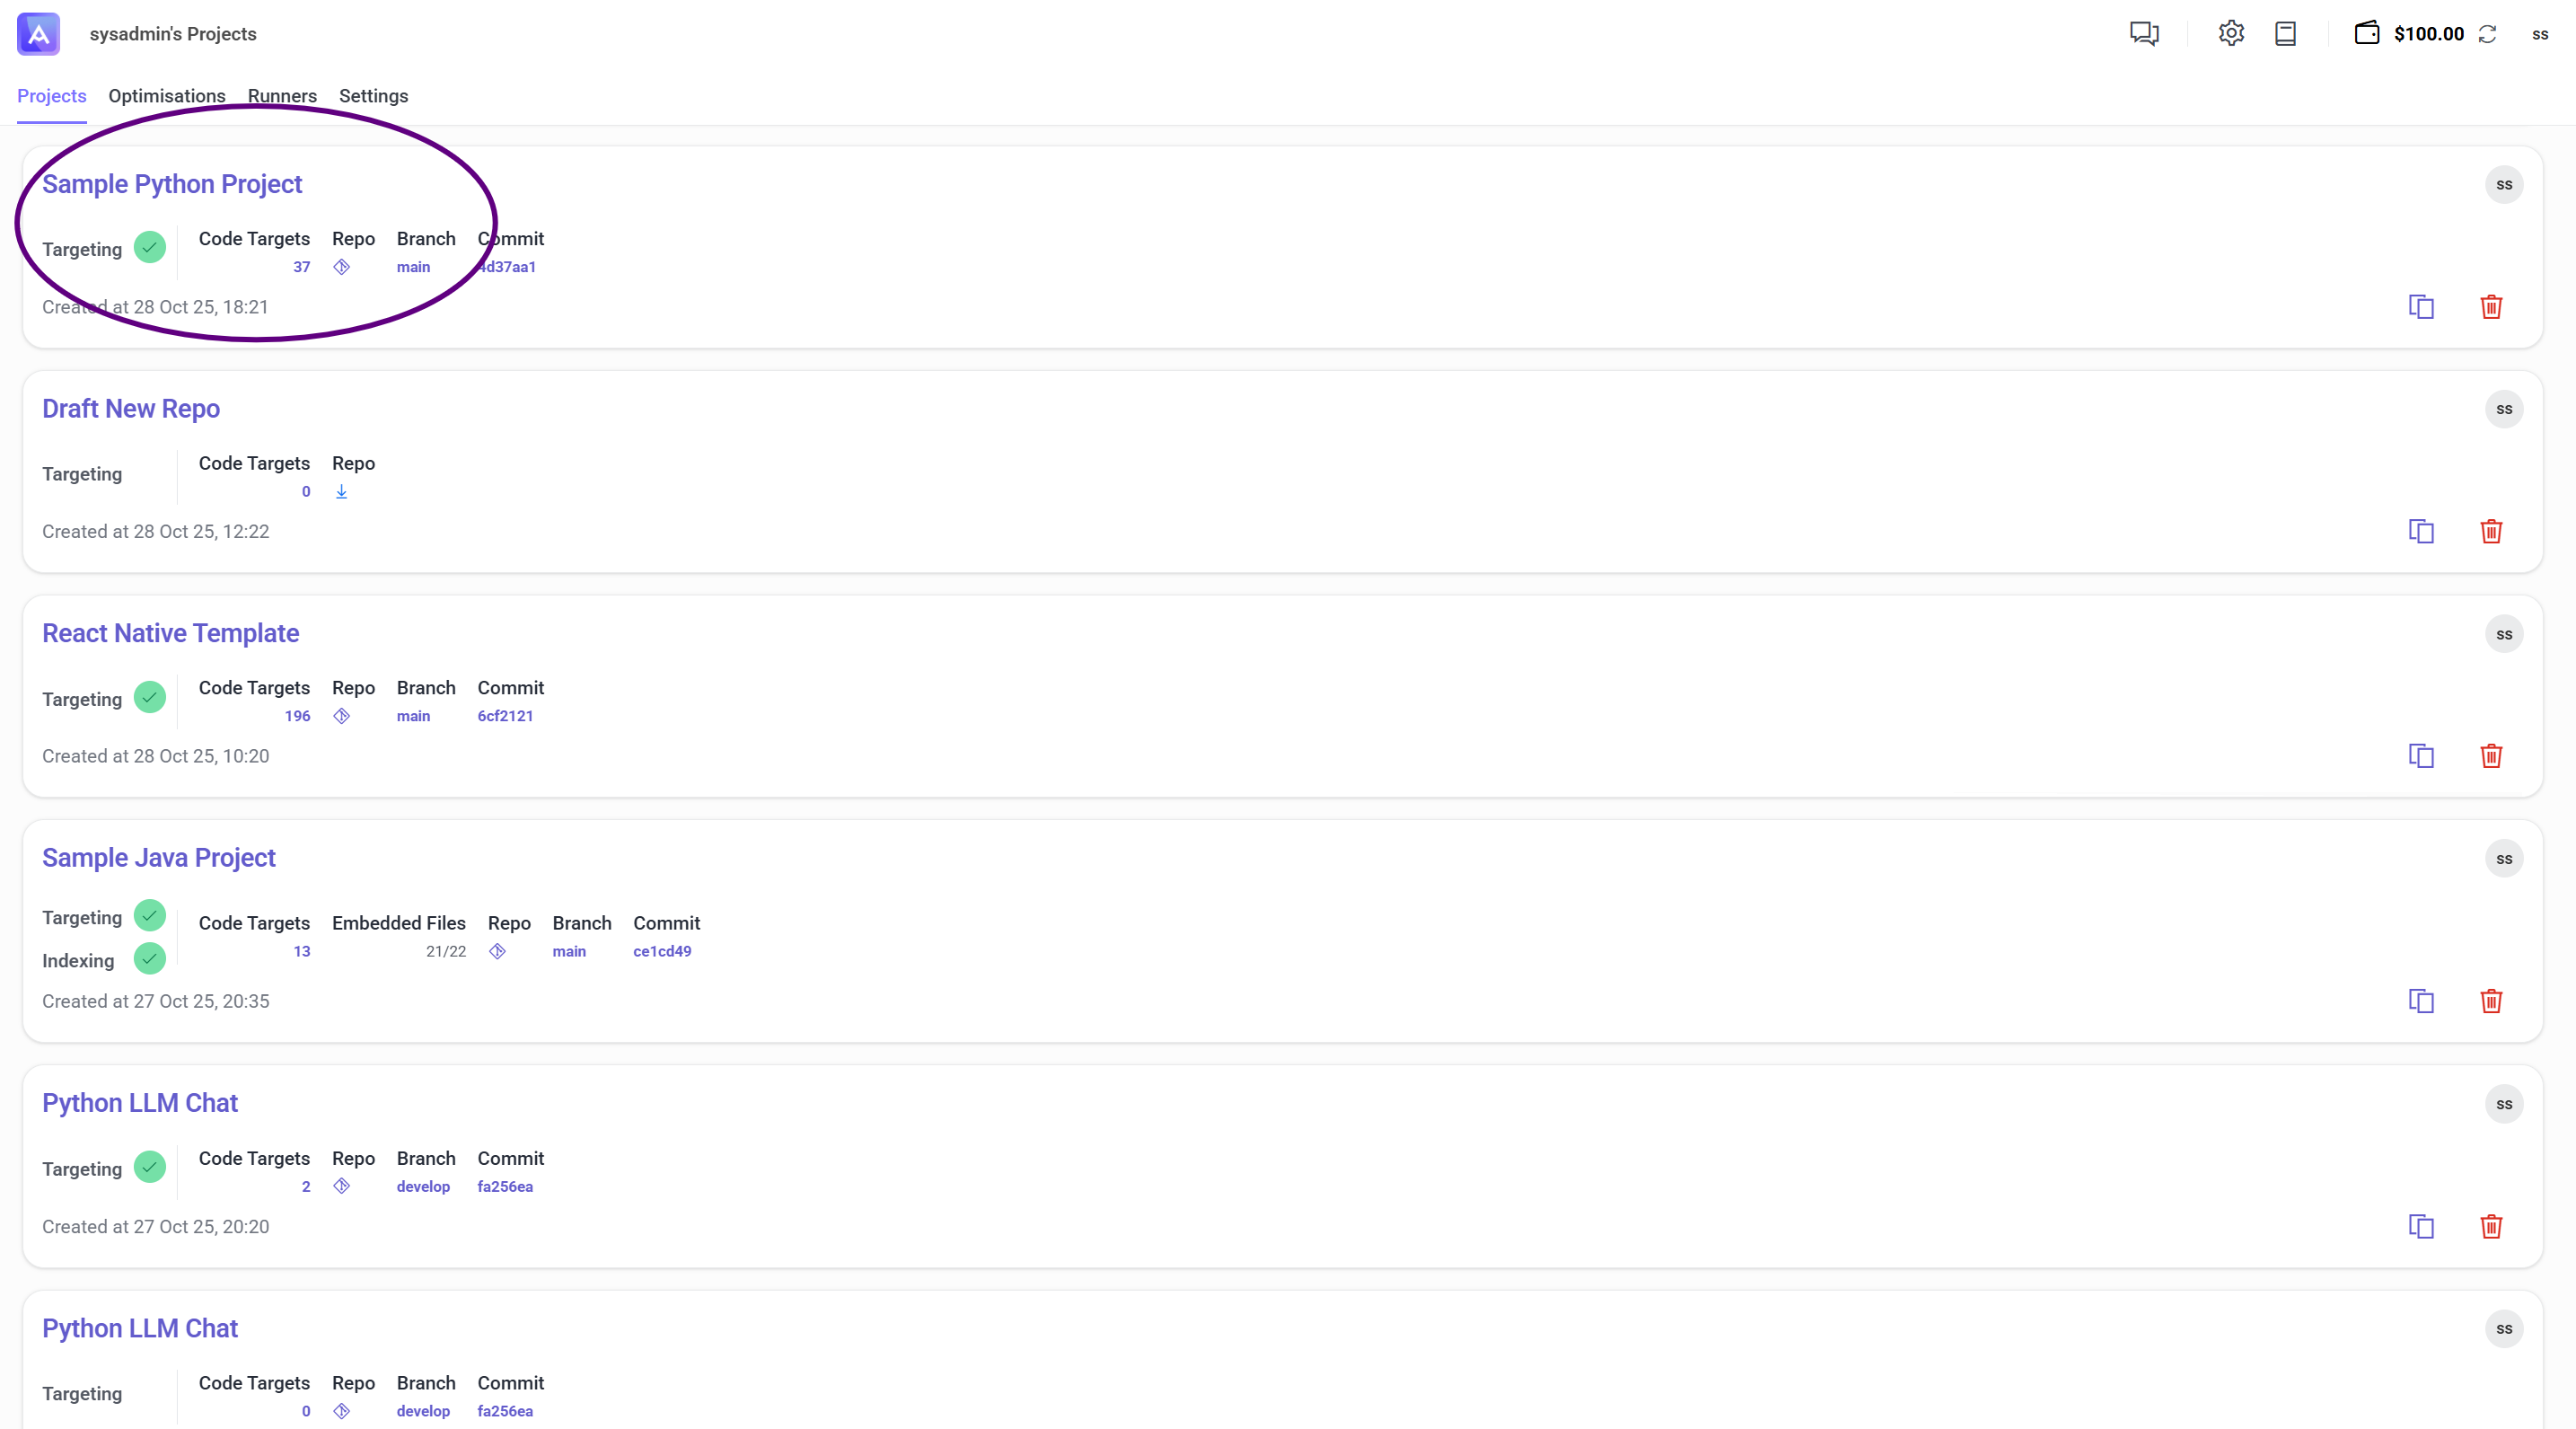
Figure 3: Imported project ready for scanning
Step 2: Register the Local Runner
Note: This step involves registering the Artemis Runner on the same machine to execute validations and benchmarks.
Artemis uses this runner to execute tests, benchmarks, and Artemis Intelligence workflows.
-
Open
Settings > Build(see Figure 4). -
Select the operating system that matches your host environment (Windows in this use case).
-
Copy the installation command displayed on the page and paste it into Windows PowerShell (see Figures 5 and 6). This command downloads and installs the runner on your local machine.
-
Start the runner using the command shown in Figure 7. When prompted in PowerShell, provide:
- A runner name (any free text identifier)
- Your Artemis credentials (username and password) to authenticate the runner
A successfully running runner appears as shown in Figure 8.
-
Once the runner is running, return to the
Settings > Buildpage in Artemis. Select the runner name from the available runners list to link it to your project.
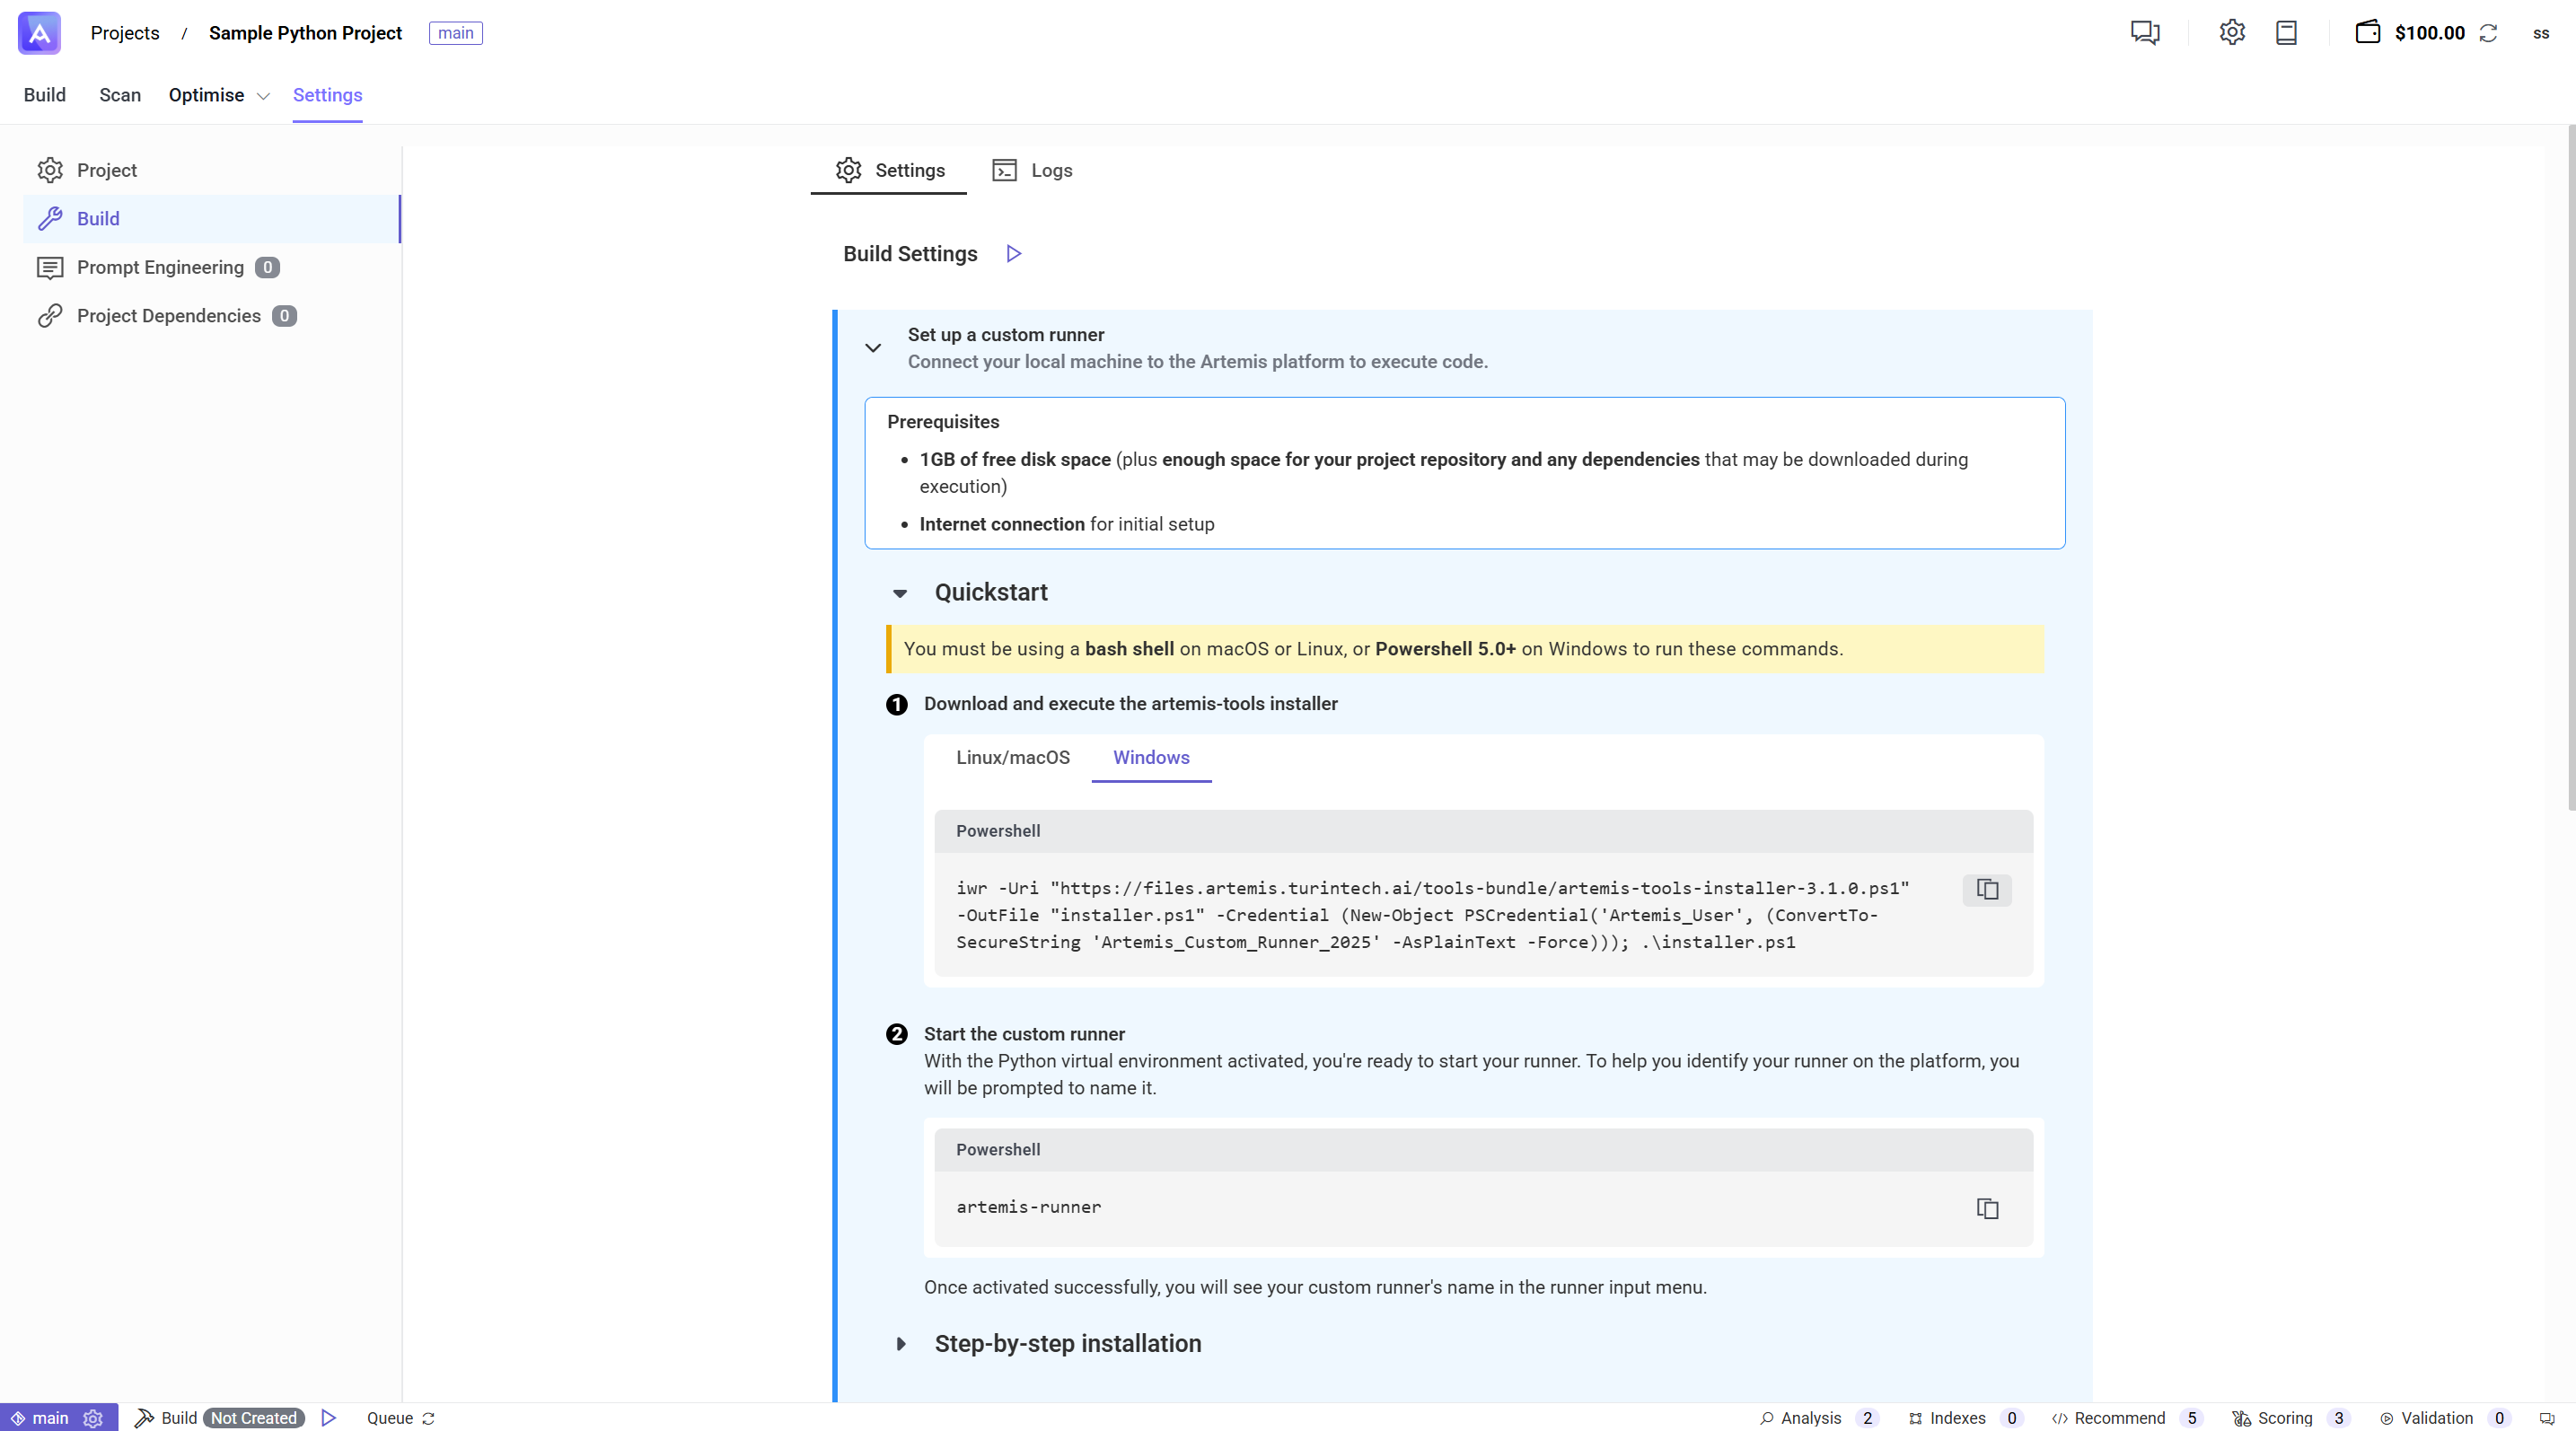
Figure 4: Copy the runner install command
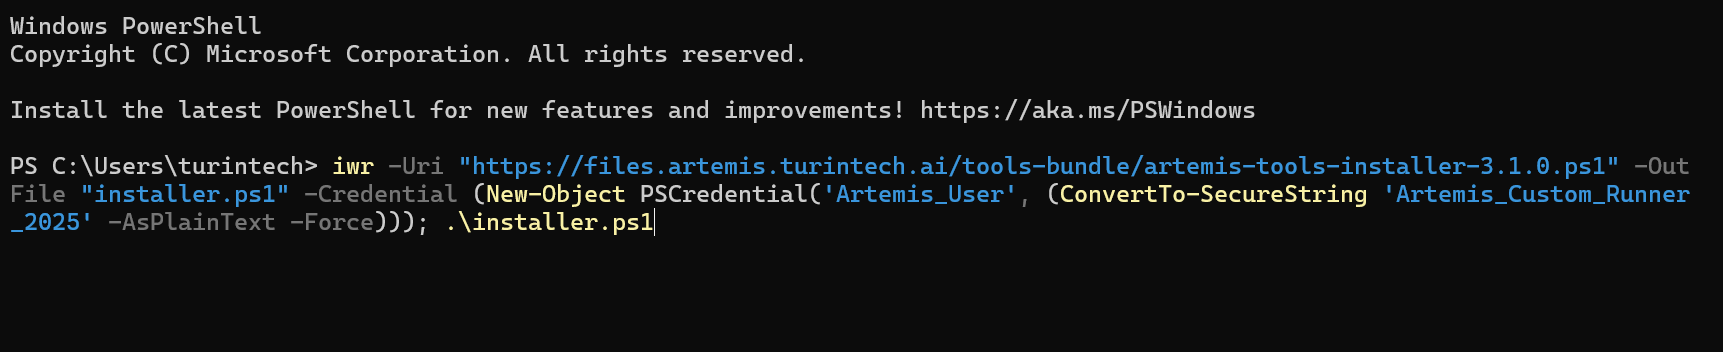
Figure 5: Runner installation command in PowerShell
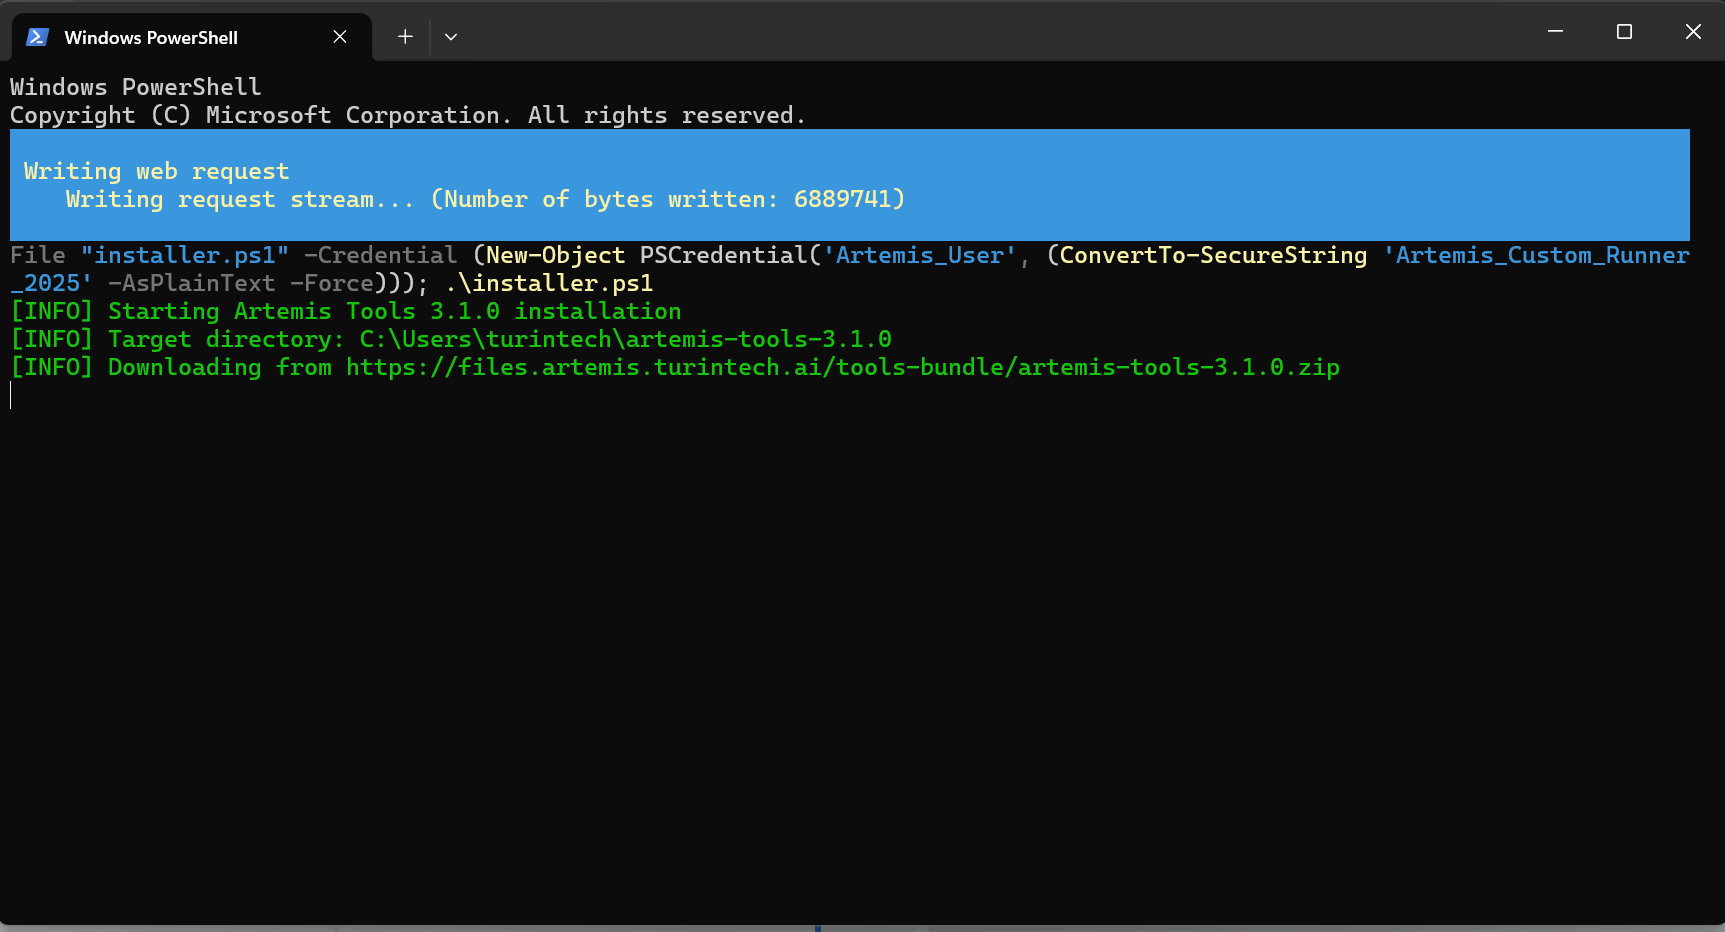
Figure 6: Runner installing
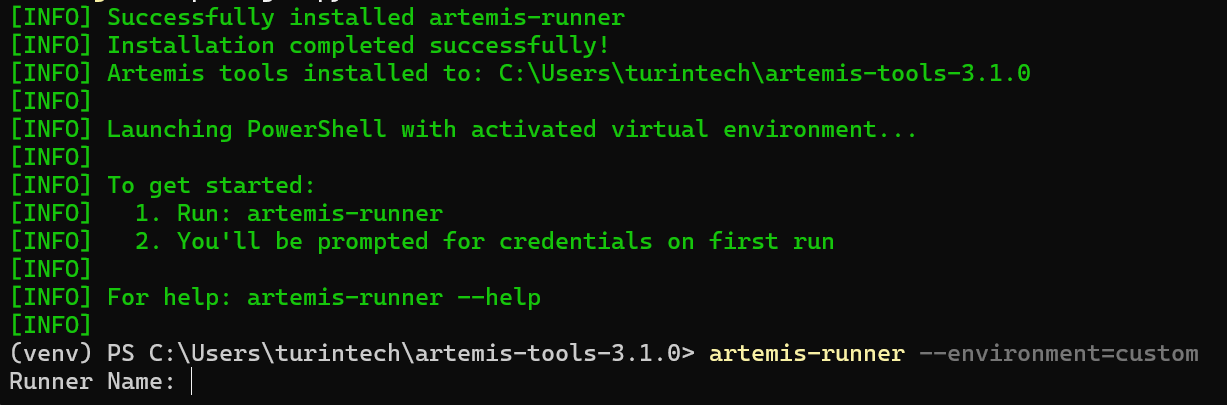
Figure 7: Start runner
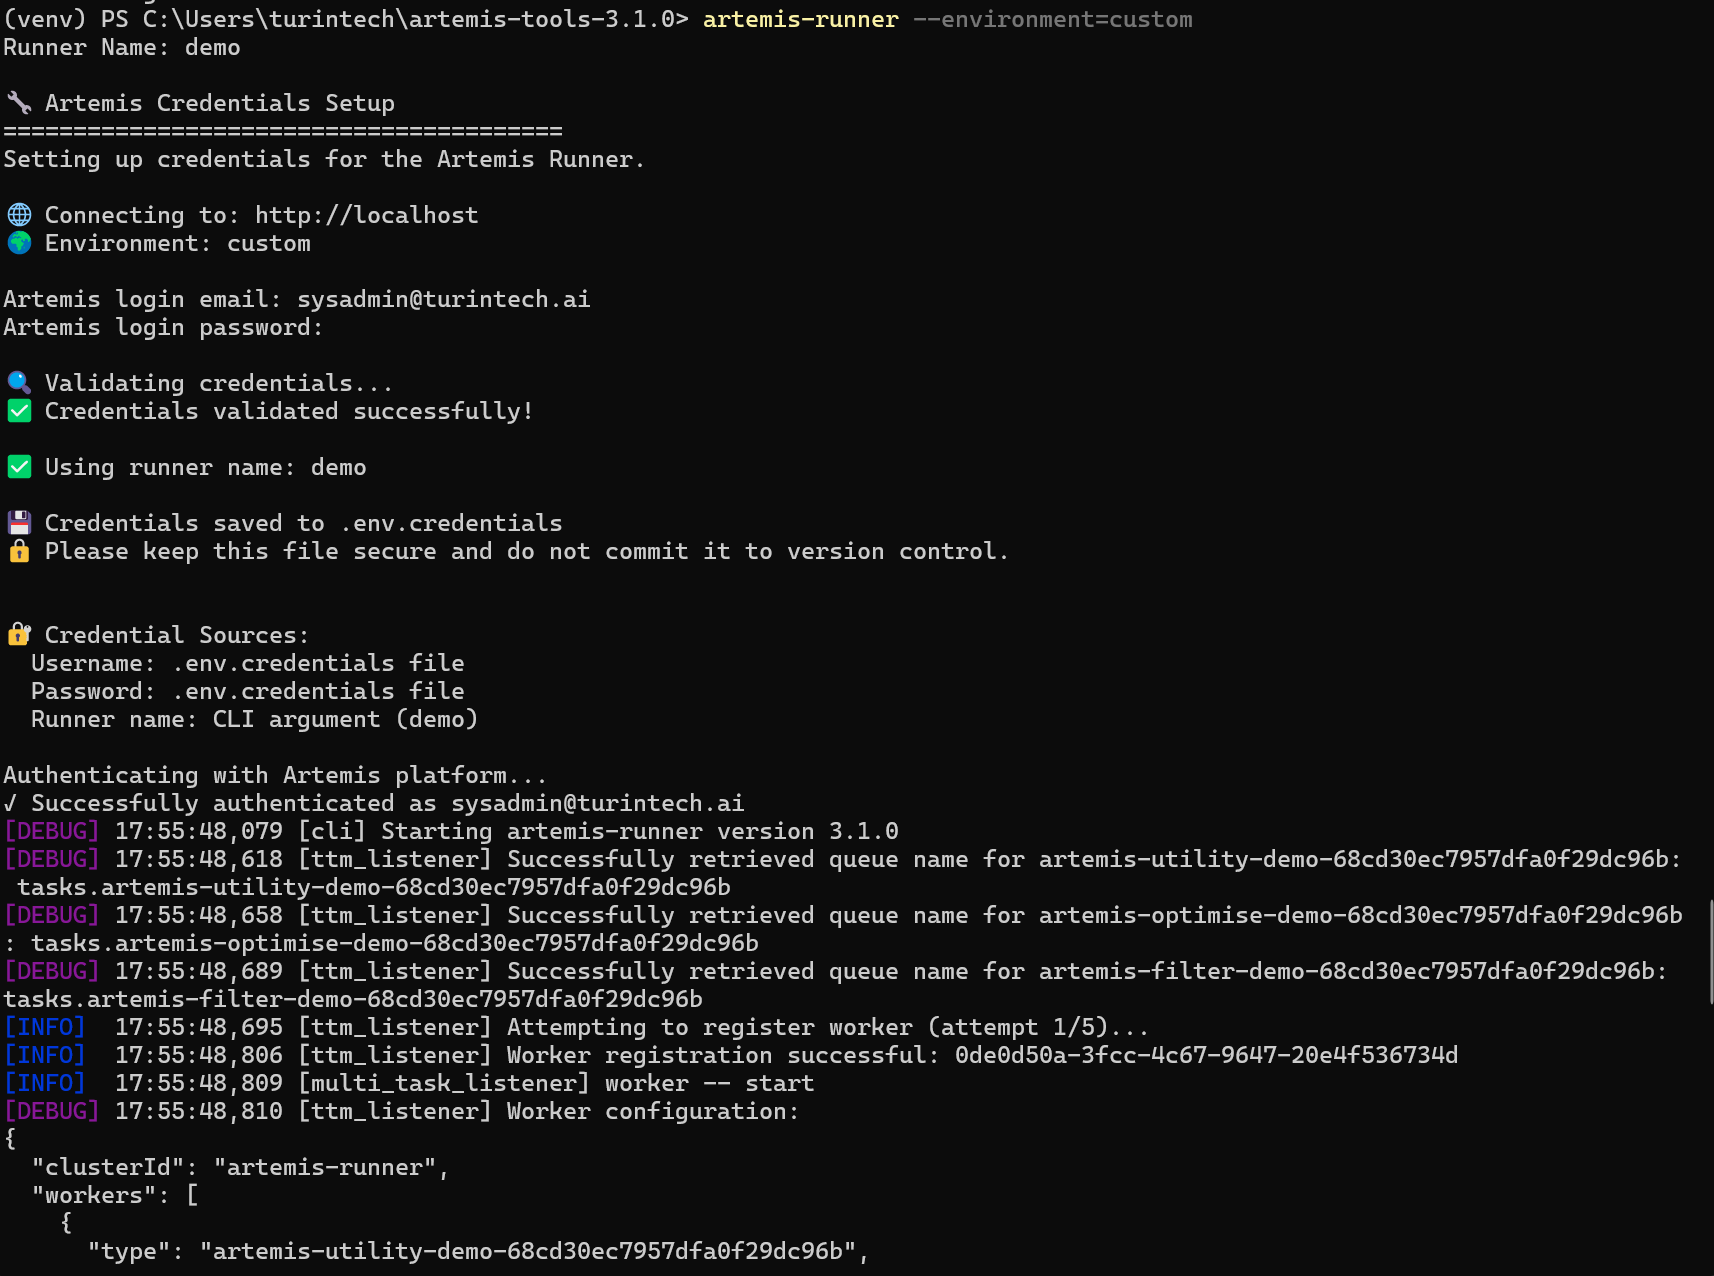
Figure 8: Runner is online and ready
Step 3: Review and Configure Rules
- The rules table displays built-in rules grouped by category (e.g., Security, Best Practices, Performance, and more). If necessary:
- Adjust importance levels to match your local policies by clicking on a rule and selecting the importance level (see Figure 9).
- Enable or disable rules depending on the target project's needs.
- Add a new custom rule (see Step 4).

Figure 9: Select and weight scan rules
Step 4: Add Custom Rules with Local AI Assistance
- Click
Add Rule. - Provide the rule name and a description of the rule. Optionally, click
Generate with AIto help you write the description using the local Qwen 3 4B model (see Figure 10). - Update the importance level and decide whether you want to enable the rule by default.
- Click
Create Rule.
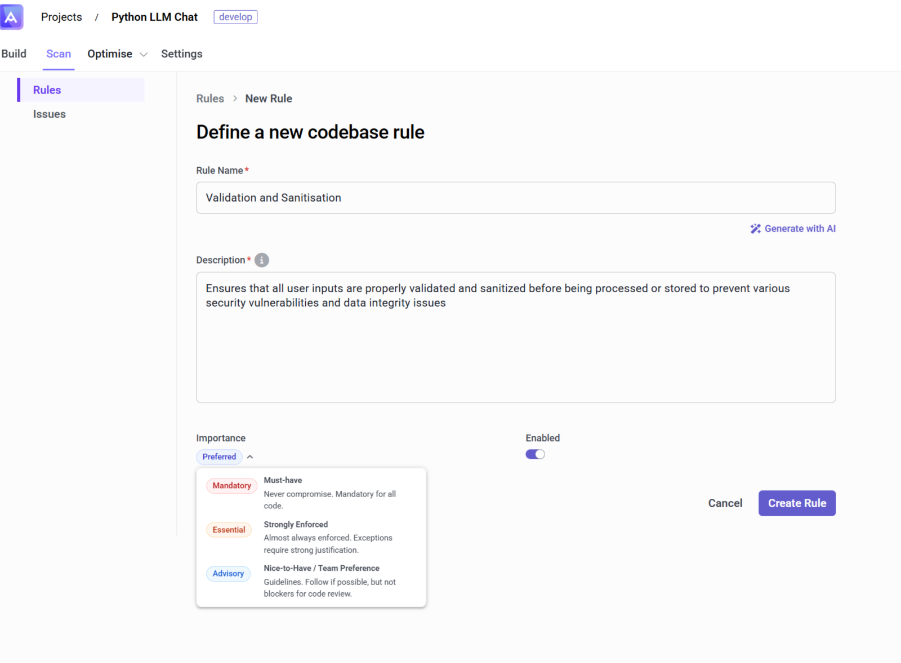
Figure 10: Create a new scan rule with AI assistance
Step 5: Run the Analysis
- Start scan by clicking
Run Analysis(see Figure 11). - When prompted (see Figure 12), confirm the list of files or directories to include. Artemis processes the scan locally and streams progress in the Scan tab.

Figure 11: Click Run Analysis
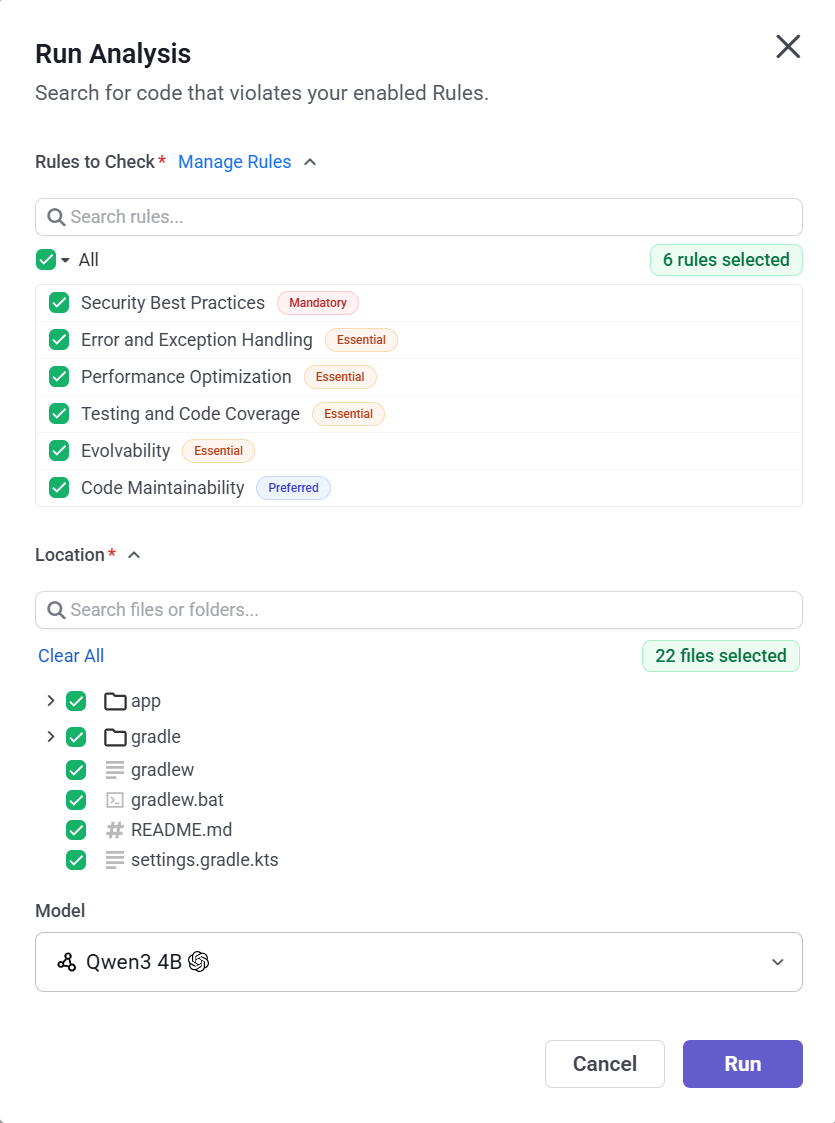
Figure 12: Select files for analysis
Step 6: Review Findings
- Issues are grouped by category and severity (Critical, High, Medium, Low) (see Figure 13).
- Each issue includes:
- A description of the issue
- The file path and line number where the issue was found
- Remediation guidance and suggested fixes
- Use filters to focus on specific severities or categories. You can also sort by severity, file, or rule type to help prioritize your review.
- Click on an issue to view detailed information and available remediation options.
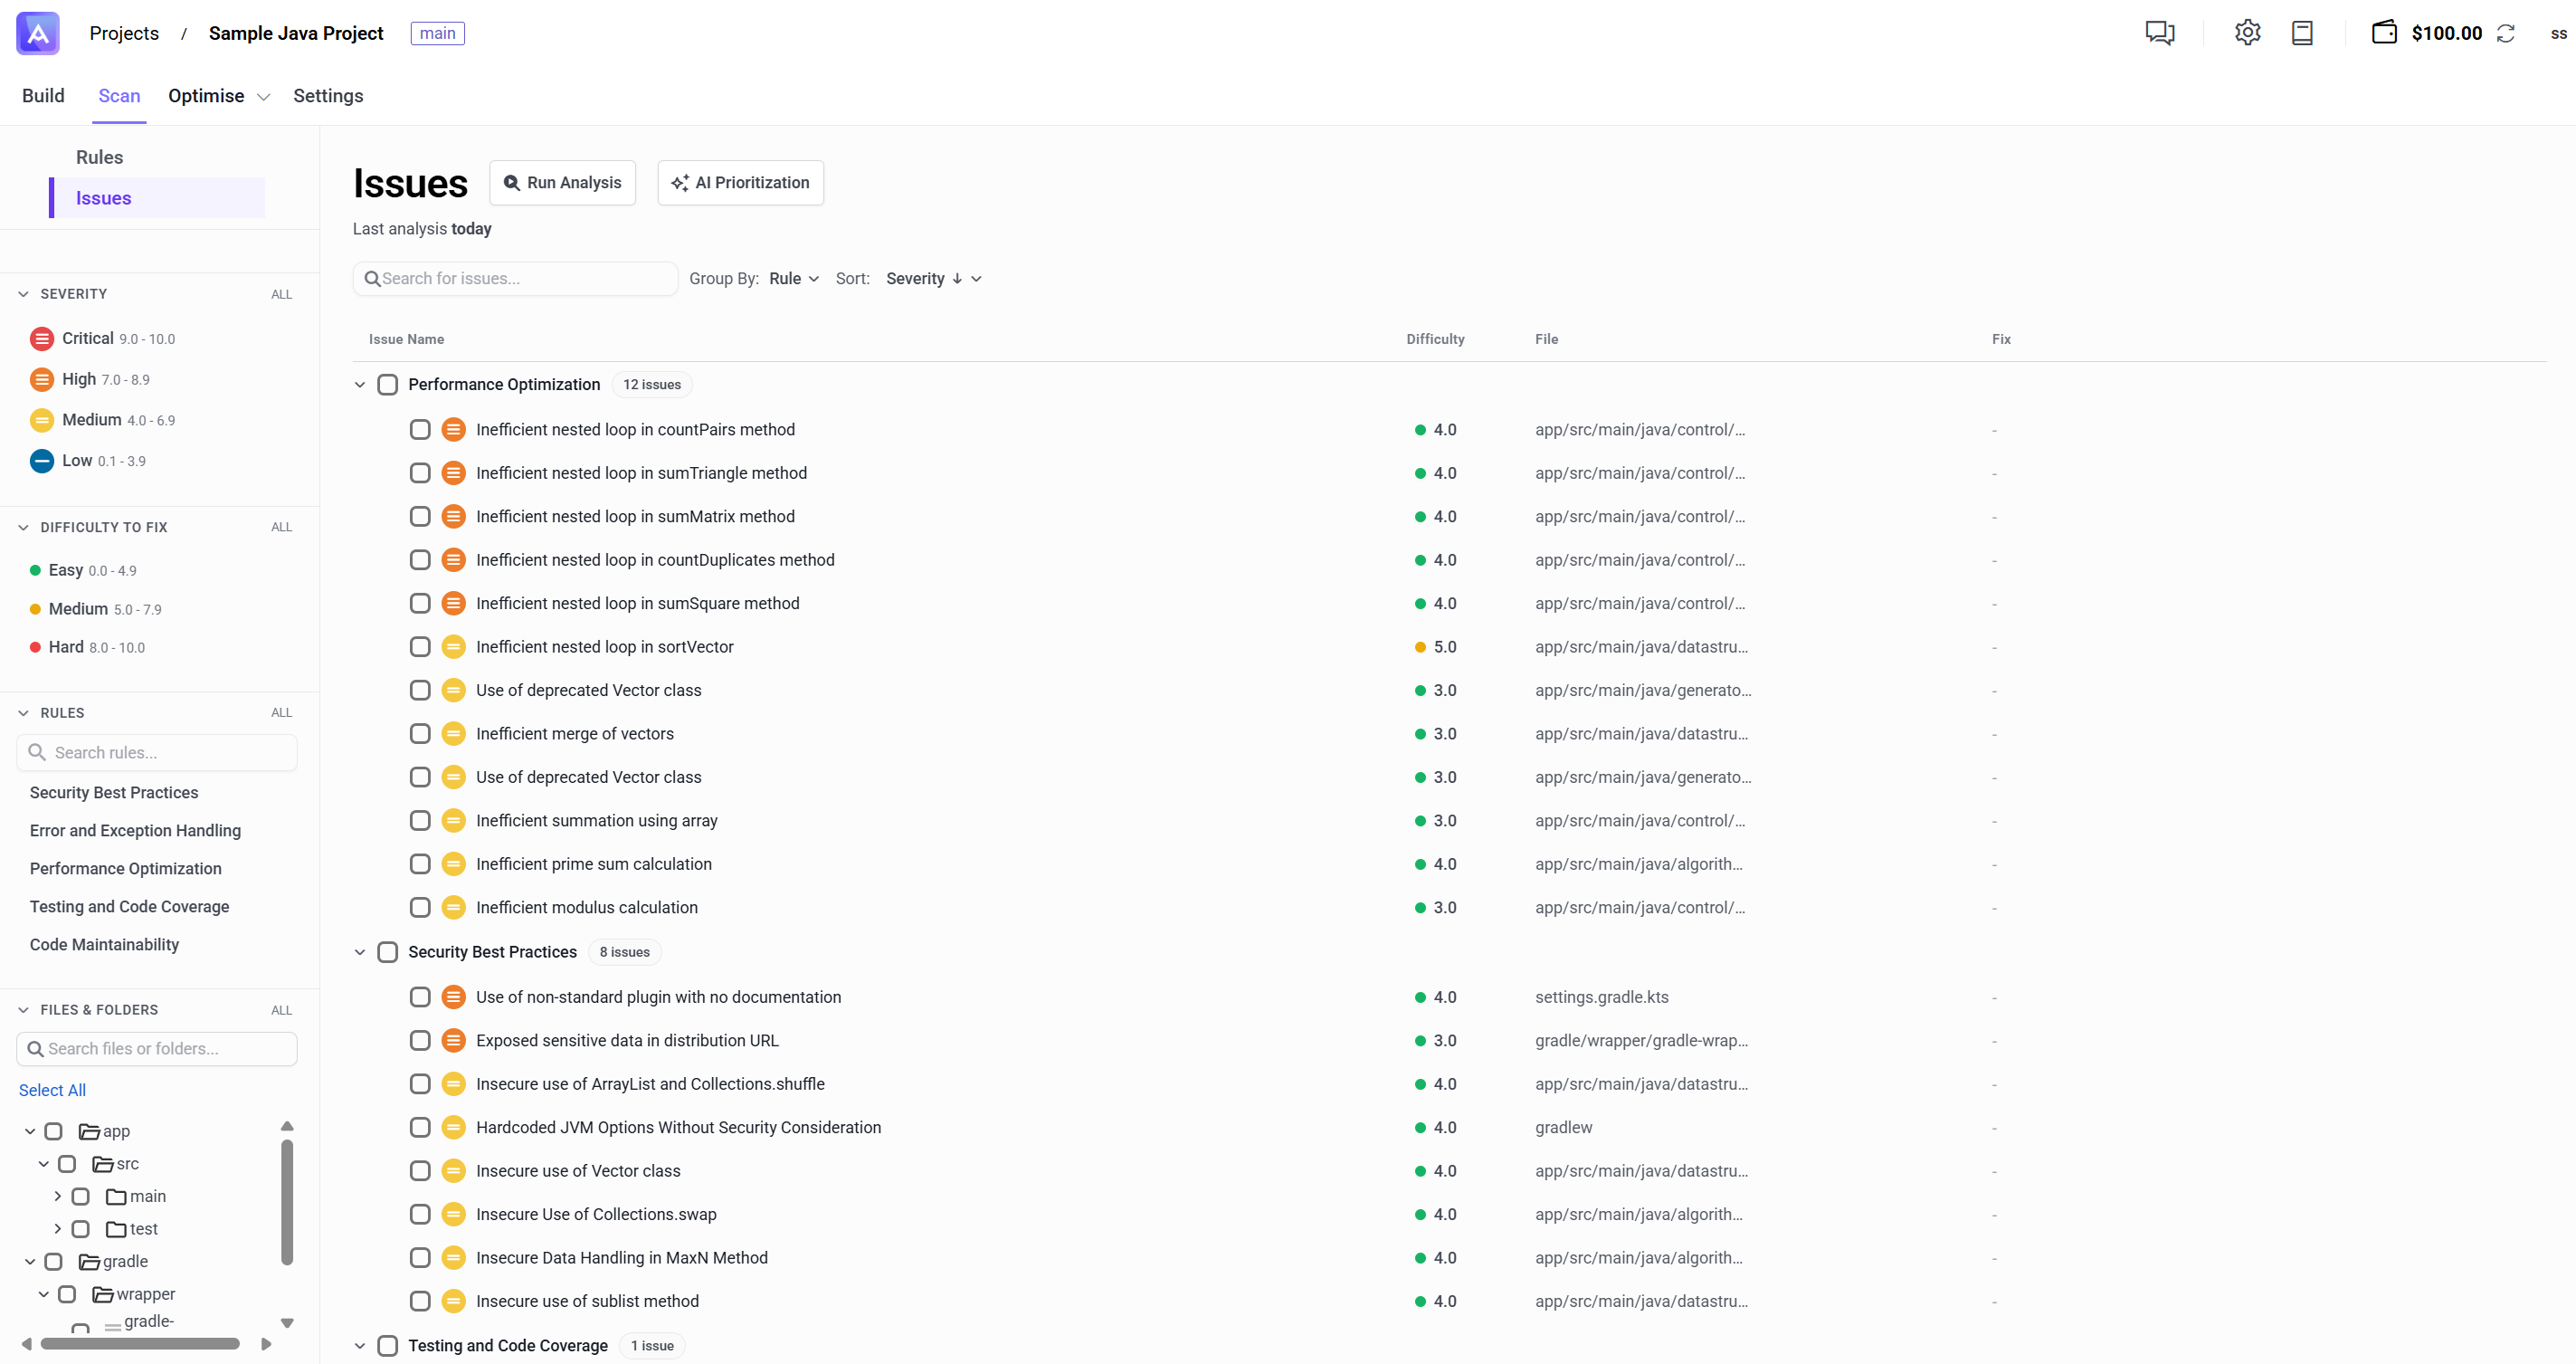
Figure 13: Run code audit analysis
Step 7: Prioritise with AI (BETA)
- Click
AI Prioritisationto activate AI-powered issue ranking. - Artemis leverages the local LLM to analyze each issue and rank them based on:
- Impact: How critical the issue is to your application's security, performance, or functionality
- Estimated effort: How much time and complexity is required to fix the issue
- Review the prioritised list. Issues are reordered with the most impactful and easiest-to-fix issues at the top.
- Use this prioritised list to decide which issues to tackle first, maximizing your remediation efficiency.
Step 8: Code Audit Findings
Choose the remediation path that fits your workflow:
- Fix as Background Task: See Step 9.
- Fix as Planning Task: See Step 10.
- Fix as Target: See Step 11.
Step 9: Fix as Background Task
- Select an issue and click
Fixto queue an automated fix (see Figure 14). Artemis runs the fix as a background task. - Once the background task is complete, a draft fix will be available (see Figure 15).
- Select the generated draft and review the changes. Note: You can interact with the chat to edit the draft or to understand what changes were made and why.
- Click
Create Pull Requestto integrate the fix into your repository.
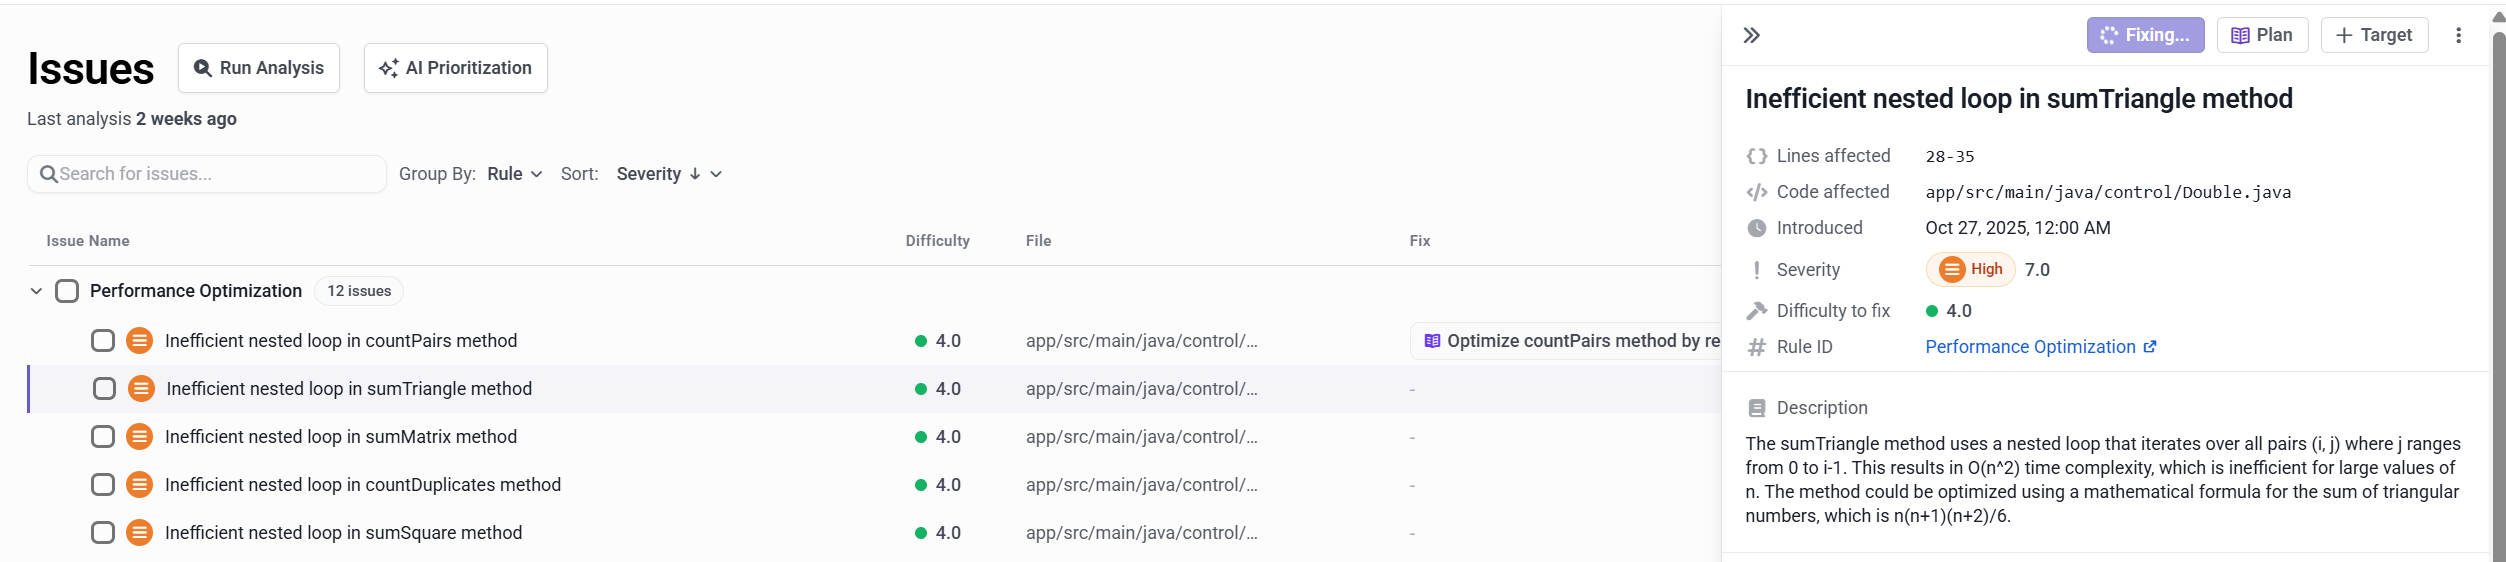
Figure 14: Fix issue as background task

Figure 15: Fix draft ready
Step 10: Fix as Planning Task
- Select the
Planningoption to open the issue in the planning workspace (see Figure 16). - Collaborate with the Planning Agent (human-in-the-loop) to design a resolution strategy (see Figure 17). The Planning Agent will ask questions and generate a structured plan to address the issue.
- Review the generated plan and approve or request revisions. Once the plan is executed, the fix will be complete (see Figure 18).
- The fix is automatically published to your Git repository.
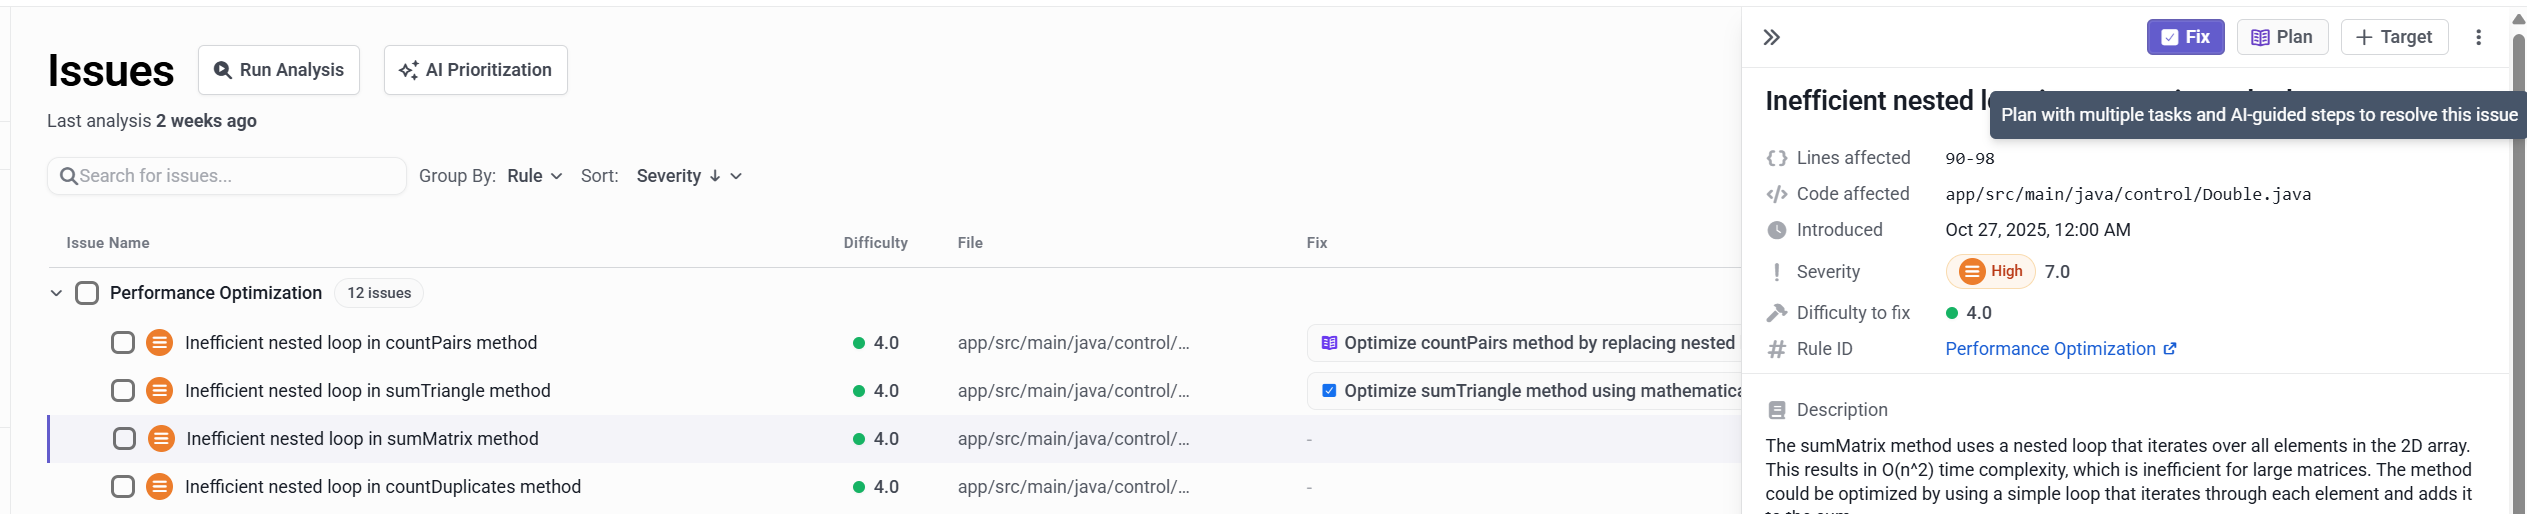
Figure 16: Select fix using planning agent
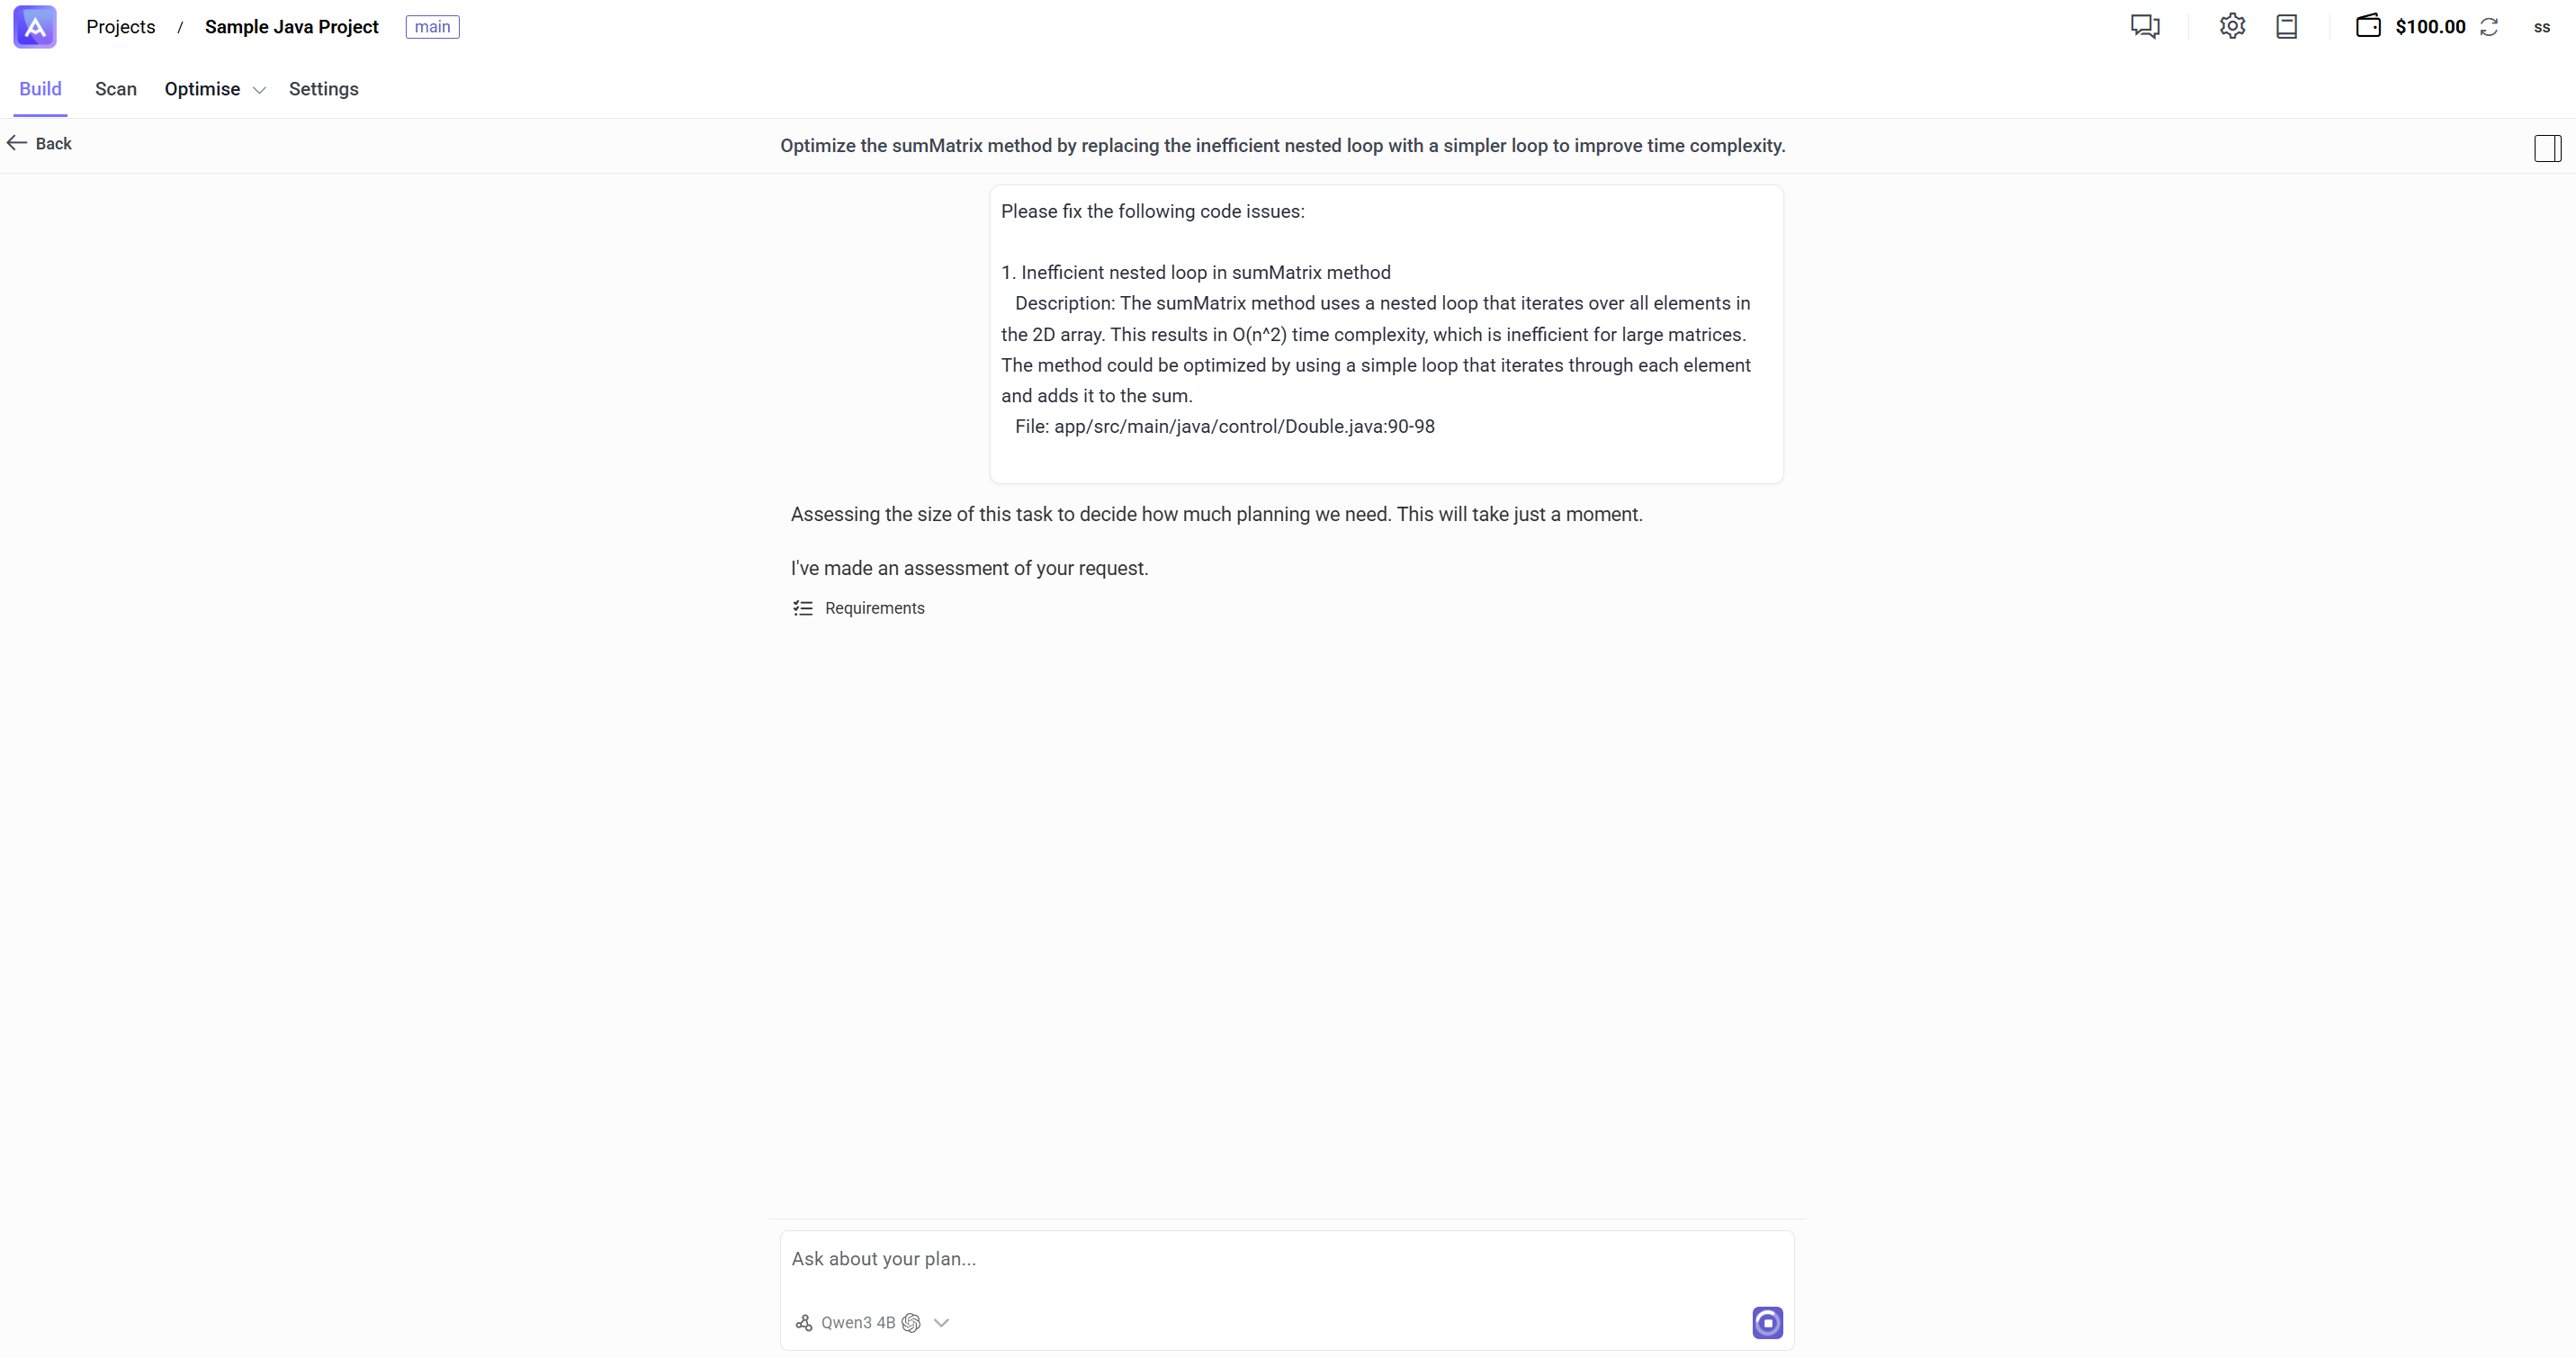
Figure 17: Planning agent running

Figure 18: Fix complete
Step 11: Fix as Target
- Click
Targetto send the issue directly into the Standalone Optimisation workflow (see Figure 19). This opens theGenerate new versiondialog. - Select the mode
Artemis Intelligence(see Figure 20). Note: You can also selectLLMfor a one-shot fix. - Configure the version settings in the dialog (see Figure 20):
- Update the
Prompt. We provide a default prompt, but incorporating domain knowledge will help guide the optimisation. - Select
Models. Multiple models can be applied for a single optimisation usingArtemis Intelligence.
- Update the
- Click
Configuration(located in the top left corner within the Artemis Intelligence option; see Figure 21). Configure the following options:- Select Executable Code and Runner. These can be updated in project Settings.
- Specify Score criteria. Multiple criteria can be selected, and the optimisation will be treated as a multi-objective optimisation.
- Note:
- You can update the Score Prompt Name and Prompt Text by clicking View.
- You can also add custom score criteria by clicking Define New.
- Click the back arrow (top left corner of Figure 21) to return to the version generation screen. Once you are satisfied with the Artemis Intelligence settings, click
Generate Versionsto start the Artemis Intelligence engine. - Optimisation versions will start being generated and populated (see Figure 22). Each row represents one optimisation version. Click a version to view code differences. Options are available on the right, including an agentic chat.
- Each optimised code version displays the following information and options (see Figure 23):
- Version ID: For example,
A-gen1pop0-f72eeidentifies the code version. - Change indicators: Green
+17and red-1show that 17 lines were added and 1 line was removed. - Three vertical dots: Click to access further actions (see Step 12).
+icon: Generate new optimisations using LLMs or Artemis Intelligence, starting from this code version.- Scale icon: Perform scoring. Click it to see a relative score comparing the version to the original code.
- Play icon: Validate the snippet.
- Score Values: These are relative scores. The first value is an average of all scores, and the subsequent values are scores for individual objectives (for example, Compatibility, Equivalence, and Performance).
- Version ID: For example,
- Click
Validateto run tests or compile steps through the registered runner (see Figure 25). - Choose integration options (see Step 12).
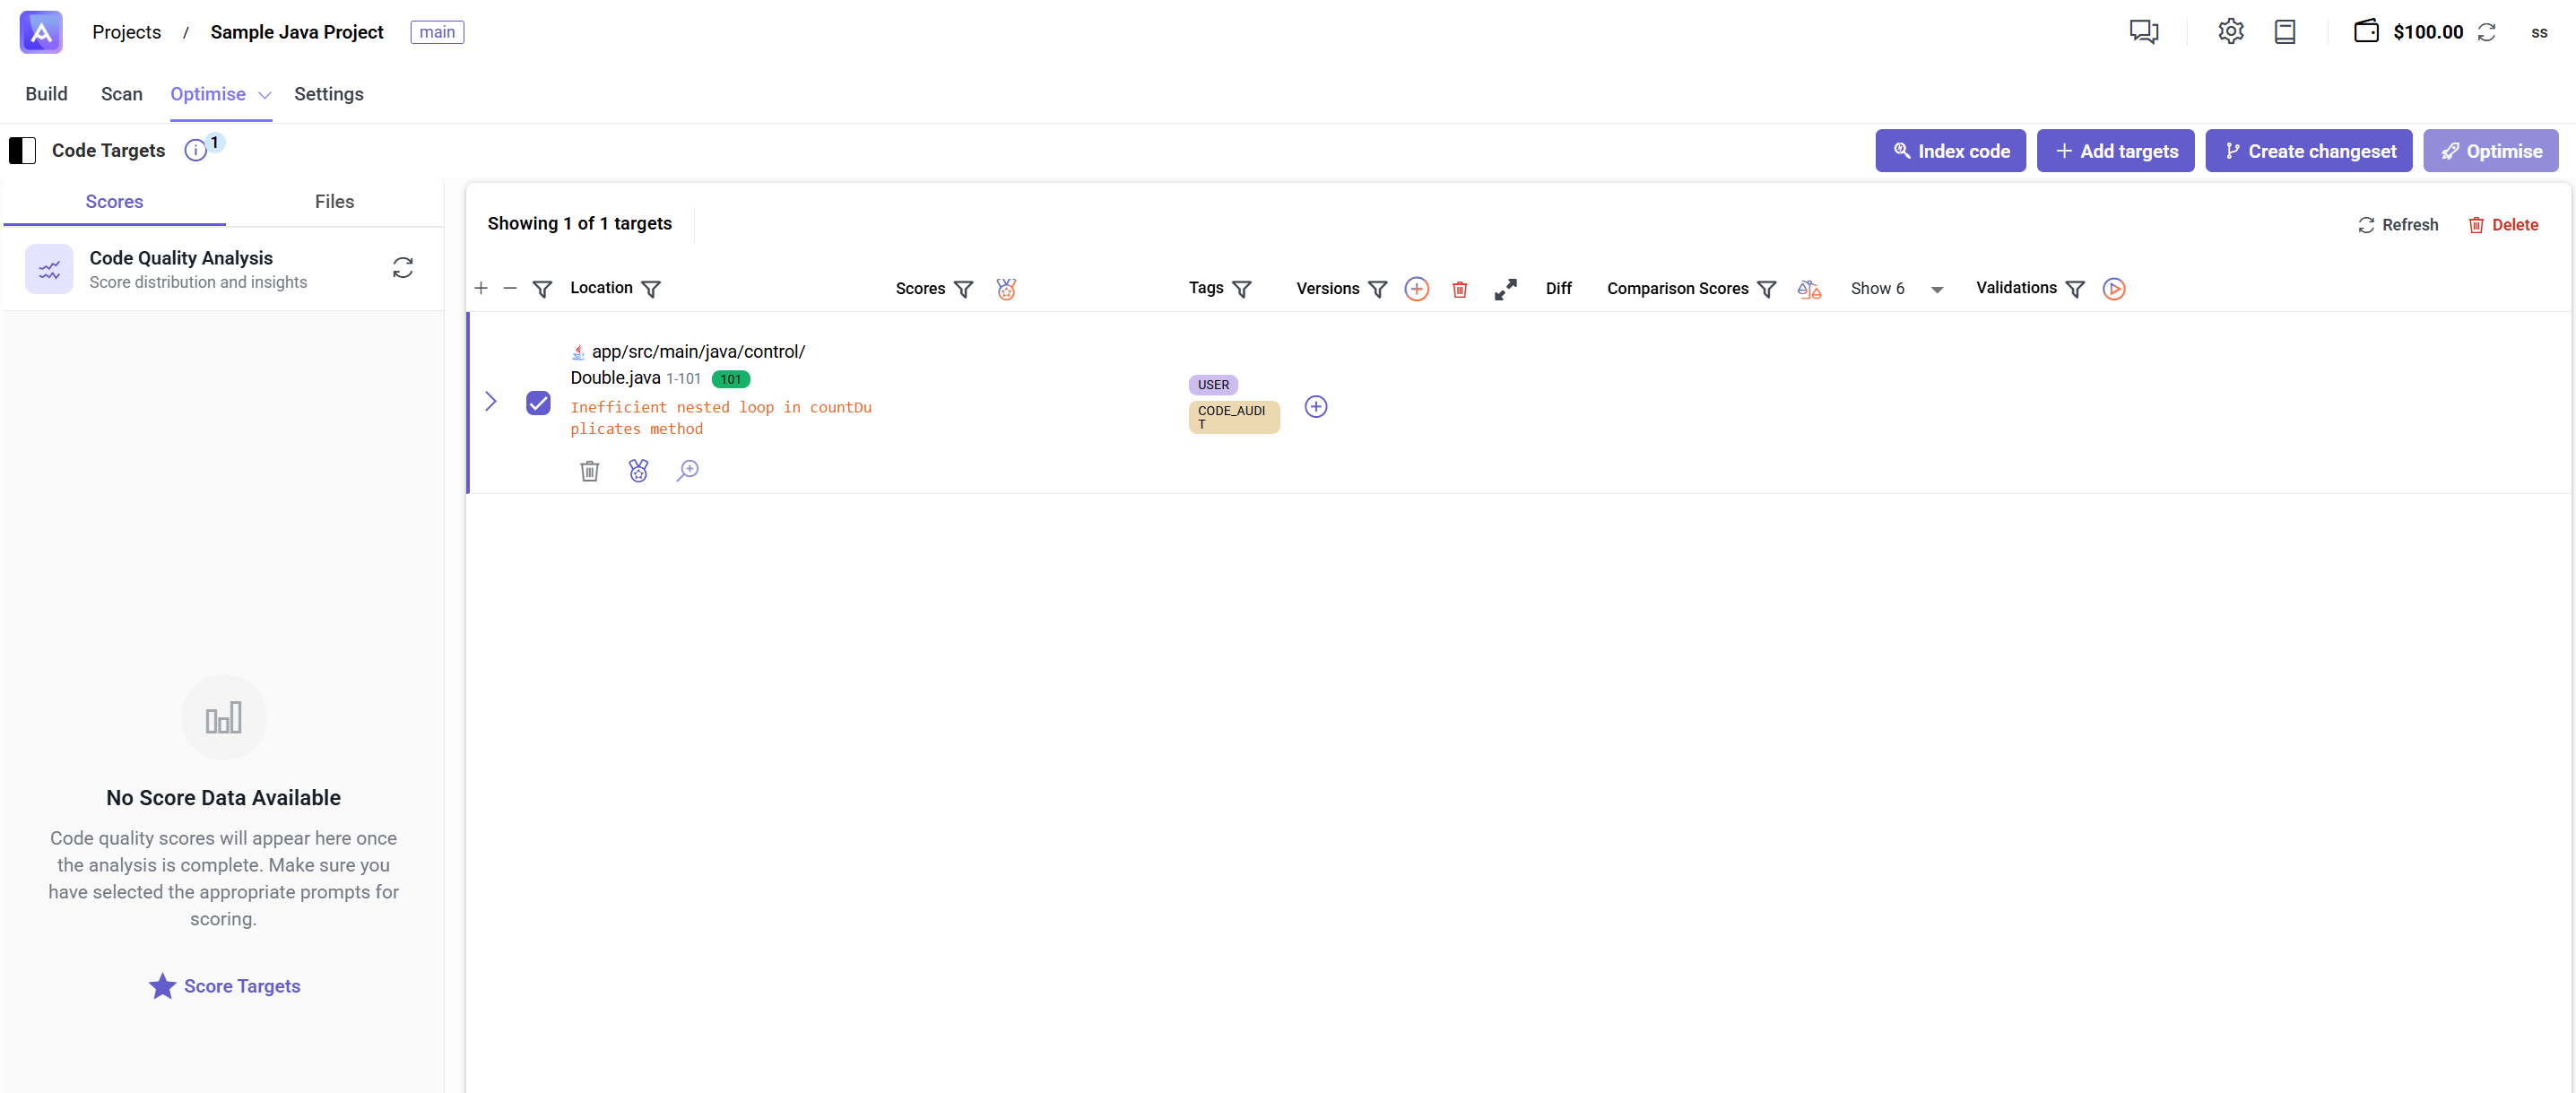
Figure 19: Add target from scan issue
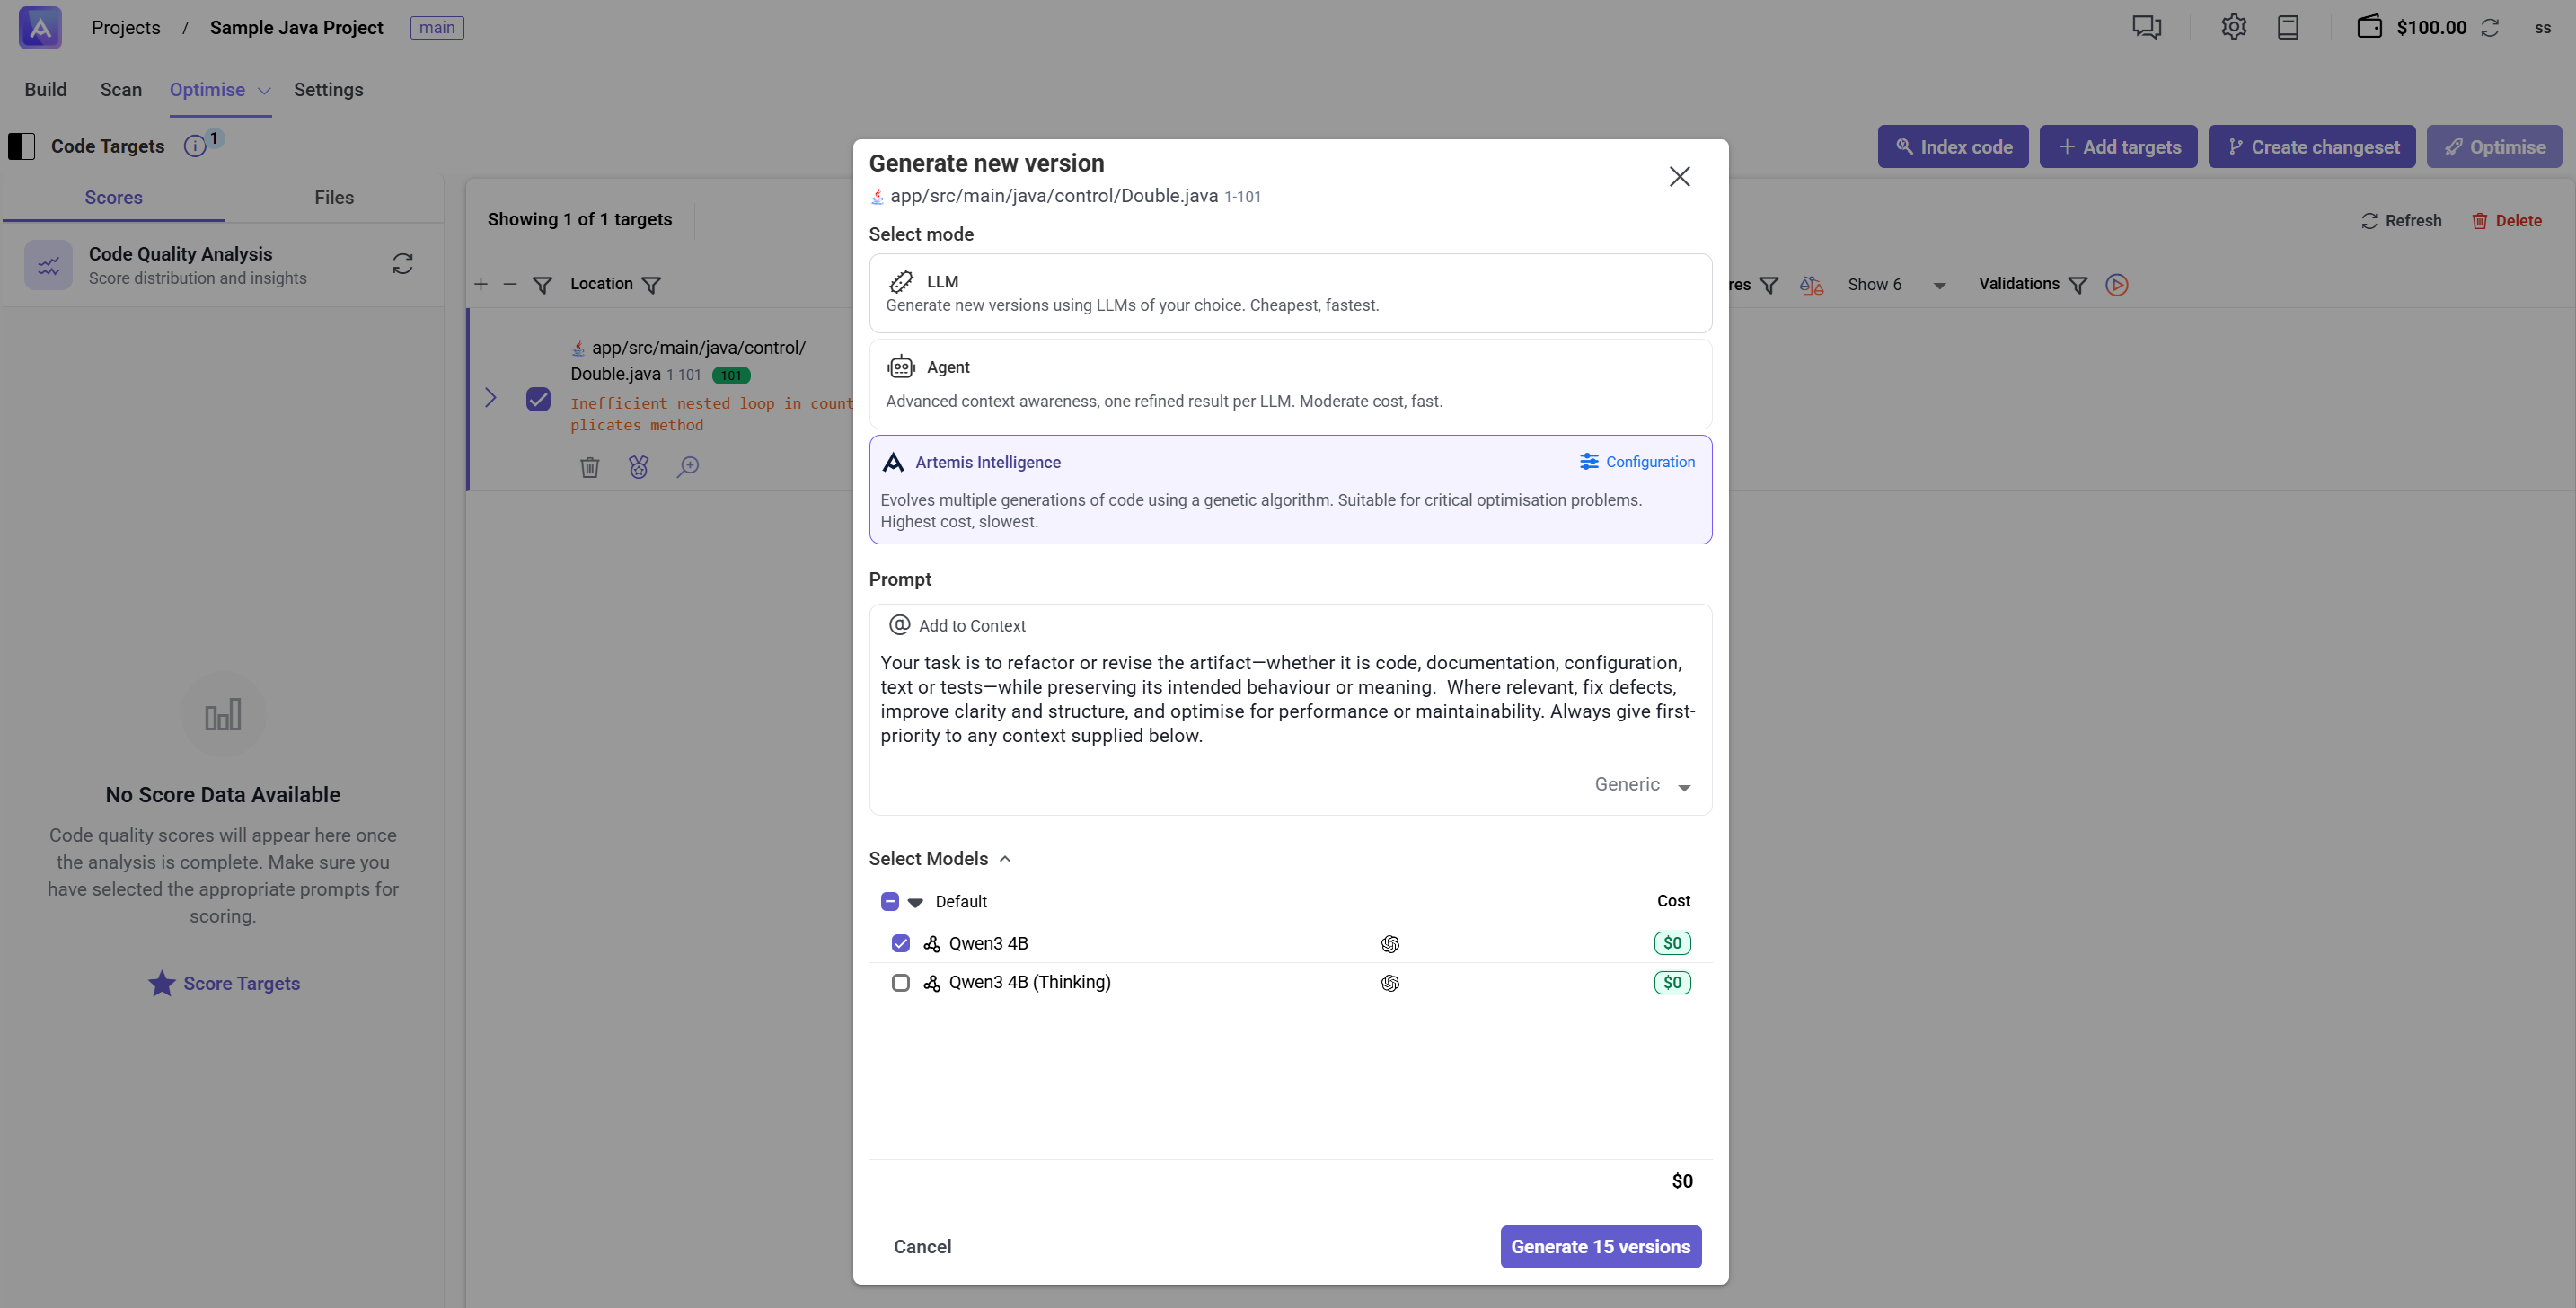
Figure 20: Use Artemis Intelligence to optimise target
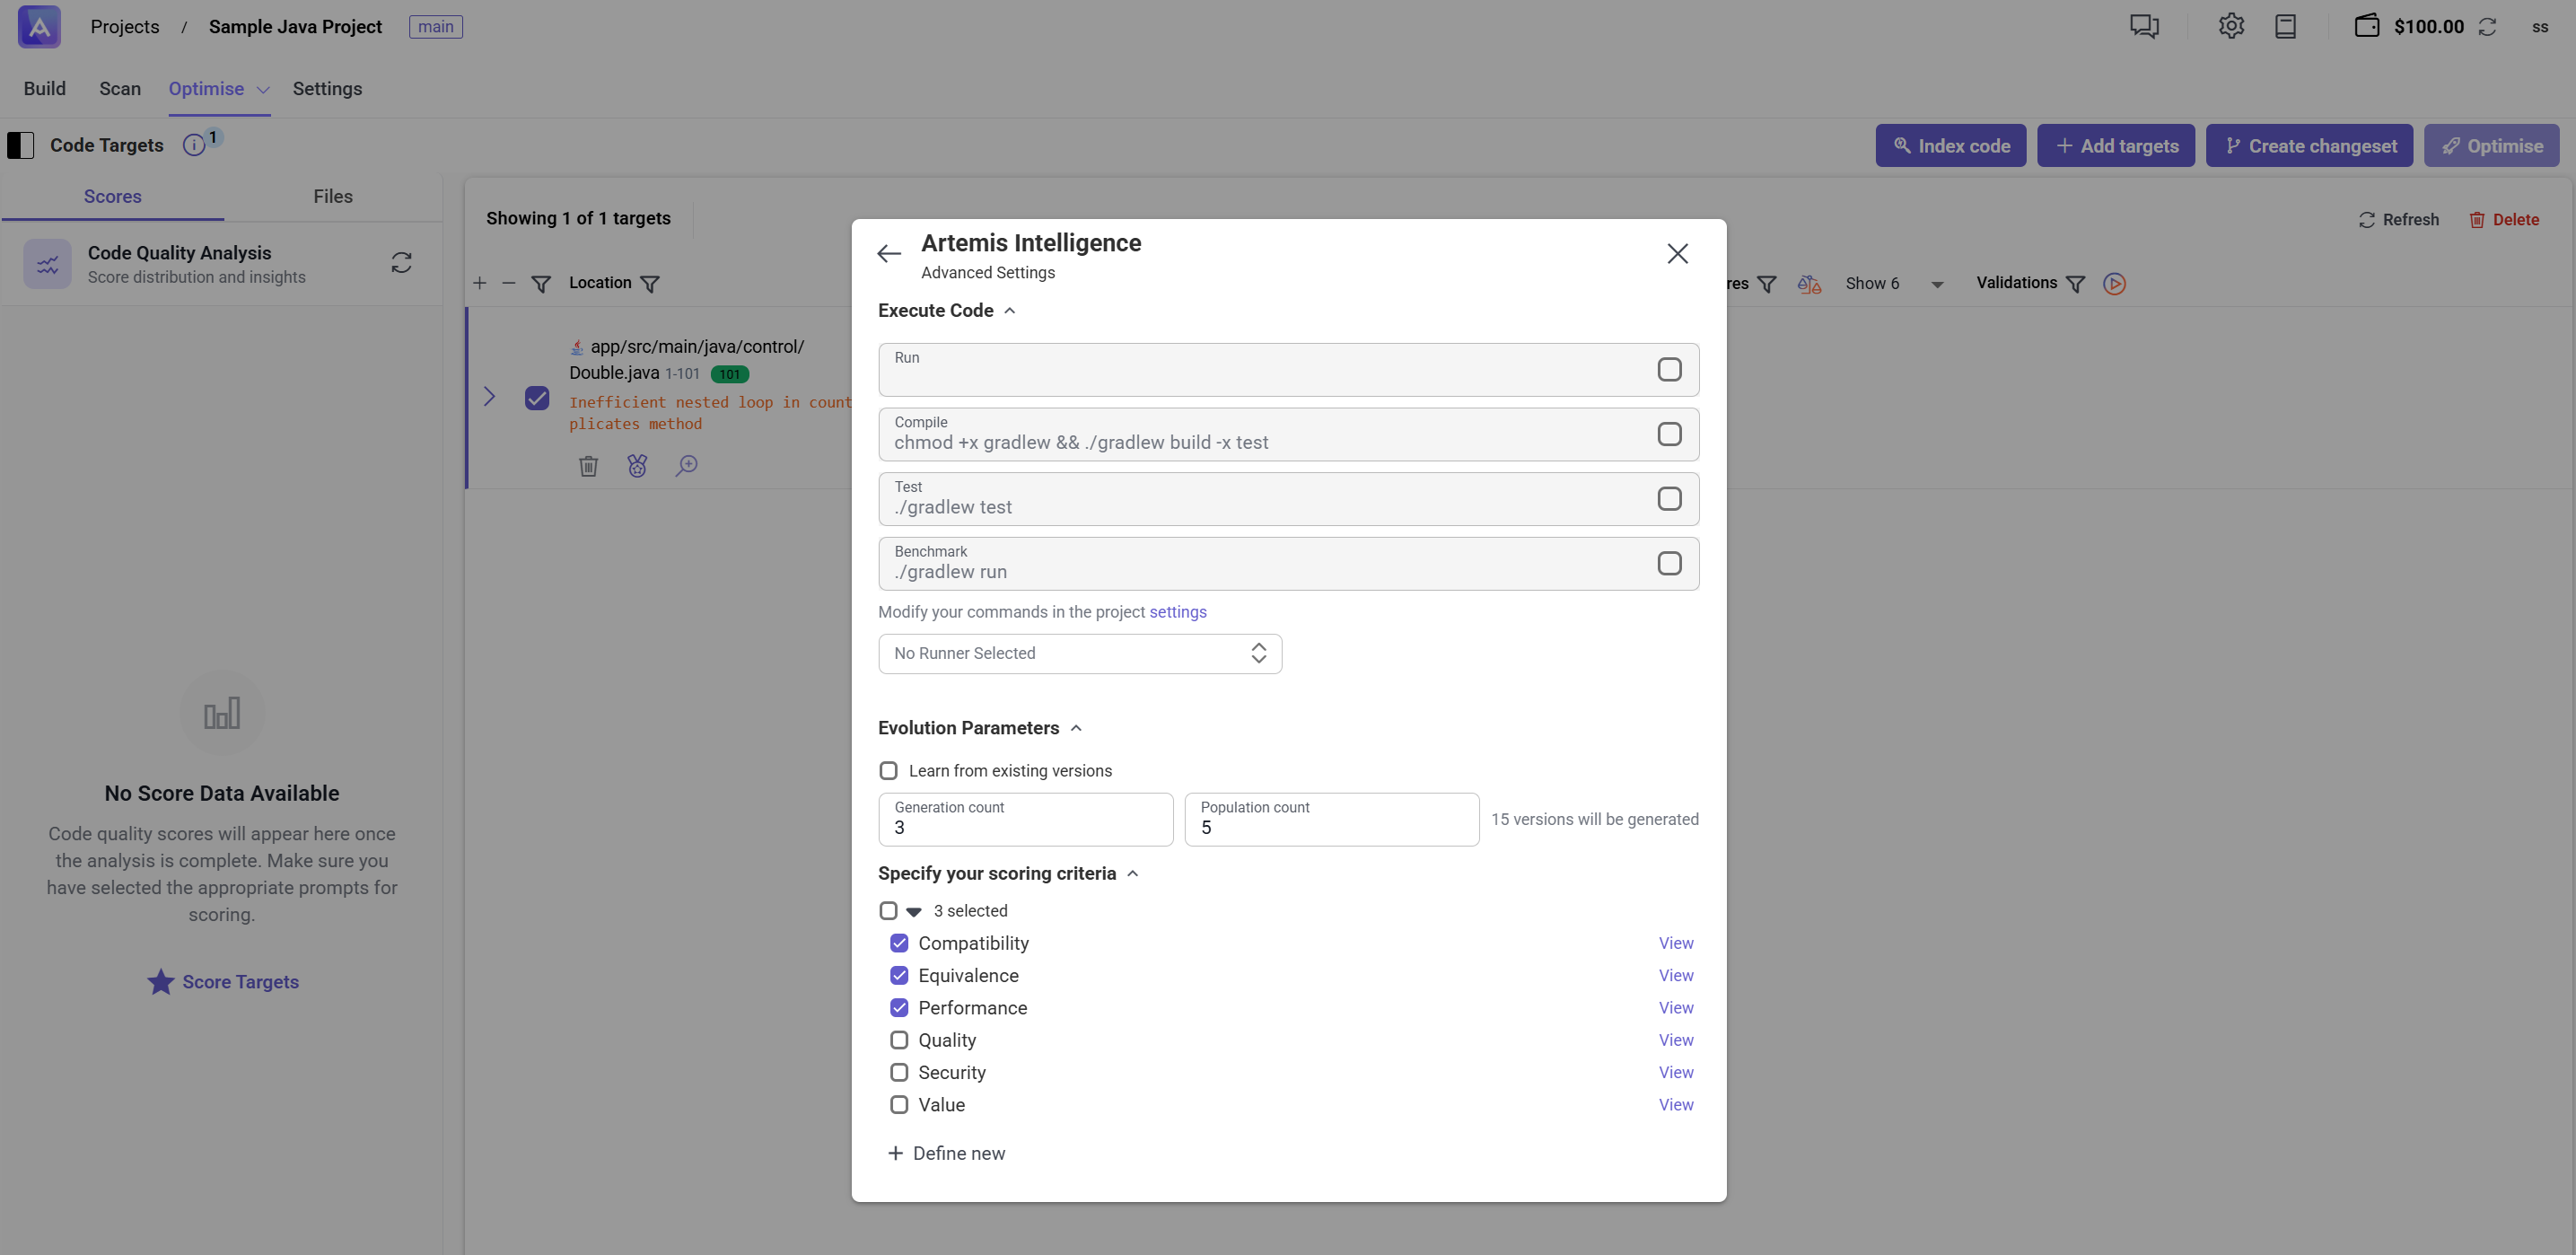
Figure 21: Specify configuration for Artemis Intelligence
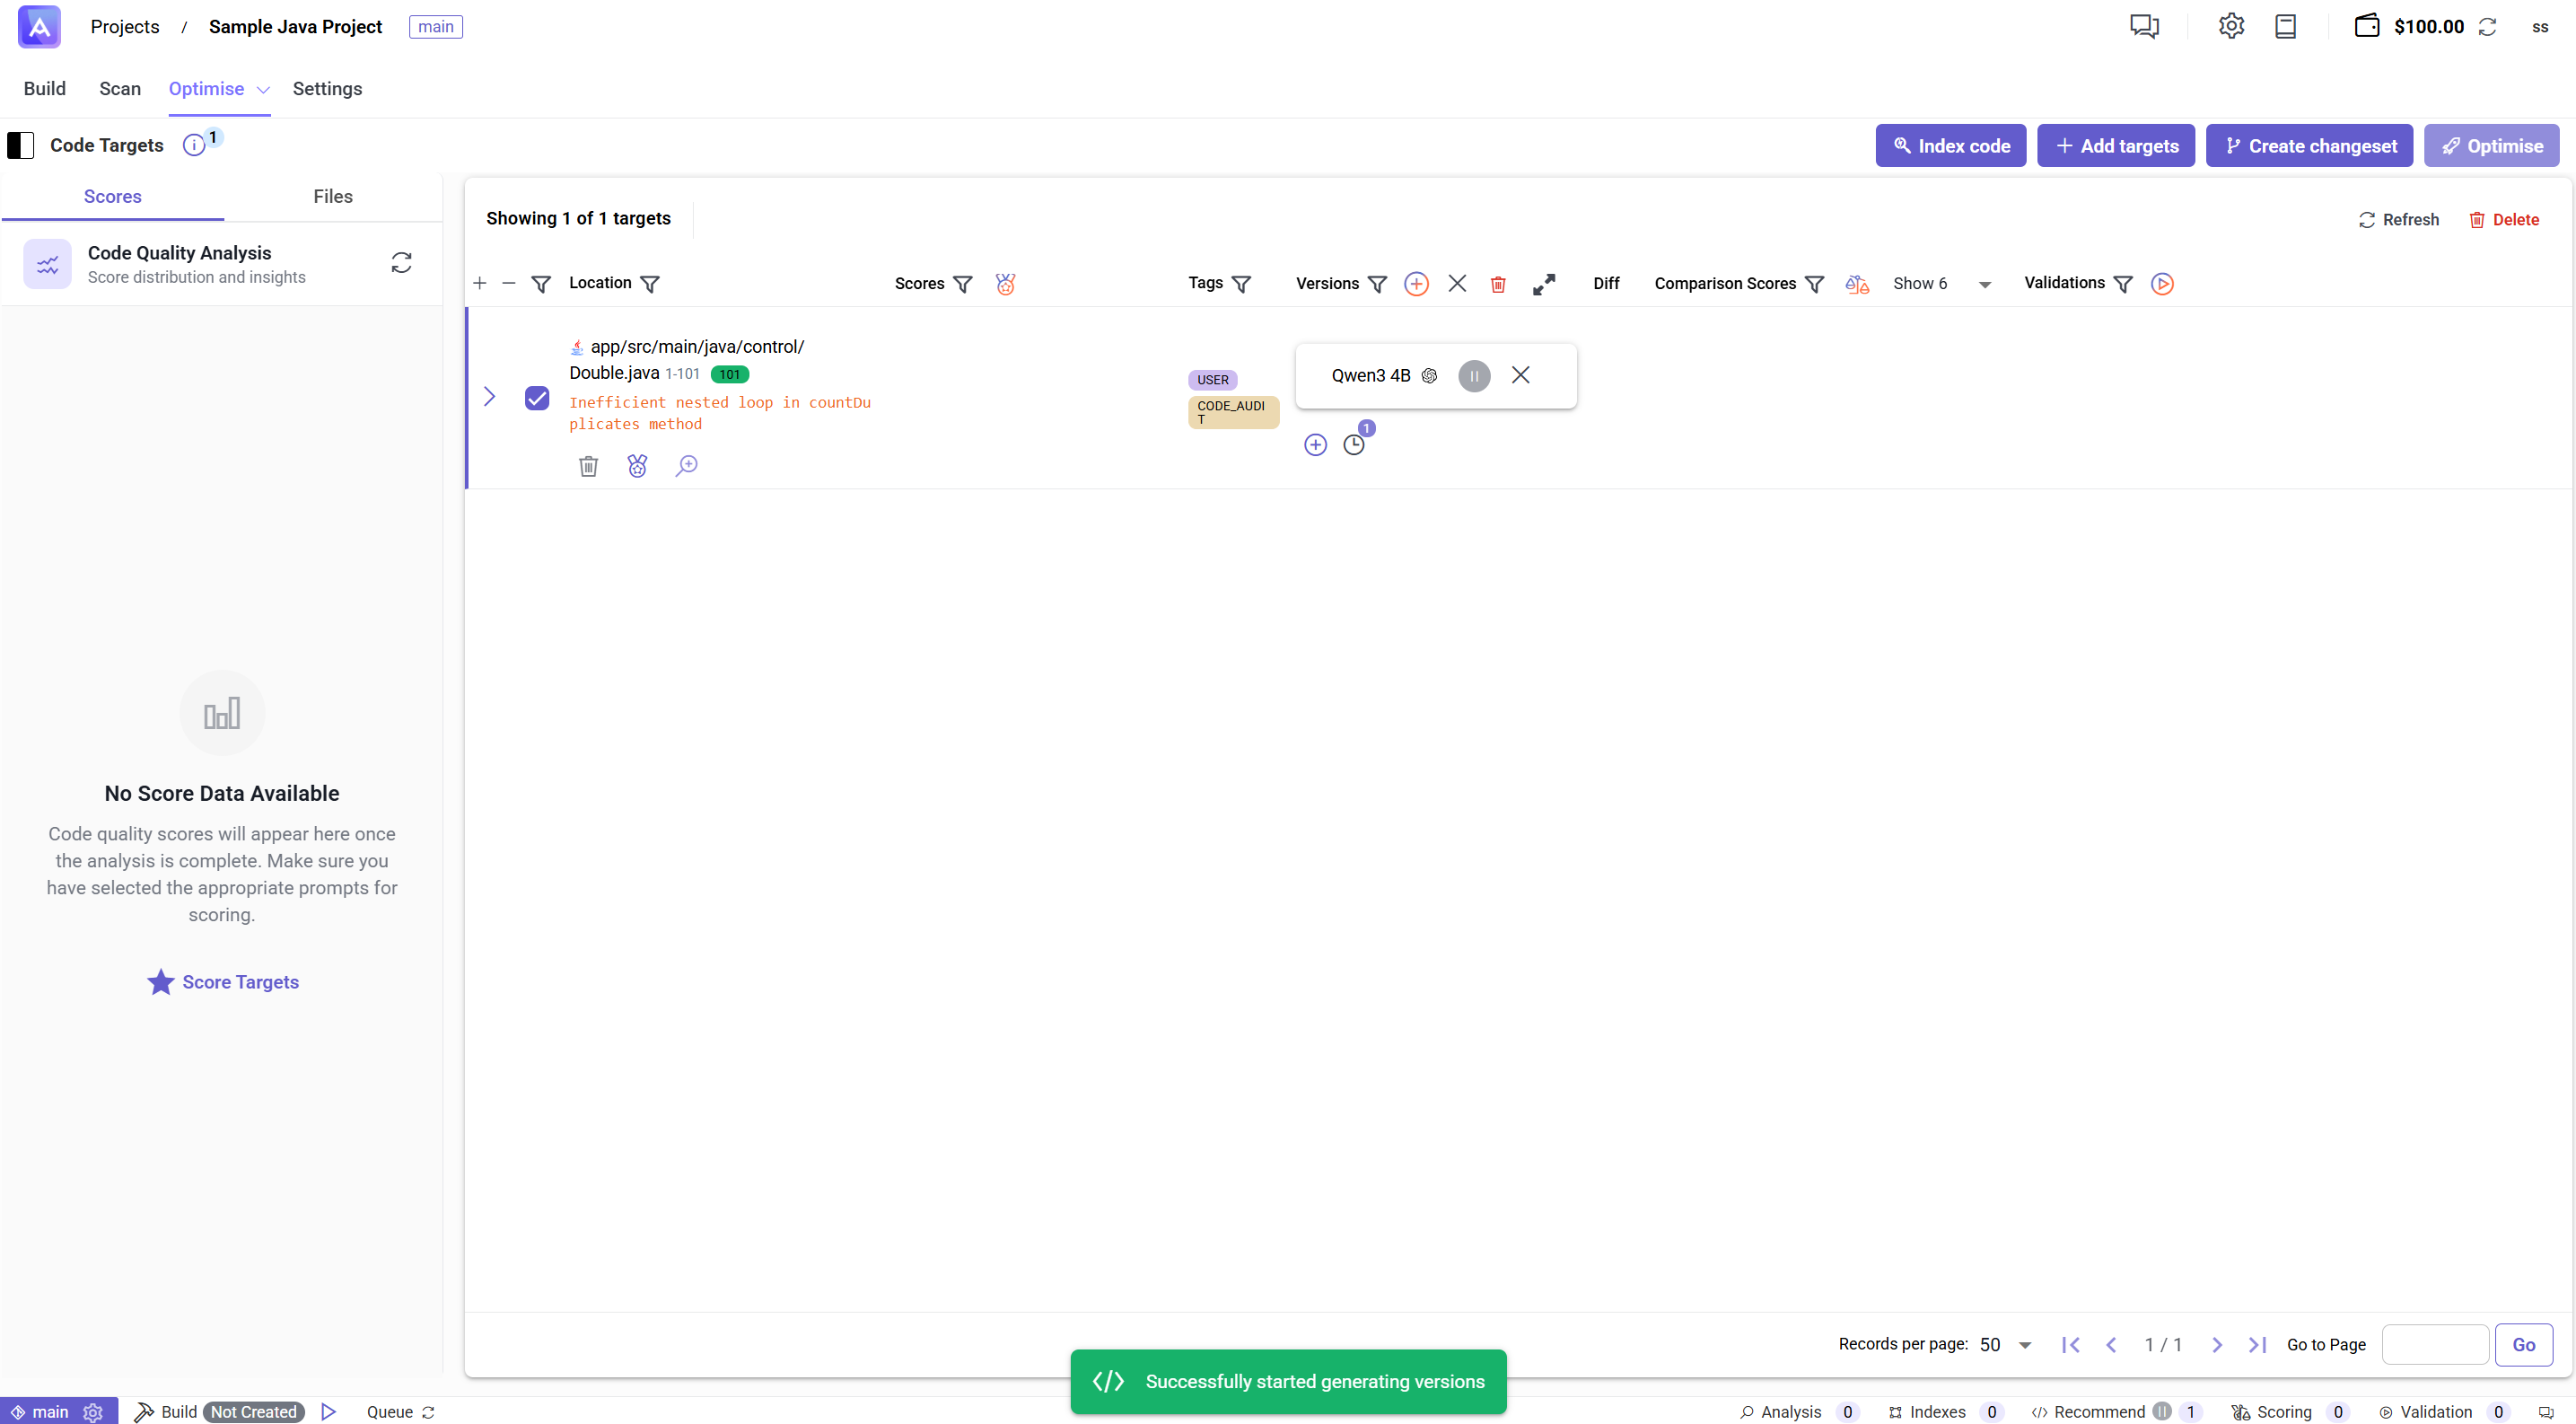
Figure 22: Artemis Intelligence generating versions
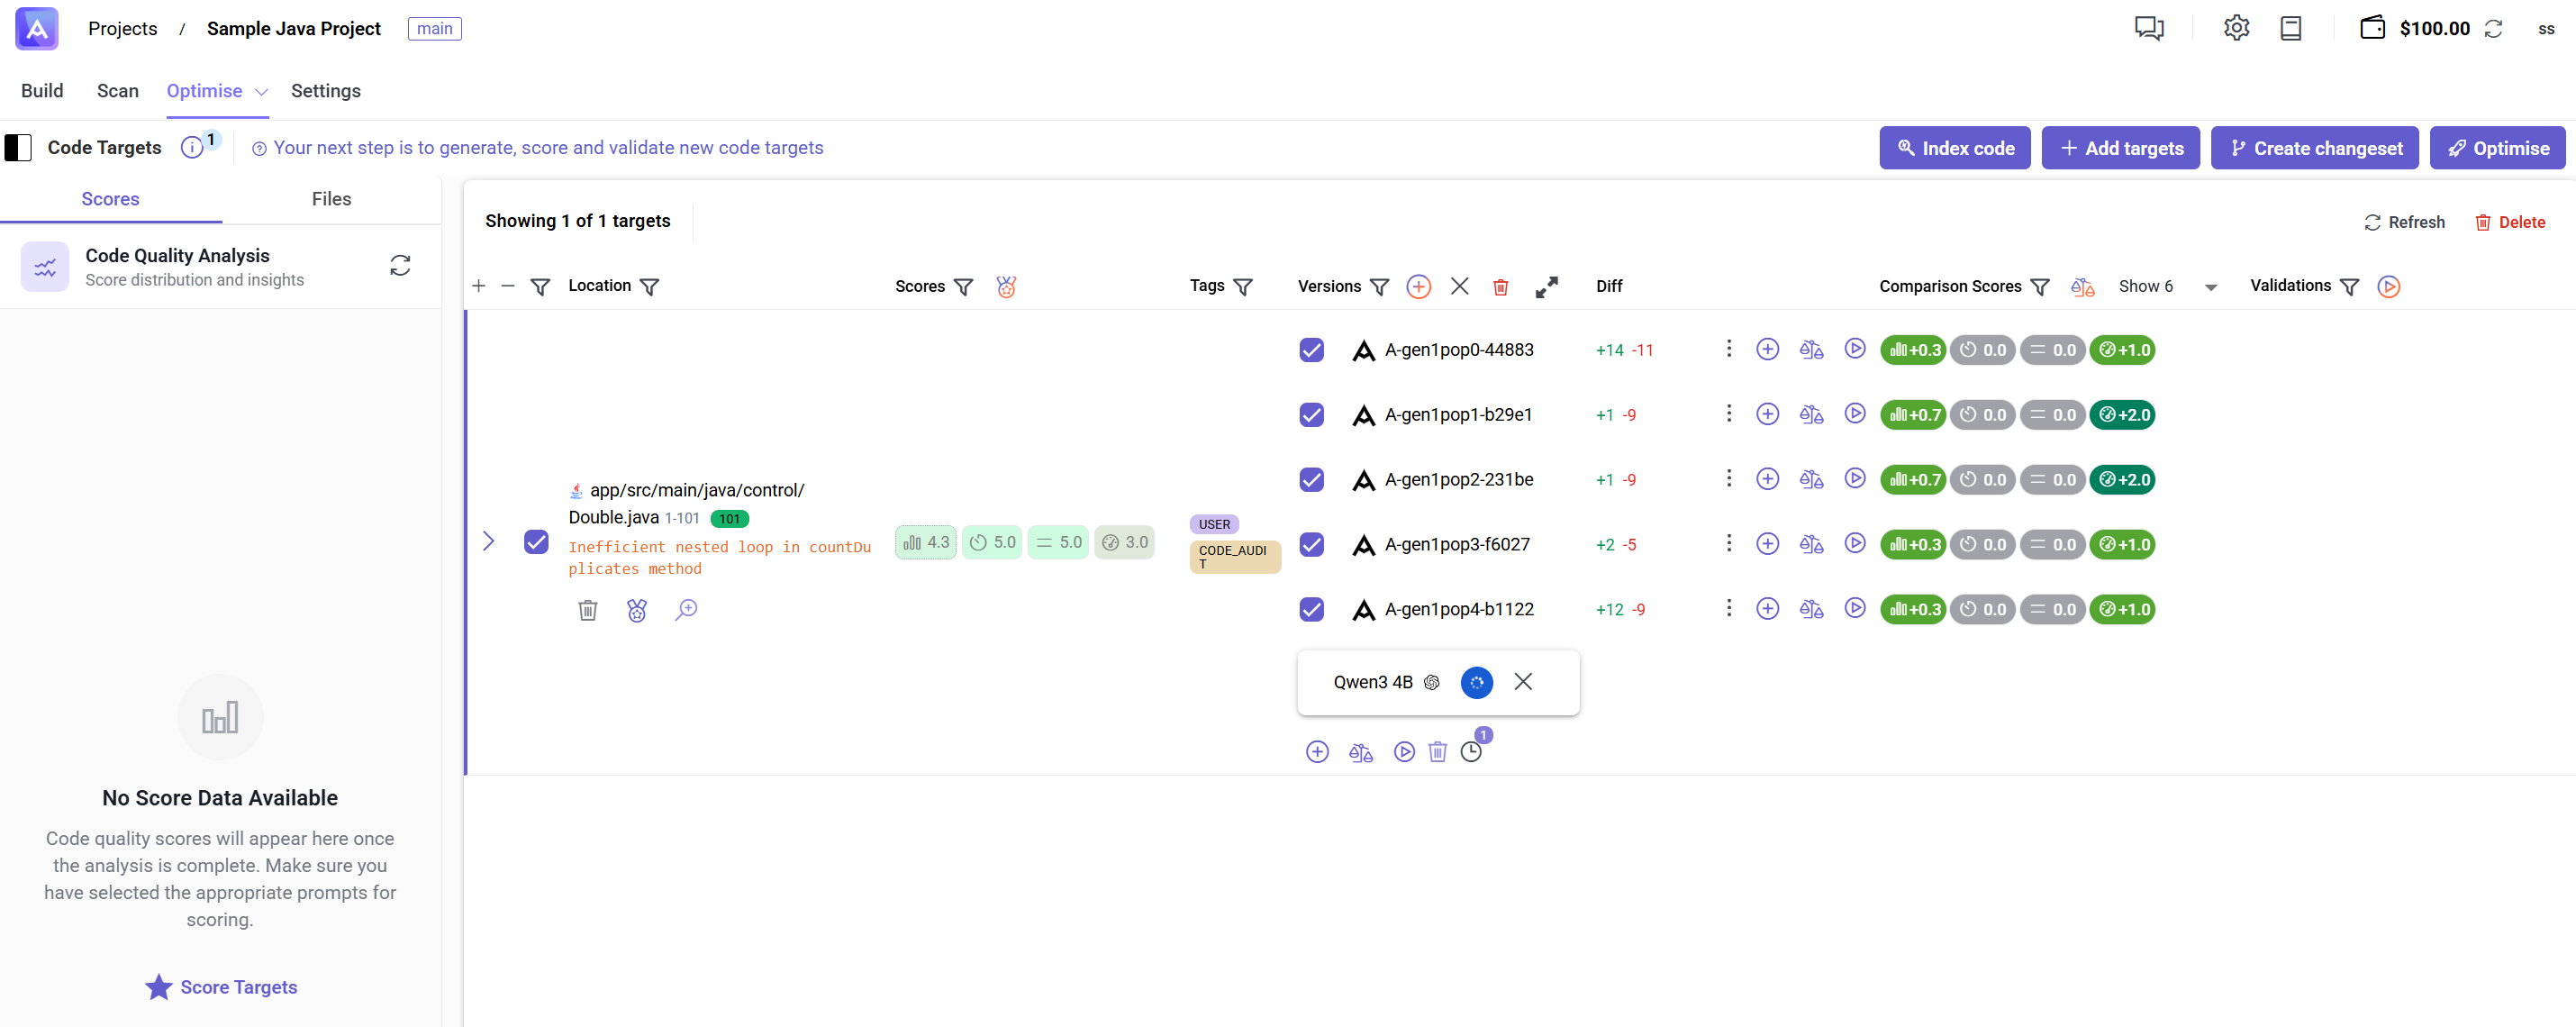
Figure 23: Review generated optimisation versions

Figure 24: One Code Version
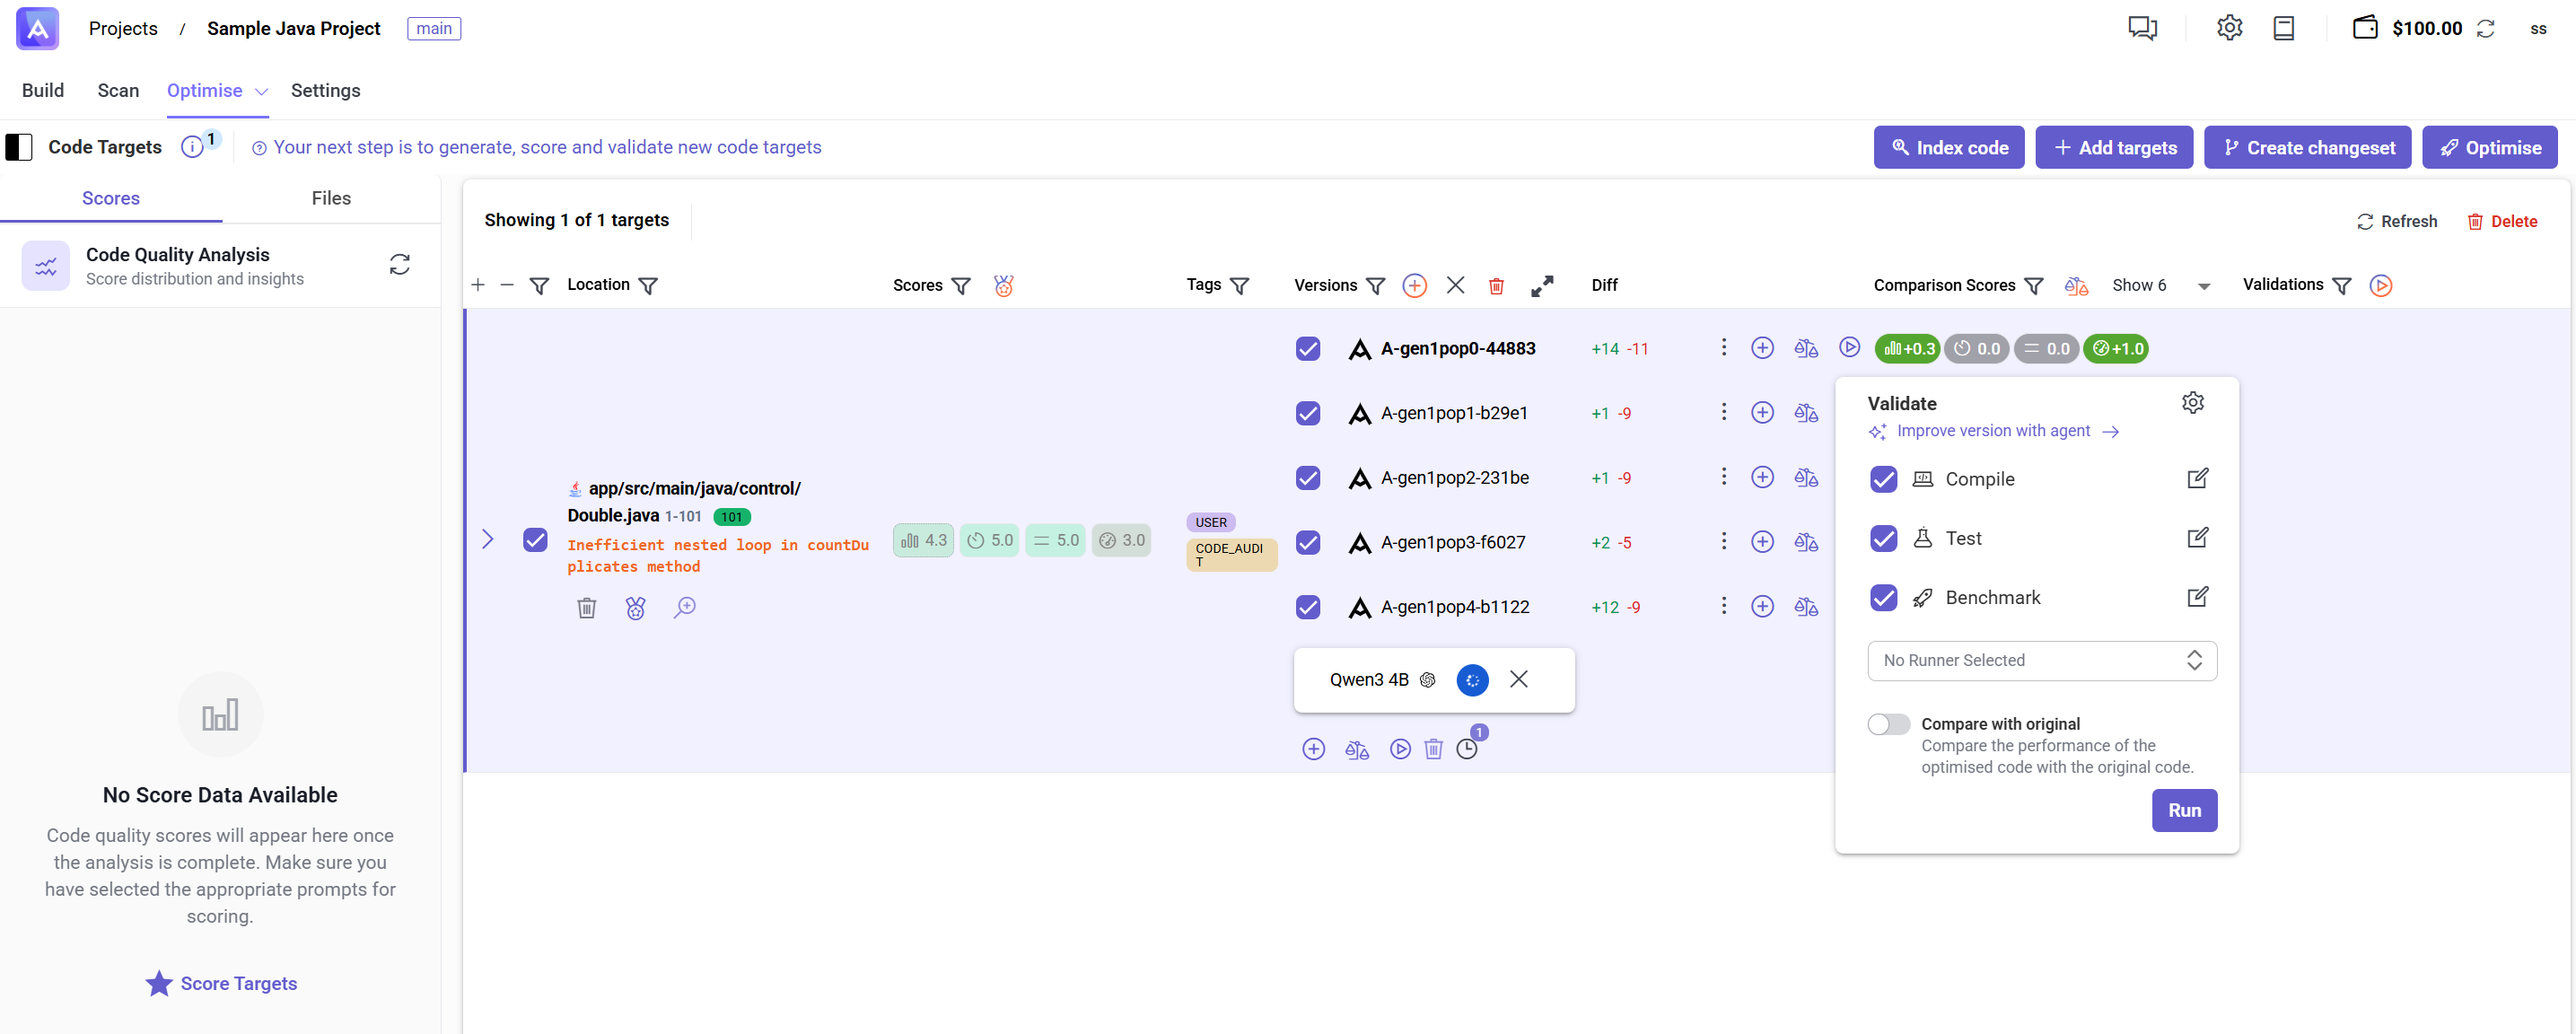
Figure 25: Run validations on optimised code
Step 12: Integrate Optimisations
- Click the options icon (three vertical dots) to choose your next steps (see Figure 26):
- Download the specific optimised file
- Download the project with the optimised file in place
- Create a changeset (which allows you to create a pull request on Git)
- Delete the file
- If you choose to create a changeset (pull request), follow the prompts to generate a pull request that integrates your optimisations into your Git repository.
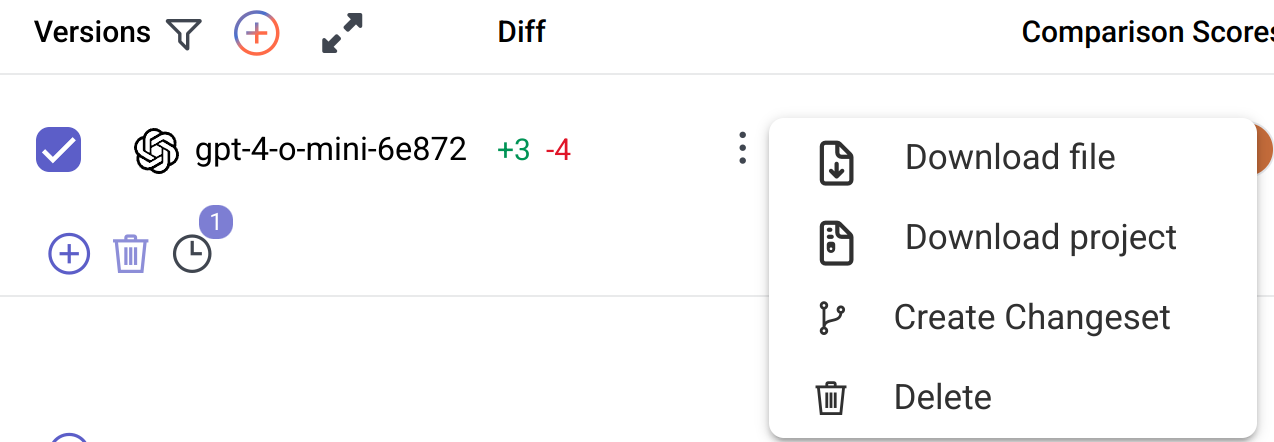
Figure 26: Version options menu
Next Steps
- Learn more about Scan rules and best practices for structuring policies
- Explore Issue management to triage and track remediation work
- Review the Scan overview for additional auditing capabilities
- After fixing issues, continue with Standalone Optimisation to further improve code quality
- Use the Planning Agent for strategic feature development
- Explore your codebase with Agentic Chat to understand project structure and find related code